Make two charming miniature pouches — Nano and Mini — perfect for keys, coins, or as sweet little gifts. This pattern walks you through each row with clear photo references and finishing steps so you can create a polished, professional-looking pouch. Youll enjoy the textured bumps and easy construction, ideal for using cotton or kitchen-style yarn.
Progress Tracker
0% Complete
— Nano :
Info :
Use 4mm crochet hook
Row 1 :
SLST into 2nd CH from hook, 2 SLST, (HDC, SLST) x 3 times, Photo 1. Working on the opposite side of the chain, (HDC, SLST) x 3 times, 3 SLST, CH 1, turn. Photo 2.
Row 2 to 21 :
work on BL only
Row 2 :
3 SLST, (HDC, SLST) x 6 times, 3 SLST. CH 1, turn. Photo 3.
Row 3 :
3 SLST, (HDC, SLST) x 2 times, to increase the STS, (HDC & SLST into the same ST) x 4 times Photo 4,5,6 & 7 (HDC, SLST) x 2 times, 3 SLST. CH 1, turn.
Row 4 :
3 SLST, (HDC, SLST) x 8 times, 3 SLST. CH 1, turn.
Row 5 :
3 SLST, (HDC, SLST) x 3 times, to increase the STS, (HDC & SLST into the same ST) x 4 times, (HDC, SLST) x 3 times, 3 SLST. CH 1, turn.
Row 6 - 17 :
3 SLST, (HDC, SLST) x 10 times, 3 SLST. CH 1, turn.
Row 18 :
3 SLST, (HDC, SLST) x 3 times, to decrease the STS, (skip 2 STS, HDC, SLST) x 2 times, (HDC, SLST) x 3 times, 3 SLST. CH 1, turn.
Row 19 :
3 SLST, (HDC, SLST) x 8 times, 3 SLST. CH 1, turn.
Row 20 :
3 SLST, (HDC, SLST) x 2 times, to decrease the STS, (skip 2 STS, HDC, SLST) x 2 times, (HDC, SLST) x 2 times, 3 SLST. CH 1, turn.
Row 21 :
3 SLST, (HDC, SLST) x 6 times, 3 SLST. CH 1, turn.
Info :
Cut the yarn and leave yarn tails approximately 20cm to sew the side of the pouch. Photo 8
Info :
Thread the yarn tail onto a tapestry needle, insert the needle into BL of the piece closest to you and FL of the piece farthest from you, Photo 9 & 10, continue until you reach the end. Cut the yarn, fasten off and hide the yarn tails. Photo 11. Flip the pouch to the right side. Photo 12. The pouch will have 11 bumps as shown on Photo 13.
Info :
Use 3.5mm crochet hook.
Info :
Begin from the corner of the piece and weave the yarn into the top of the bag. Photo 14
Info :
CH1, 40 SLST on the top of the bag as shown on Photo 15. Cut the yarn and fasten off, Photo 16 and use invisible join technique (refer to next page)
— Invisible join technique :
Info :
Once you have finished your last slip stitch, cut the yarn, and draw it out through the loop, leaving about 10 cm (4"). Photo 17.
Info :
Thread the end onto a tapestry needle and insert the needle from the front underneath both loops of the 1st slip stitch. Photo 18.
Info :
Now bring the needle up and insert it from the top into the middle of the last slip stitch of the round. Photo 19.
Info :
Pull it tight enough that the loop you have made looks like the others. Photo 20.
— Flap :
Info :
Use 4mm crochet hook
Row 1 :
SC into 2nd CH from hook, 11 SC. (12) CH 1, turn.
Row 2-8 :
12 SC, (12). CH1, turn
Row 9 :
Skip 1 ST, 11 SC. (11) CH 1, turn.
Row 10 :
Skip 1 ST, 10 SC (10). Cut the yarn and fasten off. Photo 21.
Info :
Crochet along the edge - button closure
Info :
Join new yarn at the bottom of the piece. Photo 22.
Info :
CH1, 10 SC, 5 SC, CH 6, 5 SC, 10SC. Photo 23 & 24.
Info :
Cut the yarn and leave yarn tails approximately 20cm to sew it to the pouch.
Item Name (Attach flap to pouch) :
Place the flap on top of the pouch to cover the SLST. Photo 25. Use a sewing pin to hold the flap position. Photo 26. Sew it to the bag through the back loops of the pocket. Photo 27. Lastly, use sewing needle to sew the button Photo 28.
— Mini :
Info :
All photos are referred to nano's size except some are indicated as below
Info :
Use 4mm crochet hook
Row 1 :
SLST into 2nd CH from hook, 4 SLST, (HDC, SLST) x 6 times, Photo 1. Working on the opposite side of the chain, (HDC, SLST) x 6 times, 5 SLST, CH 1, turn. Photo 2.
Row 2 to 25 :
work on BL only.
Row 2 :
5 SLST, (HDC, SLST) x 12 times, 5 SLST. CH 1, turn. Photo 3.
Row 3 :
5 SLST, (HDC, SLST) x 4 times, to increase the STS, (HDC & SLST into the same ST) x 8 times Photo 4,5,6 & 7 (HDC, SLST) x 4 times, 5 SLST. CH 1, turn.
Row 4 :
5 SLST, (HDC, SLST) x 16 times, 5 SLST. CH 1, turn.
Row 5 :
5 SLST, (HDC, SLST) x 6 times, to increase the STS, (HDC & SLST into the same ST) x 8 times, (HDC, SLST) x 6 times, 5 SLST. CH 1, turn.
Row 6 - 21 :
5 SLST, (HDC, SLST) x 20 times, 5 SLST. CH 1, turn.
Row 22 :
5 SLST, (HDC, SLST) x 6 times, to decrease the STS, (skip 2 STS, HDC, SLST) x 4 times, (HDC, SLST) x 6 times, 5 SLST. CH 1, turn.
Row 23 :
5 SLST, (HDC, SLST) x 16 times, 5 SLST. CH 1, turn.
Row 24 :
5 SLST, (HDC, SLST) x 4 times, to decrease the STS, (skip 2 STS, HDC, SLST) x 4 times, (HDC, SLST) x 4 times, 5 SLST. CH 1, turn.
Row 25 :
5 SLST, (HDC, SLST) x 12 times, 5 SLST. CH 1, turn.
Info :
Cut the yarn, fasten off and leave yarn tails approximately 25cm to sew the side of the pouch. Photo 8. Thread the yarn tail onto a tapestry needle, insert the needle into BL of the piece closest to you and FL of the piece farthest from you, Photo 9 & 10, stitch through the front to back for a strong seam, continue until you reach the end. Cut the yarn, fasten off and hide the yarn tails. Photo 11. Flip the pouch to the right side. Photo 12.
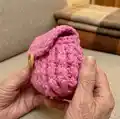
Info :
Mini pouch will have 13 bumps as shown on photo below.
Info :
Use 3.5mm crochet hook
Info :
Begin from the corner of the piece and weave the yarn into the top of the bag. CH1, 50 SLST on the top of the bag. Photo 16 & 17. Fasten off and use invisible join technique.
— Flap :
Info :
Use 4mm crochet hook
Row 1 :
SC into 2nd CH from hook, 13 SC. (14) CH 1, turn.
Row 2-12 :
14 SC, (14). CH1, turn
Row 13 :
Skip 1 ST, 13 SC. (13) CH 1, turn.
Row 14 :
Skip 1 ST, 12 SC (12). Fasten off and cut the yarn. Photo 22
Info :
Crochet along the edge for Magnetic button closure
Info :
Join new yarn at the bottom of the piece. Photo 23.
Info :
CH1, 40 SC (14 SC, 14 SC, 14 SC) as shown photo below.
Info :
Cut the yarn and leave yarn tails approximately 25 cm to sew it to the pouch.
— Attach the flap to the pouch :
Info :
Place the flap on top of the pouch to cover the SLST. Photo 25 Use a sewing pin to hold the flap position. Photo 26. Sew it to the bag through the back loops of the pocket. Photo.27 Sew the magnetic button inside of the flap so they match up to the magnet button on the pouch. Sew the leather label to the flap. The labels will make your creations look professional.
Info :
Well done! Your Mini Key Pouch is complete, I hope you enjoy making this pattern. Remember to share your finished project on Instagram and Facebook, using #Vivmade!
Create these tiny pouches to brighten your day and give as thoughtful handmade gifts that fit in the palm of your hand. 🧶
Theyre quick to make, use tiny amounts of cotton yarn, and finish beautifully with a button or leather label. ✨
Share your finished pouch with #Vivmade and enjoy a little handcrafted joy every time you reach for your keys! 😊