๐Ÿงถ Beautiful โœจ Detailed ๐Ÿ’ Adorable

Monster Frankenstein Amigurumi Pattern

Monster Frankenstein Amigurumi Pattern
4.6โ˜… Rating
5-7 Hours Time Needed
4.2K Made This
โœ‚๏ธ

Intermediate Level

Ideal for those with basic crochet experience, featuring slightly more advanced stitches and techniques to expand your skills.

โฑ๏ธ

Weekend Treat

Takes 5-7 hours, making it an enjoyable project to finish over a couple of days.

๐Ÿงธ

Cute Companion

An adorable friend to cherish, handcrafted with love to bring comfort and joy for years to come.

About This Monster Frankenstein Amigurumi Pattern

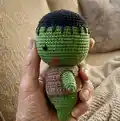
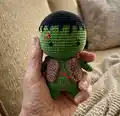
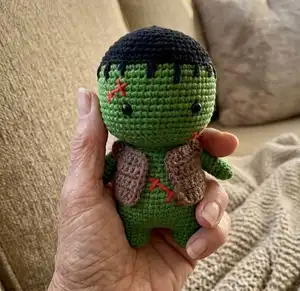
This pattern creates a small, lovable Monster Frankenstein amigurumi with a textured hairline, embroidered scars, and a tiny crocheted sweater. The design uses basic amigurumi shaping and finishing techniques to produce a tidy, professional-looking toy. Photo references are included to help you place features and complete assembly in order.

Monster Frankenstein Amigurumi Pattern crochet pattern - detailed view of completed project

Follow step-by-step rounds for the head, legs, body, arms and sweater, then finish with simple sewing and embroidery. Suitable for crocheters comfortable with increases, decreases and working in the round.

Why You'll Love This Monster Frankenstein Amigurumi Pattern

I absolutely love this pattern because it turns simple stitches into a charming character with personality. I enjoy how a few embroidered details and a contrasting hairline can bring the toy to life. The design is compact and quick to make, so you can finish it over a weekend and give it as a special handmade gift. I also love that the sweater and scars let you add little custom touches to make each monster unique.

Monster Frankenstein Amigurumi Pattern step 1 - construction progress Monster Frankenstein Amigurumi Pattern step 2 - assembly progress Monster Frankenstein Amigurumi Pattern step 3 - details and accessories Monster Frankenstein Amigurumi Pattern step 4 - final assembly and finishing

Switch Things Up

I love customizing this pattern by changing colors to create different characters; swap the green for pastel shades to make a friendly fantasy creature.

I sometimes use thicker yarn and a larger hook to make a chunkier, cuddly version that works great as a pillow buddy.

To make a tiny keychain version I use thinner yarn and a 1.75 mm hook and reduce stuffing slightly for a compact look.

I often change the sweater color or add stripes to personalize each monster and give it a unique wardrobe.

Try embroidering different scar shapes or facial expressions to give the toy a distinct personalityโ€”short stitches make subtle looks while longer crosses create bolder details.

For posable arms you can insert a short piece of wire inside the arm before final stitching, which lets you pose the monster for display.

Swap safety eyes for embroidered eyes to make the toy baby-safe, or use smaller safety eyes for a different proportion and look.

I also like to add tiny crocheted accessories like a bow tie, hat, or mini bandage to make the character story-driven.

Want a seasonal twist? Use orange and black sweater colors for Halloween or soft pastels for a spring-themed monster companion.

Lastly, experiment with different yarn texturesโ€”cotton gives a neat look while acrylic offers a fluffier finishโ€”so you can match the toy to your preferred style.

Common Mistakes & How to Fix Them

โœ— Skipping the instruction to cut the thread after the first leg; cut the thread after the first leg so you can begin the second leg and continue seamlessly into the body as instructed. โœ— Forgetting to change yarn color at the correct round for the hairline; switch to your black (hair) yarn exactly at Rnd 11 as shown so the hairline sits correctly. โœ— Overstuffing the head or body which can distort shape; stuff gradually and check shaping as you work to maintain a smooth, round silhouette. โœ— Not leaving a long tail when fastening off; leave a long tail as instructed so you have enough yarn to sew parts together securely later. โœ— Ignoring stitch counts during increases and decreases; count your stitches at the end of each round to ensure your shaping matches the pattern.

Monster Frankenstein Amigurumi Pattern

Make your own adorable Monster Frankenstein amigurumi with this clear, photo-supported pattern. You will crochet a cute green monster with a removable sweater, simple sewing steps, and charming embroidered scars. Perfect for gifting or seasonal decor, this pattern guides you through head, body, legs, arms and finishing touches. Enjoy the process and tag the designer when you share your finished toy.

Intermediate 5-7 Hours

Materials Needed for Monster Frankenstein Amigurumi Pattern

โ€” Main Fabric

  • 01
    Alize Cotton Gold 126 (used for main green body color)
  • 02
    Alize Cotton Gold 493 (used for black hair color)
  • 03
    Alize Cotton Gold 60 (used for brown sweater or accent pieces)
  • 04
    Small amounts of red yarn for embroidered scars and detail work
  • 05
    Polyester fiberfill for stuffing (amount: small bag sufficient for one toy)

โ€” Tools Required

  • 01
    Crochet hook 2.00 mm or a hook that fits your yarn
  • 02
    Polyester fiberfill
  • 03
    6 mm safety eyes (2 pieces)
  • 04
    Scissors
  • 05
    Yarn/tapestry needle for sewing and weaving ends
  • 06
    Stitch markers (optional)
  • 07
    Pins for positioning pieces (optional)

Progress Tracker

0% Complete

โ€” Head :

Round 1 :

6 sc in magic ring (6)

Round 2 :

(inc) x6 (12)

Round 3 :

(sc, inc) (18)

Round 4 :

(inc, 2 sc) x6 (24)

Round 5 :

(3 sc, inc) x6 (30)

Round 6 :

2 sc, inc, (4 sc, inc) x5, 2 sc (36)

Round 7 :

(5 sc, inc) (42)

Round 8 :

3 sc, inc, (6 sc, inc) x5, 3 sc (48)

Round 9 :

(7 sc, inc) x6 (54)

Round 10 :

4 sc, inc, (8 sc, inc) x5, 4 sc (60)

Round 11 :

sc around (60) *change to green yarn

Round 12 :

BLO Sc around (60)

Round 13-23 :

Sc around (60) (11 rnds)

Round 24 :

(3 sc, dec) x12 (48)

Round 25 :

(2 sc, dec) x12 (36)

Round 26 :

2 sc, dec, (4 sc, dec) x5, 2 sc (30)

Round 27 :

(3 sc, dec) x6 (24)

Round 28 :

sc around (24)

โ€” Leg :

Round 1 :

7 sc in magic ring (7)

Round 2 :

(inc) x7 (14)

Round 3-5 :

sc around (14) *make 2 pieces.

Info :

*After making the first leg, cut the thread. When making the second leg, do not cut the thread and continue to the body.

โ€” Body :

Round 6 :

ch4, join the first leg with the sc. Crochet on the first leg: 2 sc, (inc, 5 sc) x2, working on the chain: inc, 2 sc, inc, crochet on the second leg: (5 sc, inc) x2, 2 sc, working on the chain: 4 sc (42)

Round 7 :

(13 sc, inc) x3 (45)

Round 8-12 :

sc around (45) (5 rnds)

Round 13 :

(13 sc, dec) x3 (42)

Round 14-16 :

sc around (42) (3 rnds)

Round 17 :

(5 sc, dec) x6 (36)

Round 18-20 :

sc around (36) (3 rnds)

Round 21 :

(4 sc, dec) x6 (30)

Round 22-24 :

sc around (30)

Round 25 :

(3 sc, dec) x6, slst (24)

Info :

*Fasten off and leaving a long tail for sewing.

Info :

Stuff the body. Sew the Head with the Body.

โ€” Arm :

Round 1 :

6 sc in magic ring (6)

Round 2 :

(sc, inc) x3 (9)

Round 3-11 :

sc around (9) (9 rnds)

Info :

*I don't fill arms.

โ€” Sweater :

Round 1 :

Ch 25, (sc, inc) x12 (36) ch1, turn

Round 2 :

(2 sc, inc) x12 (48) ch1, turn

Round 3 :

Sc around (48) ch1, turn

Round 4 :

7 sc, ch3, skip 10 sc, 14 sc, ch3, skip 10 sc, 7 sc,ch1, turn

Round 5-7 :

Sc around (34) (3 rnds) ch1, turn. Cut the yarn and hide.

Info :

Follow photo references for hair placement and embroidered scar locations as shown in the pattern images.

โ€” Assembly :

Info :

Sew arms to the sides of the body, position pieces before stitching to make sure placement is even.

Info :

Attach safety eyes and embroider scars in desired locations following the photos for reference.

Info :

Weave in any remaining ends and secure all seams after sewing pieces together.

Assembly Instructions

  • After finishing Round 25 of the body, fasten off leaving a long tail and stuff the body firmly before sewing it to the head.
  • Sew the head to the body using the long tail left after fastening off, securing with an even whipstitch around the neck opening.
  • Attach arms to either side of the body by positioning them at the height shown in the photos and sewing them in place with a yarn needle.
  • Make two legs; after completing the first leg cut the thread, then make the second leg without cutting the thread and join to the body on Round 6.
  • Cut the yarn and hide ends on the sweater after completing Rnd 5-7, then place the sweater on the finished body as shown in the photos.
  • Attach 6 mm safety eyes to the head before closing the top, and embroider scar details with red yarn as shown in the reference images.

Important Notes

  • ๐Ÿ’กChange to the green yarn at Rnd 11 as indicated to create the correct hairline contrast.
  • ๐Ÿ’กLeave a long tail when fastening off the body so you have enough yarn to securely sew head and body together.
  • ๐Ÿ’กWhen making the legs, cut the thread after the first leg and do not cut after the second so you can join into the body directly.

Your Monster Frankenstein is complete and ready to bring a touch of handmade spooky charm to your home! ๐ŸŽƒ๐Ÿงถ This little companion makes a perfect gift or seasonal decoration, full of personality and tiny details. ๐Ÿงตโœจ Happy crocheting and donโ€™t forget to share and tag the designer when you post your finished monster! ๐Ÿ˜Š

You ask,

we answer.

FAQs

What size will the finished piece be?

The finished amigurumi size will depend on your yarn and hook, but using the recommended yarn and a 2.00 mm hook will produce a small toy appropriate for display or gifting.

Can I use different yarn weights for this pattern?

Yes, you can substitute yarn weights, but this will affect the final size; use an appropriate hook for your chosen yarn and check stitch counts as you work.

Do I need prior crochet experience for this pattern?

This pattern is rated intermediate, so knowledge of single crochet, increases, decreases and working in the round is recommended for best results.

How long does this project typically take to complete?

Most crocheters complete this project in 5-7 hours, depending on experience level, detailing and assembly time.