🧢 Beautiful ✨ Detailed πŸ’ Adorable

Mochi-Mouse Loves Cheese Amigurumi Pattern

Mochi-Mouse Loves Cheese Amigurumi Pattern
4.0β˜… Rating
5-7 Hours Time Needed
3.3K Made This
βœ‚οΈ

Intermediate Level

Ideal for those with basic crochet experience, featuring slightly more advanced stitches and techniques to expand your skills.

⏱️

Weekend Treat

Takes 5-7 hours, making it an enjoyable project to finish over a couple of days.

🧸

Cute Companion

An adorable friend to cherish, handcrafted with love to bring comfort and joy for years to come.

About This Mochi-Mouse Loves Cheese Amigurumi Pattern

This charming pattern creates a tiny mouse tucked into a triangular cheese slide, full of cute details like ears, teeth, and tiny feet. Youll learn to shape small amigurumi components, change yarns cleanly, and assemble the finished toy. The project uses cotton yarns and a 2.5mm hook for a firm, collectible finish.

Mochi-Mouse Loves Cheese Amigurumi Pattern crochet pattern - detailed view of completed project

Clear stitch-by-stitch rounds are provided for every piece, plus photo references to guide assembly. Perfect for making as a playful gift or a whimsical shelf companion.

Why You'll Love This Mochi-Mouse Loves Cheese Amigurumi Pattern

I absolutely love this pattern because it balances quick, satisfying shapes with charming details that bring the character to life. I enjoy how the cheese slide becomes a little scene where the mouse can hide β€” it adds personality beyond a basic amigurumi. The small pieces are perfect for practicing precise shaping and color changes without overwhelming time commitments. I also love seeing the eyes and tiny teeth come together; those finishing touches really make the mouse smile.

Mochi-Mouse Loves Cheese Amigurumi Pattern step 1 - construction progress Mochi-Mouse Loves Cheese Amigurumi Pattern step 2 - assembly progress Mochi-Mouse Loves Cheese Amigurumi Pattern step 3 - details and accessories Mochi-Mouse Loves Cheese Amigurumi Pattern step 4 - final assembly and finishing

Switch Things Up

I love how easy it is to customize this design: change the mouse color to create a whole litter of tiny mice with personalities just by switching yarn shades.

Want a pocket-sized keyring? Use thinner yarn and a smaller hook to make a mini version and add a keyring loop before finishing.

Make the cheese in different colors or stitch a little pattern onto the surface for a playful twist.

I often adjust eye size β€” try embroidered eyes for a softer look or larger safety eyes for more character.

Swap the cotton for a soft acrylic to make a cuddly, squishier mouse for kids; just check gauge changes.

Add tiny accessories like a crocheted scarf, a tiny hat, or a felt bow to personalize your mouse as a gift.

Experiment with placement of the ears and feet to change expression and posture β€” subtle shifts make the mouse look sleepier or more alert.

If you like texture, try front post or back loop rounds on the cheese edge for extra detail.

For a portable project, make only the mouse first and add the cheese later; it makes a cute surprise toy when paired with the cheese slide.

I also enjoy combining colors from different yarn brands to use leftovers β€” it creates unique, variegated results and reduces waste.

Common Mistakes & How to Fix Them

βœ— Skipping stitch counts during shaping will make the body lopsided; count after every round and mark the beginning of the round with a stitch marker. βœ— Changing color incorrectly can leave loose loops or awkward joins; always change colors in the last yarn-over of the stitch and weave in ends securely. βœ— Understuffing small pieces causes flat features that wont hold shape; stuff firmly but gradually and adjust stuffing while closing. βœ— Forgetting to weave in tails before final sewing will leave visible ends; leave long tails for sewing, then weave them through inside the piece for a clean finish.

Mochi-Mouse Loves Cheese Amigurumi Pattern

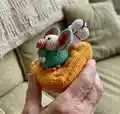
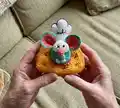
Make an adorable Mochi-Mouse tucked into a cheesy slide with this friendly amigurumi pattern. Youll work small amigurumi pieces and assemble them into a playful scene β€” perfect for gifting or play. The pattern includes clear round-by-round instructions, photos for reference, and helpful finishing tips to get a polished result.

Intermediate 5-7 Hours

Materials Needed for Mochi-Mouse Loves Cheese Amigurumi Pattern

β€” Main Fabric

  • 01
    Color A: pink Gazzal Baby Cotton 3435 (50g, 165m)
  • 02
    Color B: grey YarnArt Jeans 80 (50g, 160m)
  • 03
    Color C: white YarnArt Jeans 03 (50g, 160m)
  • 04
    Color D: yellow YarnArt Jeans 35 (50g, 160m)
  • 05
    Color E: orange Alize Cotton Gold 550 (100g, 330m)
  • 06
    Additional yarns seen in booklet: Jeans Bamboo 109 (50g,160m), Etrofil Jeans 59 (50g,160m) for other projects

β€” Tools Required

  • 01
    Crochet hook size 2.5mm
  • 02
    1 pair of 5mm safety eyes
  • 03
    Tapestry needles
  • 04
    Brown thread
  • 05
    Pins for assembly
  • 06
    Stitch markers
  • 07
    Scissors
  • 08
    Polyester fiberfill

Progress Tracker

0% Complete

β€” Body :

Round 1 :

sc 6 into a magic loop (6)

Round 2 :

inc 6 (12)

Round 3-4 :

sc 12 (2 rnds) (12)

Round 5 :

dec 6, stuff slightly, change to yarn B (6)

Round 6 :

sc 2, inc 2, sc 2 (8)

Round 7 :

sc 3, inc 2, sc 3 (10)

Round 8 :

sc 4, inc 2, sc 4 (12)

Round 9 :

sc 5, inc 2, sc 5 (14)

Round 10 :

sc 6, inc 2, sc 6 (16)

Round 11 :

sc 7, inc 2, sc 7 (18)

Round 12 :

sc 3, [sc 1, inc] 6x, sc 3 (24)

Round 13 :

sc 3, [sc 1, inc, sc 1] 6x, sc 3 (30)

Round 14 :

sc 3, [sc 3, inc] 6x, sc 3 (36)

Round 15 :

sc 3, [sc 2, inc, sc 2] 6x, sc 3 (42)

Round 16 :

sc 14, [sc 3, inc, sc 3] 2x, sc 14 (44)

Round 17-30 :

sc 44 (14 rnds) (44)

Round 31 :

[sc 20, dec] 2x (42)

Round 32 :

[sc 5, dec] 6x (36)

Round 33 :

[sc 4, dec] 6x (30)

Round 34 :

[sc 3, dec] 6x, stuff firmly (24)

Round 35 :

[sc 2, dec] 6x (18)

Round 36 :

[sc 1, dec] 6x (12)

Round 37 :

dec 6 (6)

Info :

Break the yarn, weave in the last 6 sts, stuff firmly (pic 1).

β€” Eyes :

Round 1 :

sc 4 into a magic loop (4)

Round 2 :

sc 1, inc 2, sc 1 (6)

Round 3 :

sc 2, inc 2, sc 2 (8)

Round 4 :

sc 3, inc 2, sc 3 (10)

Round 5 :

sc 4, inc 2, sc 4 (12)

Round 6 :

sc 5, inc 2, sc 5 (14)

Round 7-9 :

sc 14 (3 rnds), stuff slightly (14)

Round 10 :

dec 7 (7)

Info :

Break the yarn with a long rest to sew later, weave in the last 7 sts (pic 2). Use a pin to locate 2 pieces together (pic 3), sew 2 pieces together (pic 4&5). Insert 5mm safety eyes like pic 6 (use glue to stick the eyes). Sew the eyes on the body (pic 7).

β€” Tail :

Round 1 :

ch 15, start on the 2nd st, slst 14 (14)

Info :

Break the yarn with a long rest to sew later.

β€” Teeth :

Round 1 :

ch 4, start on the 2nd st, sc 3, ch 1, turn (3)

Round 2 :

sc 3 (3)

Info :

Break the yarn with a long rest to sew later. Sew the teeth under the nose (pic 8&9).

β€” Ears :

Round 1 :

sc 6 into a magic loop (6)

Round 2 :

inc 6 (12)

Round 3 :

[sc 1, inc] 6x (18)

Round 4 :

[sc 1, inc, sc 1] 6x (24)

Round 5 :

[sc 3, inc] 6x (30)

Round 6 :

[sc 2, inc, sc 2] 6x (36)

Infos :

Break the yarn for 2 pieces of yarn A, make other 2 pieces with yarn B but do not break the yarn (pic 10). Hold 2 pieces as pic 11 (right side on the front), crochet sc across the edges (pic 12). Fold the ear in half (pic 13), sc 3 across the edges (pic 14), leave a long rest to sew later (pic 15). Sew the ears on the body (pic 16&17).

β€” Feet :

Round 1 :

[ch 5, start on the 2nd st, slst 4] 4x (16) (pic 18), yarn over other 3 small feet (pic 19) and pull through all loops (pic 20)

Info :

Break the yarn with a long rest to sew later, make other 3 feet the same way (pic 21). Sew the feet & the tail on the body (pic 22&23).

β€” Cheese (Part 1) :

Round 1 :

Magic loop, sc 2, ch 1, turn (2)

Round 2 :

inc 2, ch 1, turn (4)

Round 3 :

inc, sc 2, inc, ch 1, turn (6)

Round 4 :

sc 6, ch 1, turn (6)

Round 5 :

inc, sc 4, inc, ch 1, turn (8)

Round 6 :

inc, sc 6, inc, ch 1, turn (10)

Round 7 :

sc 10, ch 1, turn (10)

Round 8 :

inc, sc 8, inc, ch 1, turn (12)

Round 9 :

inc, sc 10, inc, ch 1, turn (14)

Round 10 :

sc 14, ch 1, turn (14)

Round 11 :

inc, sc 12, inc, ch 1, turn (16)

Round 12 :

sc 3, ch 1, turn (3)

Round 13 :

dec, inc, ch 1, turn (3)

Round 14 :

sc 1, dec, ch 1, turn (2)

Round 15 :

sc 2, ch 1, turn (2)

Round 16 :

inc, sc 1, ch 1, turn (3)

Round 17 :

sc 3, ch 1, turn (3)

Round 18 :

inc, dec, ch 1, turn (3)

Round 19 :

sc 3, ch 1, turn (3)

Round 20 :

sc 2, inc, ch 1, turn (4)

Round 21 :

sc 4, ch 1, turn (4)

Round 22 :

inc, sc 2, inc, ch 1, turn (6)

Round 23 :

sc 6, ch 1, turn (6)

Round 24 :

sc 5, inc, ch 1, turn (7)

Round 25 :

sc 7, ch 1, turn (7)

Info :

Break the yarn, hold the piece as pic 24, join the yarn on the rnd 11, repeat rnd 12-25 (pic 25), do not break the yarn, continue to crochet the following rnds:

Round 26 :

inc, sc 5, inc, ch 12, inc, sc 5, inc, ch 1, turn (30) (pic 27)

Round 27-28 :

sc 30 (2 rnds), ch 1, turn (30)

Round 29 :

inc, sc 28, inc, ch 1, turn (32)

Round 30 :

sc 32 (pic 28) (32)

Info :

Do not break the yarn, continue to crochet sc across the edge, (sc 3) on the 3 pivots (pic 29): sc 28 + (sc 3) + sc 28 + (sc 3) + sc 30 + (sc 3)=95 (sts). We will have total 95 sts, break yarn D, change to yarn E, continue to crochet the following rnds:

Round 31 :

(blo) sc 95 (pic 30) (95)

Round 32-36 :

sc 95 (5 rnds) (95)

Info :

Break yarn E (pic 31&32). Place the cheese as pic 33, join yarn D as pic 34, crochet sc across the inner ring (sc 12+14+10+14=50 stst (pic 35), do not break the yarn, continue to crochet the inner part:

Inner Round 1 :

(blo) sc 50 (50)

Inner Round 2-6 :

sc 50 (5 rnds) (50)

Info :

Break the yarn with a long rest to sew later (pic 36&37). Part 2: Make another cheese slide (repeat rnd 1-30), and sc cross the edges as well (total 95 sts) (pic 38). And join yarn D on any st of the inner ring, crochet sc 50 across the inner ring (total 50 sts) (pic 39), do not break the yarn, continue to crochet to join 2 pieces together. Slst across the edge of the 1st piece (pic 41-42-43), break the yarn. Cut a long piece of yarn D to sew 2 rings together (pic 44), stuff firmly as long as sewing (pic 45).

Info :

Break the yarn, leave a long rest to make the dents on both side of the cheese (pic 46). Use tapestry needle to pull through both sides (pic 48-49-50-51) to create the dents (both sides). Put the mouse inside the cheese (pic 52&53), we have finished crocheting the Mochi-Mouse Loves Cheese!

Assembly Instructions

  • Sew the two eye halves together as shown, insert 5mm safety eyes between the eye lobes, glue if needed and then sew the completed eye assembly to the front of the body aligning to photos (use pic references 2-7).
  • Sew ears to the top sides of the head positioning them symmetrically; hold two layers of ear (A and B pieces), sc along the edges to join, fold, then sc across the edge and sew in place (pic 11-17).
  • Attach the feet and tail: place the four small feet evenly around the base and sew securely; sew the tail in the back center before closing final stitches (pic 22&23).
  • Assemble the cheese by joining two cheese slides, slst across the edges and sew the rings together; stuff firmly as you sew and use a tapestry needle to create dents on both sides before placing the mouse inside (pics 41-51).
  • Sew teeth under the nose and weave in all tails; check symmetry and use pins to position pieces before sewing for accurate placement.

Important Notes

  • πŸ’‘Use stitch markers at the beginning of rounds to keep track of rounds and shaping changes.
  • πŸ’‘Stuff small pieces lightly as you go, stuffing more firmly for the body to maintain shape without overfilling small facial details.
  • πŸ’‘Leave long yarn tails when breaking color changes so you have enough to sew pieces together and weave in securely.
  • πŸ’‘When changing yarns, carry the yarn neatly on the wrong side or weave in as you go to avoid loose loops and gaps.
  • πŸ’‘Pin pieces in place before permanent sewing to ensure alignment and symmetry.

This cute Mochi-Mouse tucked into a cheesy slide is designed to spark smiles and crafty joy. The pattern is playful, detailed, and full of small finishing techniques to build your skills. Make one for a friend or make a whole family of mice to fill a snack shelf! πŸ§ΆπŸ§€

You ask,

we answer.

FAQs

What size will the finished piece be?

The finished amigurumi measures approximately 10-12 cm tall when using the recommended yarns and a 2.5mm hook; the cheese slide is larger and will fit the mouse snugly.

Can I use different yarn weights for this pattern?

Yes, you can substitute yarn weights, but this will change the final size; adjust your hook accordingly and make a gauge test to ensure the mouse will fit the cheese.

Do I need prior crochet experience for this pattern?

This pattern is rated intermediate because it includes shaping, color changes, and assembly steps; basic amigurumi experience is recommended for best results.

How long does this project typically take to complete?

Most crocheters complete the project in 5-7 hours depending on experience and how much time you spend on assembly and finishing details.