🧢 Beautiful ✨ Detailed πŸ’ Adorable

Minimals Mouse Amigurumi Pattern

Minimals Mouse Amigurumi Pattern
4.0β˜… Rating
5-7 Hours Time Needed
1.9K Made This
βœ‚οΈ

Intermediate Level

Ideal for those with basic crochet experience, featuring slightly more advanced stitches and techniques to expand your skills.

⏱️

Weekend Treat

Takes 5-7 hours, making it an enjoyable project to finish over a couple of days.

🧸

Cute Companion

An adorable friend to cherish, handcrafted with love to bring comfort and joy for years to come.

About This Minimals Mouse Amigurumi Pattern

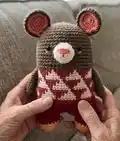
This pattern creates a 15 cm Minimals Mouse amigurumi featuring a colorwork sweater, contrasting snout and ear centers, and simple limbs. Round-by-round instructions guide you from the magic ring through shaping, dividing the legs and finishing details. The PDF includes symbol charts for color changes and precise placement notes for eyes, cheeks and arms. Ideal for making a small handmade gift or expanding your amigurumi skills with motif colorwork.

Minimals Mouse Amigurumi Pattern crochet pattern - detailed view of completed project

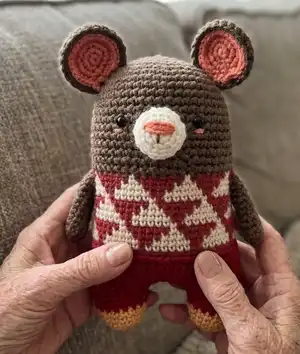
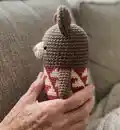
Follow the clear rounds and photos to complete head, body, legs, arms, snout and ears. Includes material list, abbreviation guide and helpful assembly notes for a polished finish.

Why You'll Love This Minimals Mouse Amigurumi Pattern

I absolutely love this pattern because it combines simple amigurumi shaping with charming colorwork details that make the character pop. I enjoy the clean, minimal aesthetic and the way the sweater motif looks when crocheted in rounds. I love that the pattern teaches dividing the legs and working each leg separately β€” it adds structure while staying accessible. The finished mouse is small, collectible and incredibly satisfying to complete, which always makes me smile when I give one away.

Minimals Mouse Amigurumi Pattern step 1 - construction progress Minimals Mouse Amigurumi Pattern step 2 - assembly progress Minimals Mouse Amigurumi Pattern step 3 - details and accessories Minimals Mouse Amigurumi Pattern step 4 - final assembly and finishing

Switch Things Up

I love customizing the sweater colors on this pattern β€” try pastel tones for a softer, nursery-friendly look, or bold contrasting colors for a modern pop.

I sometimes swap the main body color to gray or cream for a different mouse personality and it changes the whole vibe.

To make a larger version, I use a bulkier yarn and increase the hook size; the motif squares will enlarge nicely and become more visible.

If I want a tiny keychain, I use fingering yarn and a 2.5 mm hook to scale the design down while keeping the same round counts.

I often add embroidered eyelashes or tiny felt accessories like a scarf to give each mouse a unique expression.

Try placing the eyes slightly closer or farther apart to experiment with different facial expressions and personalities.

For a more poseable toy, I sometimes insert a short piece of wire into the arm before flattening it to allow slight adjustments.

Mix yarn textures for interest β€” a slightly fuzzy yarn for the body and smooth cotton for the sweater gives great contrast.

I recommend testing different color sequences on a scrap before working the full motif to ensure the contrast reads clearly.

If you like themed sets, create matching mice in a color palette and display them as a set β€” they make excellent gifts or shop items.

Common Mistakes & How to Fix Them

βœ— Skipping stitch markers while dividing the legs leads to miscounted stitches and misaligned legs; use stitch markers and recount at the division point to ensure accurate placement. βœ— Changing colors without securing tails will cause loose floats and messy joins; carry yarn neatly, weave ends in as you go, and secure color changes with a tidy knot or small tail weave. βœ— Overstuffing the head or body causes bulging and distortion of the sweater motif; stuff gradually and evenly, adding small amounts to preserve shape and stitch definition. βœ— Forgetting to place eyes and cheeks in the correct rounds will ruin facial symmetry; mark the position between Rnd 13 and 14 for eyes and between Rnd 14 and 15 for cheeks before securing. βœ— Crocheting too tightly on small pieces like the snout and ears makes sewing difficult and distorts shape; maintain a moderate, even tension and unblock parts gently if needed.

Minimals Mouse Amigurumi Pattern

Make a charming Minimals Mouse with this detailed amigurumi pattern. Youll work simple single crochet rounds, colorwork body motifs, and assemble small parts for a 15 cm handmade toy. The pattern includes clear round-by-round instructions, symbol charts, and placement notes so you can follow along confidently. Perfect as a gift or a cute collectible to decorate your shelf.

Intermediate 5-7 Hours

Materials Needed for Minimals Mouse Amigurumi Pattern

β€” Main Fabric

  • 01
    Worsted weight yarn - Beige yarn (for sweater motif accent)
  • 02
    Worsted weight yarn - Yellow yarn (for feet details)
  • 03
    Worsted weight yarn - White yarn (for snout and snout details)
  • 04
    Worsted weight yarn - Brown yarn (main body/head/arms)
  • 05
    Worsted weight yarn - Orange yarn (inner ear)
  • 06
    Worsted weight yarn - Red yarn (sweater main color)

β€” Tools Required

  • 01
    Crochet hook 5/0 (3.0 mm)
  • 02
    Yarn needle for sewing and weaving ends
  • 03
    Fiberfill stuffing (polyester fiberfill)
  • 04
    5 mm black plastic safety eyes x2 (or glue on eyes)
  • 05
    Glue (to glue the eyes on the face if not using safety eyes)
  • 06
    Scissors
  • 07
    Stitch markers (to mark rounds and leg division)
  • 08
    Pins for assembly (optional)

Progress Tracker

0% Complete

β€” Head / Body / Legs :

Info :

*Change the color of the yarn according to the SYMBOL PATTERNS on page 1. Changing the yarn color is not mentioned in the descriptive design below.

Rnd 1 :

scx6 in the yarn loop, tighten the loop [6 sts]

Rnd 2 :

(2-sc inc) x 6 [12]

Rnd 3 :

(scx1, 2-sc inc) x 6 [18]

Rnd 4 :

(scx2, 2-sc inc) x 6 [24]

Rnd 5 :

(scx3, 2-sc inc) x 6 [30]

Rnd 6 :

(scx4, 2-sc inc) x 6 [36]

Rnd 7 :

(scx5, 2-sc inc) x 6 [42]

Rnd 8 :

(scx6, 2-sc inc) x 6 [48]

Rnd 9~36 :

sc in all 48 st [48]

Info :

Eyes location: place safety eyes between Rnd 13 and 14. Cheek location is between Rnd 14 and 15. Arms location is between Rnd 20 and 21. Follow symbol chart on page 1 for color changes.

Info :

DIVIDE THE LEGS: To make a leg, identify the center space between the legs by the 6 stitches, and each leg identifies the other by 18. (Use stitch markers to help.) Sc at the 31th st of the Rnd 36. This sc is the first st of the first leg (left leg). Continue working on the first leg (left leg).

Rnd 37~40 :

sc in all 18 st [18]

Rnd 41 :

(scx1, sc2tog) x 6 [12]

Rnd 42 :

(sc2tog) x 6 [6]

Info :

Fasten off, leaving a long tail. Stuff the leg. Using a yarn needle, weave the yarn tail through the front loop of each remaining stitch and pull tight to close.

Second Leg (Right leg) :

Rejoin the Red yarn to 7th back unworked st of Rnd 36. This sc is the first st for the second leg (right leg). Continue working the second leg the same way as the first leg from Rnd 37-42.

Info :

Using a yarn needle, sew the 6 sts between the legs to join them securely.

β€” Arm x2 :

Rnd 1 :

Use the Brown yarn to make MAGIC RING. scx5 in the yarn loop, tighten the loop [5 sts]

Rnd 2 :

(2-sc inc) x 5 [10]

Rnd 3~11 :

sc in all 10 st [10]

Info :

Fasten off, leaving a long tail for sewing. Flatten the ARM, do not stuff.

β€” Snout :

Rnd 1 :

Use the White yarn to make 4 chains. scx1 in second ch from hook, scx1 in the next chain, scx3 in the bottom chain, working up the other side - scx1, scx2 in the next chain, slst [8 sts]

Rnd 2 :

ch 1, 2-sc inc, scx1, (2-sc inc) x 3, scx1, (2-sc inc) x 2, slst [14]

Rnd 3 :

ch 1, 2-sc inc, scx3, 2-sc inc, scx2, sc2tog, scx1, sc2tog, scx2, slst [14]

Rnd 4 :

ch 1, sc in all 14 st, slst [14]

Info :

Fasten off, leaving a long tail for sewing. Fill in some stuffing to the snout, then make the nose and mouth on the snout. Section for snout stitching on the face uses 19 sts across with an 8 sts area for the snout placement; refer to diagram for exact alignment.

β€” Ear x2 :

Rnd 1 :

Use the Orange yarn to make MAGIC RING. scx6 in the yarn loop, tighten the loop [6 sts]

Rnd 2 :

(2-sc inc) x 6 [12]

Rnd 3 :

(scx1, 2-sc inc) x 6 [18]

Rnd 4 :

(scx2, 2-sc inc) x 6 [24]

Info :

Fasten off, and make another Orange ear, and two Brown ears by the same way.

Edging :

Locate orange colored ear part on the brown ear, and then SC together with brown yarn. Orange: the stitches only through backloop. Brown: go through both loops. [24]

Info :

Fasten off, leaving a long tail for sewing. Attach ears to head with orange inner centered on the brown ear as shown in placement diagram (inner ear between 3rds and 4rds rounds as illustrated).

Assembly Instructions

  • Place and glue or insert 5 mm safety eyes between Rnd 13 and Rnd 14, spacing evenly on the face before securing.
  • Sew the snout to the face centered over 8 sts area between Rnd 13 and Rnd 15, embroider nose and mouth onto snout.
  • Attach arms to the body between Rnd 20 and Rnd 21, angling slightly forward; sew firmly using the long tails left for sewing.
  • Position ears on top of the head so inner ear centers align with the placement diagram (inner orange centered inside brown ear), then sew through both ear layers and secure ends inside the head.
  • Sew the legs into position and close the 6 sts between the legs, then weave in all remaining ends and adjust stuffing for a smooth finish.

Important Notes

  • πŸ’‘Change yarn color according to the symbol chart on page 1 to achieve the sweater motif and body stripes.
  • πŸ’‘Use stitch markers to mark the 31st stitch at Rnd 36 for accurate leg division and to keep track during shaping.
  • πŸ’‘Stuff parts gradually and avoid overstuffing small pieces like the snout and arms to preserve shape and make sewing easier.
  • πŸ’‘When joining the orange ear inner to the brown outer, work orange through the backloop only and brown through both loops for a neat edging.

This Minimals Mouse pattern is a delightful small amigurumi that fits perfectly on shelves or desks and makes a lovely handmade gift. It combines simple single crochet shaping with charming colorwork for a unique, modern look. Enjoy every stitch and share your finished mouse with friends and family. 🧢🧡

You ask,

we answer.

FAQs

What size will the finished piece be?

The finished amigurumi measures approximately 15 cm (5.9 inches) tall when using the recommended worsted yarn and a 3.0 mm hook.

Can I use different yarn weights for this pattern?

Yes, you can use different yarn weights, but the final size will change; using fingering weight yarn with a 3 mm hook will produce a smaller result, and bulky yarn will create a larger, chunkier toy.

Do I need prior crochet experience for this pattern?

This pattern is rated intermediate; basic knowledge of single crochet, increases, decreases and working in the round is recommended for best results.

How long does this project typically take to complete?

Most crocheters complete this project in about 5-7 hours, depending on experience and how many details (color changes, embroidery) you include.