🧢 Beautiful ✨ Detailed πŸ’ Adorable

Mini Seal Amigurumi Pattern

Mini Seal Amigurumi Pattern
4.0β˜… Rating
5-7 Hours Time Needed
1.1K Made This
βœ‚οΈ

Intermediate Level

Ideal for those with basic crochet experience, featuring slightly more advanced stitches and techniques to expand your skills.

⏱️

Weekend Treat

Takes 5-7 hours, making it an enjoyable project to finish over a couple of days.

🧸

Cute Companion

An adorable friend to cherish, handcrafted with love to bring comfort and joy for years to come.

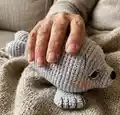
About This Mini Seal Amigurumi Pattern

This pattern creates a mini gray seal amigurumi about 6 inches tall from bottom to top of head using worsted weight yarn and a 3.25 mm hook. You will crochet from the front of the head to the back, then add tail fins, embroidery details and final assembly.

Mini Seal Amigurumi Pattern crochet pattern - detailed view of completed project

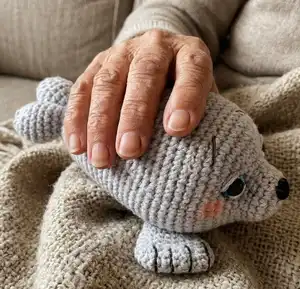
The instructions include every round and helpful photos to guide you through eye placement and sewing the fins. Perfect for making a sweet collectible or gift.

Why You'll Love This Mini Seal Amigurumi Pattern

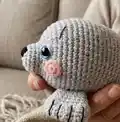
I absolutely love this pattern because it captures a lot of personality with just simple shaping and small details. I enjoy how the eye shaping and gentle embroidery can change the seal's expression, making each one unique. The construction from head to tail in a continuous spiral gives a smooth body shape I find very satisfying to stitch. Sharing techniques like working on the opposite side of the chain and the eye placement trick makes assembly easier, and I hope you feel proud finishing your little seal.

Mini Seal Amigurumi Pattern step 1 - construction progress Mini Seal Amigurumi Pattern step 2 - assembly progress Mini Seal Amigurumi Pattern step 3 - details and accessories Mini Seal Amigurumi Pattern step 4 - final assembly and finishing

Switch Things Up

I love how easy it is to customize this pattern by changing yarn color; try pastel shades for a soft look or variegated yarn for a playful finish.

I often make a larger version by using bulky yarn and a bigger hook if I want a cuddly pillow-sized seal.

You can swap safety eyes for embroidered eyes for a baby-safe toy and still follow the same placement instructions.

I sometimes add tiny crocheted accessories like a scarf or little hat to give my seal more personality.

For different expressions, adjust eyebrow placement and the tension when creating the eye shaping technique described in the pattern.

I recommend experimenting with blush placement β€” a faint circle under each eye gives a sweet look, but heavier color makes a more stylized result.

If you want posable fins, add thin wire inside the fin before closing, or embroider extra lines for a textured appearance.

Try different eye sizes (12mm, 15mm, 18mm) but remember to move the eyes slightly if you change size to preserve balance on the face.

I also enjoy adding small felt details like tiny embroidered whiskers or a tiny nose patch to increase realism.

Don’t be afraid to mix yarn weights across components β€” for example, use a fuzzy yarn for the body and smooth yarn for fins β€” just adjust your hook size and stuffing accordingly.

Common Mistakes & How to Fix Them

βœ— Placing safety eyes too early can cause difficulty when shaping the eye sockets; mark the position but attach backs later or remove eyes while doing the shaping and stuffing. βœ— Overstuffing the head and body will distort the shape and make sewing pieces together difficult; stuff gradually, checking shape as you go to maintain a smooth profile. βœ— Skipping stitch markers while working in continuous spiral can make it easy to lose track of rounds; use a marker to always know your beginning round and count stitches frequently. βœ— Not working on the opposite side of the chain correctly will give uneven fins; follow the opposite-side-of-chain instructions carefully and refer to the example pictures to ensure symmetry.

Mini Seal Amigurumi Pattern

Make a cuddly mini seal with this clear intermediate crochet pattern. You will work from the front of the head to the back, creating a squishy body, tail fins and removable details for expressive eyes. The pattern includes step-by-step rounds, assembly photos, and helpful tips so you can finish a charming handmade seal you will love to gift or display.

Intermediate 5-7 Hours

Materials Needed for Mini Seal Amigurumi Pattern

β€” Main Fabric

  • 01
    Worsted Weight yarn (#4), approximately 100g main color (Color A: Gray)
  • 02
    Less than 50g combined accent colors for details (optional)
  • 03
    Light gray sample used for pictured seal

β€” Tools Required

  • 01
    Crochet hook size D / 3.25 mm
  • 02
    18 mm safety eyes (2 pieces)
  • 03
    18 mm safety nose (1 piece)
  • 04
    Scissors
  • 05
    Sewing needle (yarn needle) for sewing and embroidery
  • 06
    Embroidery thread (black) for eyebrows and fin lines
  • 07
    Stitch marker
  • 08
    Polyester fiberfill stuffing (fiberfill)
  • 09
    Pins for assembly (optional)
  • 10
    Blush or red crayon for cheeks (optional)

Progress Tracker

0% Complete

β€” Head and Body :

Round 1 :

Make 6 sc into a magic ring= 6

Round 2 :

Increase in each st around= 12

Round 3 :

(sc, inc) x 6= 18

Round 4-6 :

sc in each st around

Round 7 :

2 sc, (sc, inc) x 6, 4 sc= 24

Round 8 :

2 sc, (2 sc, inc) x 6, 4 sc= 30

Round 9 :

2 sc, (3 sc, inc) x 6, 4 sc= 36

Round 10 :

2 sc, (4 sc, inc) x 6, 4 sc= 42

Round 11 :

2 sc, (5 sc, inc) x 6, 4 sc= 48

Info :

Place eyes between rounds 9 and 10, leaving 10 holes between them. Place the 1st eye after the 2nd increase. Count 10 holes after that and place the 2nd eye. If you want the sunken eye look, do not place the backs of the eyes on until round 21. Place the nose between rounds 2 and 3, in between the eyes.

Round 12-17 :

sc in each st around

Round 18 :

(dec, 10 sc) x 4= 44

Round 19-20 :

sc in each st around

Round 21 :

(dec, 9 sc) x 4= 40

Info :

Now for the eyes. Stuff the head well. Cut a long piece of yarn and remove the eyes. Place the needle in the hole where the first eye was and insert the needle into a hole next to the eye hole. Go back and forth between each eye hole repeating the process from the first eye. Pull slightly on the yarn after going through each hole. Do this about 3 times on each side until you reach the look you want. Follow the pictures for help. There is also a youtube video I have for extra help on this process. https://www.youtube.com/watch?v=9XoBnTY6k70&t=55s To place the backs of the eyes you will need to remove most of the stuffing to place the washers on the eyes then re stuff it.

β€” Head and Body Continued :

Round 22-23 :

sc in each st around

Round 24 :

(dec, 8 sc) x 4= 36

Info :

Stuff the body as you work

Round 25-26 :

sc in each st around

Round 27 :

(dec, 7 sc) x 4= 32

Round 28-29 :

sc in each st around

Round 30 :

(dec, 6 sc) x 4= 28

Round 31 :

sc in each st around

Round 32 :

(dec, 5 sc) x 4= 24

Round 33 :

sc in each st around

Round 34 :

(dec, 6 sc) x 3= 21

Round 35 :

(dec, 5 sc) x 3= 18

Round 36 :

(dec, 4 sc) x 3= 15

Round 37 :

(dec, 3 sc) x 3= 12

Info :

Work 5 sc, you are going to sc the round in half. Work a sc to the opposite side of the circle. You will now have two rounds that are 6 sc each. Refer to the pictures.

Info :

Now you are going to start making the tail fins: Continue around one of the circles

Round 1 :

Increase in each st around= 12

Round 2 :

(3 sc, inc) x 3= 15

Round 3 :

(4 sc, inc) x 3= 18

Round 4-5 :

sc in each st around

Info :

Stuff the fins as you work

Round 6 :

(sc, dec) x 6= 12

Round 7 :

sc in each st around

Round 8 :

dec x 6= 6

Info :

F/O and sew the hole closed.

Info :

Attach the yarn to a stitch on the 2nd circle

Info :

Repeat rounds 1-8

Info :

F/O and sew the hole closed.

β€” Fins(Make 2) :

Info :

With Color A: Ch 7

Round 1 :

inc in 2nd ch from hook, 4 sc, inc3, working on the opposite side of the chain: 4 sc, inc= 15

Info :

*refer to pg. 11 for help with working on the opposite side of the chain*

Round 2 :

inc x 2, 4 sc, inc x 3, 5 sc, inc= 21

Round 3-4 :

sc in each st around

Info :

Do not stuff the fins

Round 5 :

dec, 9 sc, dec, 8 sc= 19

Round 6 :

dec, 8 sc, dec, 7 sc= 17

Round 7 :

sc in each st around

Round 8 :

dec, 7 sc, dec, 6 sc= 15

Round 9 :

(dec, 3 sc) x 3= 12

Round 10-11 :

sc in each st around

Round 12 :

(dec, 2 sc) x 3= 9

Round 13-14 :

sc in each st around

Info :

Work 2 sc, fold the fins in half and sc the opening closed.

Info :

F/O and leave a long tail for sewing

β€” Assembly :

Item Head and Body (A) :

1. Take a long strand of black thread and thread your needle. Insert the needle into a hole above the eyes. Bring the needle to a hole a few rounds above the eye. Embroider an eyebrow. Repeat for the 2nd side. Weave in any tail ends.

Item Head and Body (B) :

2. If you want to add sleepy eyes. Thread your needle with a long strand of gray yarn. Insert the needle into a hole in between the eyes. Bring the needle up to a corner on the inside of the eye. Wrap the needle around the front of the eye and insert the needle into a hole on the outside of the eye. Pull tightly. Repeat one more time. Repeat for the 2nd eye. Weave in any yarn tails.

Item Fins :

1. Thread your needle with a long strand of black embroidery thread. Insert the needle into a hole on the back of the fin. Bring the needle to a hole in between rounds 5 and 6. Bring the needle around the front of the fin to the back. Insert the needle into a hole and embroider a line. Repeat 3 more times. You will want the lines one hole apart from each other. Weave in any tail ends.

Item Fins :

2. Turn the body upside down and pin the fins onto the body approximately between rounds 16 and 20.

Item Fins :

3. Sew the fins onto the body.

Item Cheeks :

1. If you want add some cheeks with blush or red crayon.

Assembly Instructions

  • Embroider eyebrows: Thread a long strand of black thread and insert the needle into a hole above the eyes, bring the needle to a hole a few rounds above and embroider an eyebrow on each side; weave in tails.
  • Create sleepy eyes: Thread a long strand of gray yarn, insert between eyes, bring needle up to an inside corner, wrap around the front of the eye and insert to an outside hole, pull tightly and repeat once for each eye; weave in yarn tails.
  • Embroider fin lines: Thread black embroidery thread through the back of each fin and embroider lines by bringing the needle to holes between rounds 5 and 6, repeating about four times so lines are one hole apart; weave in ends.
  • Attach fins: Turn the body upside down, pin fins approximately between rounds 16 and 20, then sew the fins securely onto the body.
  • Place eyes for sunken look: If you want deeper eyes remove some stuffing to place washers, then re-stuff around the eyes before closing.
  • Add cheeks if desired: Use a little blush or a red crayon to add soft cheek color near the eyes and blend gently.

Important Notes

  • πŸ’‘Do not join rounds unless stated; work in a continuous spiral for smooth shaping.
  • πŸ’‘Use a stitch marker to mark the beginning of each round to stay on track during increases and decreases.
  • πŸ’‘All stitches are worked in both loops unless stated otherwise in the pattern.
  • πŸ’‘Stuff the body gradually as you work to maintain the desired shape and avoid overstuffing.

You have finished a sweet mini seal! This little amigurumi makes a perfect handmade gift or shelf friend. Share your finished seal with the maker and enjoy stitching more characters soon. 🐾🧢

You ask,

we answer.

FAQs

What size will the finished piece be?

The finished amigurumi measures approximately 6 inches from bottom to top of head when using suggested worsted weight yarn and a 3.25 mm hook.

Can I use different yarn weights for this pattern?

Yes, you can use different yarn weights, but this will change the final size; use an appropriate hook size for your chosen yarn and adjust eye and nose placement as needed.

Do I need prior crochet experience for this pattern?

This pattern is rated intermediate, so basic amigurumi skills like magic ring, increases, decreases, and sewing parts together are recommended.

How long does this project typically take to complete?

Most crocheters complete this project in 5-7 hours, depending on experience, assembly time, and how many finishing details you add.