🧢 Beautiful ✨ Detailed πŸ’ Adorable

Mini Mouse Amigurumi Pattern

Mini Mouse Amigurumi Pattern
4.5β˜… Rating
5-7 Hours Time Needed
2.7K Made This
βœ‚οΈ

Intermediate Level

Ideal for those with basic crochet experience, featuring slightly more advanced stitches and techniques to expand your skills.

⏱️

Weekend Treat

Takes 5-7 hours, making it an enjoyable project to finish over a couple of days.

🧸

Cute Companion

An adorable friend to cherish, handcrafted with love to bring comfort and joy for years to come.

About This Mini Mouse Amigurumi Pattern

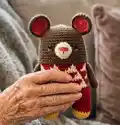
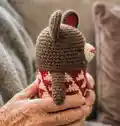
This pattern creates a 15 cm mini mouse amigurumi with a cozy patterned body and sweet facial details. The design uses color changes to form a fair isle motif on the torso and includes full symbol charts for reference. Clear step-by-step written rounds and helpful photos make assembly and finishing straightforward.

Mini Mouse Amigurumi Pattern crochet pattern - detailed view of completed project

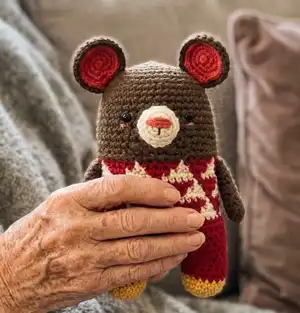
Youll work in continuous rounds for the head and body, divide the legs, then create separate arms, ears and a snout to sew on. Materials are common worsted yarns and a 3mm hook for a compact, neat finish.

Why You'll Love This Mini Mouse Amigurumi Pattern

I absolutely love this pattern because it mixes simple amigurumi construction with charming colorwork that makes each doll feel special. The shape is compact and squishy, perfect for gifting or collecting, and the fair isle panel adds a delightful handmade touch. I enjoy how quickly a finished mouse comes together β€” it feels rewarding to complete in just a few focused sessions. The pattern also encourages learning small shaping techniques like leg division and sewn-on snouts which make the finished face so expressive.

Mini Mouse Amigurumi Pattern step 1 - construction progress Mini Mouse Amigurumi Pattern step 2 - assembly progress Mini Mouse Amigurumi Pattern step 3 - details and accessories Mini Mouse Amigurumi Pattern step 4 - final assembly and finishing

Switch Things Up

I love customizing this pattern by changing the color panel β€” try pastel tones for a soft nursery friend or bold contrasting colors for a playful look.

I sometimes make a smaller keychain version by using thinner yarn and a smaller hook; the same rounds produce an adorable mini treasure.

I often add embroidered freckles or tiny whiskers with a contrasting thread to give each mouse a unique expression and personality.

If you want a posable doll, I add a short piece of craft wire inside the arms before stitching them closed so I can tweak the pose for display.

Try swapping the fair isle section for stripes or a simple color block to practice color changes without following the chart exactly.

I recommend experimenting with eye types β€” safety eyes, embroidered eyes, or glued beads each give a different feel and are worth testing.

To make a softer, cuddlier version, use a larger hook with bulkier yarn and slightly understuff the head to keep the shape plush and huggable.

I also enjoy making tiny outfits or props, like a small scarf or felt bow, which are quick to add and make the mouse gift-ready.

For a quick handmade gift, I attach a key ring or loop to the head before final assembly so it becomes a wearable charm instantly.

I encourage you to try different yarn textures β€” cotton, acrylic, or blends will change drape and stitch definition and can be a fun design choice.

Common Mistakes & How to Fix Them

βœ— Not changing yarn colors according to the symbol chart; follow the color-change instructions on page 1 exactly to achieve the intended pattern and avoid mismatched panels. βœ— Forgetting to place stitch markers when dividing the legs; use markers to clearly mark the 6-st center gap and the 31st stitch to ensure correct leg placement. βœ— Overstuffing components causing distortion; stuff gradually and evenly, especially the head and legs, to retain the intended shape. βœ— Skipping counting rounds during increases results in incorrect stitch counts; count after each increase round and verify the totals shown in brackets. βœ— Pulling the yarn tail too tight when closing the leg causes puckering; weave the tail through the front loops evenly and pull gently to close the gap.

Mini Mouse Amigurumi Pattern

Make a charming mini mouse amigurumi you can finish in a weekend. This pattern includes full round-by-round instructions, symbol charts, and assembly guidance so you can follow along easily. Youll learn shaping for the head, body, legs, ears, arms, and the little snout details that give this mouse its personality. Perfect as a handmade gift or shelfie β€” create a cozy, collectible friend with clear step-by-step directions.

Intermediate 5-7 Hours

Materials Needed for Mini Mouse Amigurumi Pattern

β€” Main Fabric

  • 01
    Worsted weight yarn (suggested colors): Beige yarn (small amount for pattern details)
  • 02
    Yellow yarn (small amount for feet detail)
  • 03
    White yarn (for snout)
  • 04
    Brown yarn (main body/head color)
  • 05
    Orange yarn (ear inner color)
  • 06
    Red yarn (main body/pattern color)

β€” Tools Required

  • 01
    Crochet hook 5/0 (3mm)
  • 02
    Yarn needle for sewing and weaving ends
  • 03
    Scissors
  • 04
    Stitch markers
  • 05
    Polyester stuffing (fiberfill)
  • 06
    Glue (to glue the eyes on the face if preferred)
  • 07
    5mm Black plastic eyes x2
  • 08
    Wooden pins for straightening the doll's feet (optional)

Progress Tracker

0% Complete

β€” Head :

Rnd Use the Brown yarn to make MAGIC RING :

Use the Brown yarn to make MAGIC RING.

Round 1 :

scx6 in the yarn loop, tighten the loop [6 sts]

Round 2 :

(2-sc inc) x 6 [12]

Round 3 :

(scx1, 2-sc inc) x 6 [18]

Round 4 :

(scx2, 2-sc inc) x 6 [24]

Round 5 :

(scx3, 2-sc inc) x 6 [30]

Round 6 :

(scx4, 2-sc inc) x 6 [36]

Round 7 :

(scx5, 2-sc inc) x 6 [42]

Round 8 :

(scx6, 2-sc inc) x 6 [48]

Round 9~36 :

sc in all 48 st [48]

Info :

*Change the color of the yarn according to the SYMBOL PATTERNS on page 1. Changing the yarn color is not mentioned in the descriptive design below. Eyes location: between Rnd 13 and 14. Cheek location: between Rnd 14 and 15.

β€” Body :

Round 20~36 :

sc in all 48 st [48]

Info :

Follow the symbol pattern on page 1 for color changes in Rnd 20-36 using Red and Beige yarns to create the fair isle panel.

β€” Divide The Legs :

Info :

To make a leg, identify the center space between the legs by the 6 stitches, and each leg identifies the other by 18. (Use stitch markers to help.) Sc at the 31th st of the Rnd 36. This sc is the first st of the first leg (left leg). Continue working on the first leg (left leg).

β€” Legs :

Round 37~40 :

sc in all 18 st [18]

Round 41 :

(scx1, sc2tog) x 6 [12]

Round 42 :

(sc2tog) x 6 [6]

Info :

Fasten off, leaving a long tail. Stuff the leg. Using a yarn needle, weave the yarn tail through the front loop of each remaining st and pull tight to close.

Second leg (Right leg) :

Rejoin the Red yarn to 7th back unworked st of Rnd 36. This sc is the first st for the second leg (right leg). Continue working the second leg (right leg) the same way as the first leg (left leg), from Rnd 37–42. Using a yarn needle, sew the 6 sts between the legs.

β€” Arm x2 :

Rnd Use the Brown yarn to make MAGIC RING :

Use the Brown yarn to make MAGIC RING.

Round 1 :

scx5 in the yarn loop, tighten the loop [5 sts]

Round 2 :

(2-sc inc) x 5 [10]

Round 3~11 :

sc in all 10 st [10]

Info :

Fasten off, leaving a long tail for sewing. Flatten the ARM, do not stuff.

β€” Snout :

Rnd Use the White yarn to make 4 chains :

Use the White yarn to make 4 chains.

Round 1 :

scx1 in second ch from hook ,scx1 in the next chain, scx3 in the bottom chain, Working up the other side-scx1, scx2 in the next chain, slst [8 sts]

Round 2 :

ch 1, 2-sc inc, scx1, (2-sc inc) x 3, scx1, (2-sc inc) x 2, slst [14]

Round 3 :

ch 1, 2-sc inc, scx3, 2-sc inc, scx2, sc2tog, scx1, sc2tog, scx2, slst [14]

Round 4 :

ch 1, sc in all 14 st, slst [14]

Info :

Fasten off, leaving a long tail for sewing. Fill in some stuffing to the snout. And then make a nose and mouth on the snout. Section for the snout stitching on the face is shown in the illustration; align snout centered between eyes (eyes located between Rnd 13 and 14).

β€” Ear x2 :

Rnd Use the Orange yarn to make MAGIC RING :

Use the Orange yarn to make MAGIC RING.

Round 1 :

scx6 in the yarn loop, tighten the loop [6 sts]

Round 2 :

(2-sc inc) x 6 [12]

Round 3 :

(scx1, 2-sc inc) x 6 [18]

Round 4 :

(scx2, 2-sc inc) x 6 [24]

Info :

Fasten off, and make another Orange ear, two Brown ears by the same way.

Round 5 (Edging) :

Locate orange colored ear part on the brown ear, and then SC together with brown yarn. (Orange: the stitches only through backloop/ Brown: go through both loops). [24]

Info :

Fasten off, leaving a long tail for sewing. Attach ears to the top of the head using the photograph references for location measurements. Use the edging step to join inner orange disc to brown ear before sewing.

β€” Assembly / Placement Notes :

Info :

Arms location: between Rnd 20 and 21. Cheek location: between Rnd 14 and 15. Eyes location: between Rnd 13 and 14. Sew the 6 sts between the legs to reconnect the body after making both legs.

Assembly Instructions

  • Attach the snout to the face centered between the eyes (eyes located between Rnd 13 and 14) and sew securely using the long tail left on the snout, then embroider nose and mouth.
  • Position and sew the arms between Rnd 20 and 21 on each side of the body, flattening the arm and using the long tail to stitch in place; do not stuff the arms.
  • After making both legs, use a yarn needle to sew the 6 sts between the legs to join the legs and stabilize the bottom of the body.
  • Join inner orange ear discs to the brown ear using the edging method (orange through back loop only, brown through both loops) then sew the completed ears to the top of the head in the positions shown between Rnd 6-8 and following the illustration.
  • Insert and secure 5mm black plastic eyes between Rnd 13 and 14 before stuffing the head firmly; glue the eyes in place if preferred for extra security.

Important Notes

  • πŸ’‘Change yarn colors according to the SYMBOL PATTERNS on page 1 when working Rnd 20~36 to create the fair isle panel.
  • πŸ’‘Use stitch markers when dividing the legs to mark the center 6-st gap and the 31st stitch of Rnd 36 for accurate placement.
  • πŸ’‘Place eyes and facial features before final stuffing to ensure correct alignment; eyes are located between Rnd 13 and 14 and cheeks between Rnd 14 and 15.
  • πŸ’‘Weave in ends as you go and leave long tails for sewing pieces together to make assembly easier.
  • πŸ’‘Stuff firmly but not overly tight to preserve shape; overstuffing can distort the stitch pattern and body proportions.

This Mini Mouse is a cozy, pocket-sized friend thats fun to make and even more fun to gift. The fair isle torso adds handmade charm while the sewn snout and ears give a playful personality. Create a little collection in different colors β€” they make perfect little presents and shelf friends. 🧢🐭✨

You ask,

we answer.

FAQs

What size will the finished piece be?

The finished amigurumi measures approximately 15 cm (5.9 inches) tall when using worsted yarn and a 3.0 mm crochet hook, or similar if using fingering weight on a 3 mm hook.

Can I use different yarn weights for this pattern?

Yes, you can use different yarn weights but your finished size will change; if you use fingering weight yarn with a 3mm hook the pattern will yield approximately the same size listed, while bulkier yarns will make a larger doll.

Do I need prior crochet experience for this pattern?

This pattern is rated Intermediate: basic crochet experience including working in the round, increases, decreases, and simple color changes is recommended for best results.

How long does this project typically take to complete?

Most crocheters complete this project in 5-7 hours, though time may vary depending on experience, color changes, and assembly speed.