🧢 Beautiful ✨ Detailed πŸ’ Adorable

Mini Flower Basket & Flowers Amigurumi Pattern

Mini Flower Basket & Flowers Amigurumi Pattern
4.3β˜… Rating
5-7 Hours Time Needed
1.8K Made This
βœ‚οΈ

Intermediate Level

Ideal for those with basic crochet experience, featuring slightly more advanced stitches and techniques to expand your skills.

⏱️

Weekend Treat

Takes 5-7 hours, making it an enjoyable project to finish over a couple of days.

🏑

Cozy Accent

A warm touch for your space that transforms ordinary corners into inviting nooks filled with handmade charm.

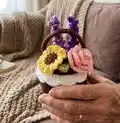
About This Mini Flower Basket & Flowers Amigurumi Pattern

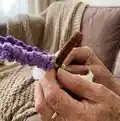
This pattern creates a tiny crochet basket with a scalloped lace edge and handle, plus a variety of mini flowers and leaves to fill it. It is designed for small-gauge yarn and thin hooks to produce delicate, detailed pieces. Techniques include working in the round, working with wire inside a round, and simple fabric-rolling for the rose.

Mini Flower Basket & Flowers Amigurumi Pattern crochet pattern - detailed view of completed project

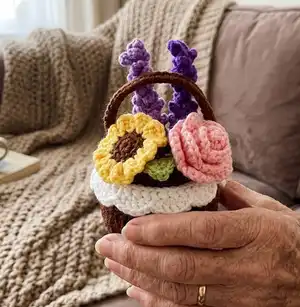
Complete round-by-round instructions are provided for every piece along with assembly tips and wiring guidance. Perfect for gift-giving, shelf decor, or as a sweet practice project for small amigurumi work.

Why You'll Love This Mini Flower Basket & Flowers Amigurumi Pattern

I absolutely love this pattern because it combines tiny, detailed flowers with a sweet little basket that feels special to assemble. I enjoy the delicate shaping of the rose and the playful texture of the lavender spikes. The pattern lets me mix colors and experiment with different yarns to create unique arrangements. I find it so satisfying to tuck each mini bloom into the basket and see the finished composition come together.

Mini Flower Basket & Flowers Amigurumi Pattern step 1 - construction progress Mini Flower Basket & Flowers Amigurumi Pattern step 2 - assembly progress Mini Flower Basket & Flowers Amigurumi Pattern step 3 - details and accessories Mini Flower Basket & Flowers Amigurumi Pattern step 4 - final assembly and finishing

Switch Things Up

I love how easy it is to customize color palettes for this set; I often choose pastel tones for a soft look or bold contrasts for a bright display.

I sometimes change yarn weight and hook sizes to make a larger or smaller basket; switching to bulky yarn creates a chunky, statement piece.

I like to replace wired stems with pipe cleaners for kid-friendly versions that still hold a pose well.

I often add tiny beads or French knots to the center of flowers for added texture and a little sparkle.

I sometimes glue small felt leaves under the petals for a softer, flatter option that sits snugly inside the basket.

I also experiment with scented sachets tucked into the basketβ€”dabbing a little essential oil on a hidden felt piece gives a lovely aroma.

I enjoy making multiples of one flower type to create a bouquet look, or mixing different species for a wildflower-style arrangement.

I sometimes mount a finished mini basket on a gift box or card for a unique, handcrafted present that doubles as decor.

I recommend practicing the (put wire on) technique on a scrap to get comfortable before working on final pieces; it makes wiring neater and easier to hide.

If you want a wearable option, you can shorten wires and attach a loop to the basket base to make a brooch or pendantβ€”just protect wires well for safety.

Common Mistakes & How to Fix Them

βœ— Skipping the step to put wire on where instructed can lead to floppy stems; follow the (put wire on) instruction and secure the wire in place as shown so stems hold shape. βœ— Forgetting to sew the basket lace to Round 8 before Round 9 can make alignment awkward; attach the lace to the edge of Round 8 first, then continue with Round 9 for a neat finish. βœ— Overstuffing the basket body will distort its shape and make sewing difficult; stuff the basket body halfway through sewing and adjust stuffing gradually for an even shape. βœ— Not using the correct hook sizes for each piece results in inconsistent sizing; use 3.0mm/3.5mm for the basket and 2.0mm/2.5mm for flower details to match gauge and proportions.

Mini Flower Basket & Flowers Amigurumi Pattern

Create a charming mini crochet flower basket filled with tiny handmade blooms using this complete pattern. You will learn to crochet a basket with lace and handle, plus a collection of mini flowers (lavender, sunflower, rose, tulip, forget-me-not) and leaves, then assemble them into a sweet display. The pattern includes full round-by-round instructions, materials, abbreviations, and assembly tips so you can finish a delightful little decoration.

Intermediate 5-7 Hours

Materials Needed for Mini Flower Basket & Flowers Amigurumi Pattern

β€” Main Fabric

  • 01
    Basket: #3 light 5ply yarn (pick colors you like)
  • 02
    Flowers: #2 fine 4ply yarn (pick colors you like)

β€” Tools Required

  • 01
    Crochet hook size 3.0mm
  • 02
    Crochet hook size 3.5mm (optional for basket)
  • 03
    Crochet hook size 2.0mm
  • 04
    Crochet hook size 2.5mm (optional for flowers)
  • 05
    Stitch markers
  • 06
    Tapestry needle
  • 07
    Scissors
  • 08
    Wire (0.3-0.5mm diameter; To be used as flower stems)
  • 09
    Stuffing

Progress Tracker

0% Complete

β€” Basket Cover :

Round 1 :

14dc in magic loop (14st)

Round 2 :

14dc inc (28st)

Round 3 :

14[dc, dc inc] (42st)

β€” Basket Lace :

Row 1 :

45ch, 44sc, turn (44st)

Row 2 :

11[ch, dc, dc inc, dc, ch, ss] (66st)

β€” Basket Body :

Round 1 :

14dc in magic loop (14st)

Round 2 :

14dc inc (28st)

Round 3 :

14[dc, dc inc] (42st)

Round 4 :

42dc blo (42st)

Round 5-8 :

21[dc, dc flo] (42st)

Info :

Sew the basket lace on the edge of Round 8 before starting Round 9.

Round 9 :

42sc (42st)

Info :

Crochet the basket cover and the body together while crocheting Round 9, or sew them together after you finish Round 9.

Info :

Stuffing the basket body halfway through sewing.

β€” Basket Handle :

Row 1 :

32ch, (put wire on) 31sc (31st)

β€” Mini Leaf :

Round 1 :

7ch, (put wire on) sc, hdc, 2dc, hdc, (3sc), hdc, 2dc, hdc, sc (13st)

β€” Mini Lavender :

Row 1 :

26ch, 10[sc, 3ch, ss-in the 3rd ch], 10[sc, 4ch, ss-in the 4th ch], 5[sc, 5ch, ss-in the 5th ch]

Info :

Wrap the fabric around a wire with the right side facing out.

β€” Mini Forget-Met-Not :

Round 1 :

5[3ch, dc, 3ch, ss] in magic loop

Info :

Make a stamen. 1. Wrap yarn around a wire about 1cm. 2. Bend it into a circle. 3. Insert the wire into the center of the flower.

Info :

Adjust the position of the stamen.

β€” Mini Sunflower :

Round 1 :

6sc in magic loop (6st)

Round 2 :

6inc (12st)

Info :

Make one each with brown and green yarn.

Round 3 :

11[(3ch, dc, 3ch), ss]

Info :

Make the 2 round pieces' wrong sides facing each other, work into any 2 parallel stitches of them, and crochet Round 3 with yellow yarn.

Info :

Insert a wire in the center of the flower.

β€” Mini Rose :

Row 1 :

28ch, work into the 4th chain-12[(3dc), ch, sk], (3dc), turn (51st)

Row 2 :

13[ch, dc, dc inc, dc, ch, ss] (78st)

Info :

Roll the fabric into the shape of a rose, and keep it in shape by sewing.

Info :

Insert a wire in the center of the flower.

β€” Mini Tulip :

Round 1 :

6sc in magic loop (6st)

Round 2 :

6inc (12st)

Round 3 :

6[sc, inc] (18st)

Round 4-8 :

18sc (18st)

Info :

Leave some yarn and sew a cross on the last round.

Info :

Insert a wire in the center of the flower.

β€” Assembly :

Info :

Sew the basket lace on the edge of Round 8 before starting Round 9 for a neat edge.

Info :

Attach the basket cover to the body during Round 9 or sew them together after finishing Round 9.

Info :

Insert wire stems into each flower and adjust the position of stamens and petals before arranging into the basket.

Info :

Insert flowers into the basket and arrange until you are happy with the composition.

Assembly Instructions

  • Sew the basket lace onto the edge of Round 8 before starting Round 9 so the lace aligns neatly with the body edge.
  • Attach the basket cover to the body either by crocheting them together during Round 9 or by sewing the cover to the body after finishing Round 9.
  • Insert a length of wire as instructed into each flower (put wire on rounds) and secure the wire inside by catching it with yarn so stems are stable.
  • Stuff the basket body gradually and finish sewing, stuffing halfway through sewing to maintain shape and avoid lumps.
  • Roll and sew the rose strip into shape and insert a wire in the center of the flower to use as a stem for arranging.

Important Notes

  • πŸ’‘Use the (put wire on) technique at the start of rounds that require wire and crochet that round with the wire under the working yarn.
  • πŸ’‘Sew the basket lace onto Round 8 before beginning Round 9 to ensure the lace edge is secured and aligned.
  • πŸ’‘Stuff the basket body halfway through sewing to keep the piece uniformly filled and properly shaped.
  • πŸ’‘Wrap the lavender fabric around wire with the right side facing out so the finished piece sits correctly on the stem.

This mini flower basket pattern brings tiny botanical charm to your home or gifts with sweet crocheted blooms and a scalloped basket. Handcraft a set of lavender, sunflower, rose, tulip and forget-me-not flowers and arrange them into a cozy basket for display. Perfect for gifting, shelf decor, or making as a set to brighten any space. 🌸🧢

You ask,

we answer.

FAQs

What size will the finished piece be?

The finished mini basket measures only a few centimeters across and each flower is small and delicate; exact size will vary with yarn weight and hook size, but the pieces are intended as petite decorative items.

Can I use different yarn weights for this pattern?

Yes, you can change yarn weight, but it will affect the final size; the pattern uses #3 light 5ply for the basket and #2 fine 4ply for flowersβ€”use appropriate hooks if substituting yarns.

Do I need experience working with wire in crochet?

Basic familiarity with adding wire is helpful; the pattern explains the (put wire on) method and how to crochet with wire for a round, making it accessible to intermediate crocheters.

How long does this project typically take to complete?

Most crafters complete the whole set in about 5-7 hours, depending on experience and how many flowers you make; arranging and finishing may add extra time.