🧶 Beautiful ✨ Detailed 💝 Adorable

Mini Christmas Hat Amigurumi Pattern

Mini Christmas Hat Amigurumi Pattern
4.1★ Rating
1-2 Hours Time Needed
1.7K Made This
✂️

Beginner Friendly Level

Perfect for those just starting their crochet journey, with clear instructions and simple techniques

⏱️

Quick Make

Complete in under 2 hours—lightning fast fun for instant gratification and quick gifts.

🎁

Tiny Treasure

Small, sweet, and gift-worthy creations that fit perfectly in the palm of your hand with detailed charm.

About This Mini Christmas Hat Amigurumi Pattern

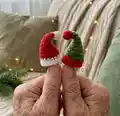
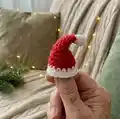
This pattern creates a tiny, adorable Christmas hat you can use as an ornament, doll accessory, or keychain charm. It features simple single crochet rounds, brief increases and decreases for shaping, and a few quick color changes for the brim and pompom. The hat is small and portable, making it a perfect quick handmade gift or seasonal decoration.

Mini Christmas Hat Amigurumi Pattern crochet pattern - detailed view of completed project

Clear round-by-round instructions and video links are provided to guide you through stitch markers, the hat construction, and making a hanging loop. Works up quickly using a 3 mm hook and Yarnart Jeans colors listed in the supplies.

Why You'll Love This Mini Christmas Hat Amigurumi Pattern

I absolutely love this pattern because it is delightfully simple and instantly rewarding to crochet. I enjoy how a few small rounds and color changes create a recognizable festive hat that looks charming on any miniature project. The pattern is great for using leftover yarn and makes quick gifts that are handmade with love. I also appreciate that the design is portable—perfect to crochet while traveling or as a last-minute present.

Mini Christmas Hat Amigurumi Pattern step 1 - construction progress Mini Christmas Hat Amigurumi Pattern step 2 - assembly progress Mini Christmas Hat Amigurumi Pattern step 3 - details and accessories Mini Christmas Hat Amigurumi Pattern step 4 - final assembly and finishing

Switch Things Up

I love how easy it is to customize this hat by changing yarn colors—try metallic or variegated yarn for a festive shimmer.

I sometimes make a tiny brim using a contrasting color to give the hat more definition and character.

To create a larger version, I use a bulkier yarn and a bigger hook; conversely, a thinner yarn and smaller hook makes a miniature keychain charm.

I like to add a small pompom or bell at the tip for extra holiday flair; sew it on securely so it does not come loose.

I often embroider a tiny motif or initial on the brim to personalize the hat for gift-giving.

I recommend experimenting with textured stitches for the body to give a different look, such as alternating front loop and back loop rows.

I sometimes add a short length of wire inside to make a posable tip that can curl or bend for whimsical shapes.

For a flat ornament, try flattening the hat and stitching down the sides to create a little cone-shaped decoration.

I also enjoy grouping several mini hats on a garland, attaching them to a length of ribbon for quick festive decor.

When making multiple hats, I change up the size and colors to create a coordinated set perfect for gift tags or tree decorations.

Common Mistakes & How to Fix Them

✗ Not using a stitch marker can cause you to lose track of the beginning of rounds; use a stitch marker or scrap piece of yarn to mark the first stitch of each round. ✗ Crocheting too loosely will allow gaps where stuffing or background shows through; use a slightly smaller hook than recommended on the yarn label and maintain tight, consistent tension. ✗ Changing colors without fastening ends properly results in loose tails and messy joins; change color by completing the last stitch of the previous color with the new color and weave in ends securely. ✗ Forgetting to count stitches on increase or decrease rounds creates uneven shaping; count your stitches after each shaping round to ensure you have the correct stitch total. ✗ Cutting the yarn too short when fastening off makes finishing difficult; leave a long tail for sewing or weaving in so you can secure the brim and pompom properly.

Mini Christmas Hat Amigurumi Pattern

Create a tiny, festive crochet hat perfect for ornaments, dolls, or keychains. This sweet mini Christmas hat uses simple single crochet rounds and easy color changes to give you a cute seasonal accessory. You will love how fast it works up and how charming it looks on your tree or gifts. Includes video links and clear step-by-step rounds.

Beginner Friendly 1-2 Hours

Materials Needed for Mini Christmas Hat Amigurumi Pattern

— Main Fabric

  • 01
    Yarnart Jeans Green Color 52 (as main color)
  • 02
    Yarnart Jeans White Color 62 (for start/brim and pompom)
  • 03
    Yarnart Jeans Red Color 90 (for brim or accent/pompom)

— Tools Required

  • 01
    3 mm crochet hook
  • 02
    Scissors
  • 03
    Stitch marker or scrap piece of yarn
  • 04
    Yarn needle

Progress Tracker

0% Complete

— Hat :

Info :

To keep track of the beginning of the rounds, use a stitch marker. Video on how to use a scrap piece of yarn as a stitch marker: https://youtu.be/Vs--AuI9l-c

Info :

Start with white color yarn.

Round 1 :

mr, sc 6 = [6]

Round 2 :

sc in each st around = [6]

Round 3 :

(sc 1, dec) x 2 = [4] Change to red color yarn.

Round 4 :

(sc 1, inc) x 2 = [6]

Round 5-6 :

sc in each st around = [6]

Round 7 :

(sc 1, inc) x 3 = [9]

Round 8 :

sc in each st around = [9]

Round 9 :

(sc 2, inc) x 3 = [12]

Round 10 :

(sc 3, inc) x 3 = [15]

Round 11 :

(sc 4, inc) x 3 = [18] Change to white color yarn.

Round 12-13 :

sc in each st around = [18]

Info :

Finish crocheting with sl st.

Info :

Cut the yarn and fasten off.

Info :

Here is a video on how to crochet the hat: https://youtu.be/PIT4rIFQrSQ

Info :

Please watch the video on how to make a hanging loop: https://youtu.be/u_4pnU7PkaM

Assembly Instructions

  • If adding a hanging loop, create the loop using the video instructions and securely attach it to the top tip of the hat before fastening off.
  • Attach the pompom (if used) to the tip of the hat by sewing through the center with a yarn needle and securing with several passes to prevent loosening.
  • Weave in all yarn tails on the inside of the hat and trim any excess to keep a neat finish and avoid visible ends on the brim.
  • When changing colors for the brim or pompom, complete the last stitch of the previous color with the new color to create a clean join, then weave ends neatly.
  • Block or shape the finished hat gently by pinching and molding with your fingers to achieve the desired curve before final trimming.

Important Notes

  • 💡Use a stitch marker to keep track of the beginning of each round, especially when making increases and decreases.
  • 💡Pick a crochet hook at least a size smaller than suggested on the yarn label and crochet tightly enough to avoid gaps in the fabric.
  • 💡You can vary the size by using finer or bulkier yarn and adjusting the hook size, but expect changes in final measurements.

This Mini Christmas Hat is a delightful tiny project that brings holiday charm to any gift or decoration. It works up quickly and looks adorable on trees, dolls, or as a sweet keychain. Make a whole set in different colors to spread festive cheer this season! 🎄🧶

You ask,

we answer.

FAQs

What size will the finished piece be?

The finished amigurumi hat measures about 2.76 inches (7 cm) long when using the recommended Yarnart Jeans yarn and a 3 mm hook.

Can I use different yarn weights for this pattern?

Yes, you can use different yarn weights, but the final size will change; use an appropriate hook for your chosen yarn and adjust tension for a tight fabric.

Do I need prior crochet experience for this pattern?

This pattern is beginner friendly and uses basic single crochet, increases, and decreases; familiarity with the magic ring and single crochet is helpful.

How long does this project typically take to complete?

Most crocheters complete this mini hat in under 2 hours, depending on experience and whether you add a pompom or hanging loop.