🧶 Beautiful ✨ Detailed 💝 Adorable

Mini Cherry Bakewell Pattern

Mini Cherry Bakewell Pattern
4.6★ Rating
2-3 Hours Time Needed
1.5K Made This
✂️

Beginner Friendly Level

Perfect for those just starting their crochet journey, with clear instructions and simple techniques

⏱️

Bite-Sized Project

Finishes in 2-4 hours—perfect for an afternoon of creative relaxation.

🎁

Tiny Treasure

Small, sweet, and gift-worthy creations that fit perfectly in the palm of your hand with detailed charm.

About This Mini Cherry Bakewell Pattern

This pattern creates a tiny crocheted Cherry Bakewell—an iced pastry with a little cherry on top. It uses DK yarn and simple rounds to build the iced top, cherry and pastry base for a neat, miniature finish. The design includes tips for a flat iced top and a tidy, layered pastry base for the best small-scale result.

Mini Cherry Bakewell Pattern crochet pattern - detailed view of completed project

Perfect for small gifts, play food, or market stalls, this pattern is compact and satisfying to make. Clear round-by-round instructions and a helpful stuffing tip ensure straight edges and a professional look.

Why You'll Love This Mini Cherry Bakewell Pattern

I absolutely love this pattern because it turns a classic bakewell tart into a tiny, irresistible crochet treat. I enjoy how quickly each piece comes together, making it a perfect project for evenings or a relaxing afternoon. The finished tarts look charming whether displayed in a box or made into a set for gifts. I also love the simple stuffing tip included — it really helps achieve a beautifully flat iced top every time.

Mini Cherry Bakewell Pattern step 1 - construction progress Mini Cherry Bakewell Pattern step 2 - assembly progress Mini Cherry Bakewell Pattern step 3 - details and accessories Mini Cherry Bakewell Pattern step 4 - final assembly and finishing

Switch Things Up

I love experimenting with colors for this pattern; try pastel shades for a soft, vintage look or bright tones for playful modern treats.

If you want larger pastries, switch to a bulkier DK or aran yarn and increase your hook size accordingly to get a chunkier result.

I sometimes substitute the cherry with a tiny embroidered heart or a felt circle for a different decorative top.

To make a matching set, change the icing color for each tart so you have a variety of pastel or candy-themed pastries.

I recommend trying different stuffing methods — quilt padding layers give a flatter top, while toy stuffing gives a more domed appearance.

Make tiny gift boxes or a bakery tray to display several tarts by crocheting small cases or repurposing small cardboard boxes lined with paper.

I often add a loop at the base to turn the mini tarts into keychains or hangable ornaments for seasonal decorations.

Try embroidering tiny details like icing drips or a glaze highlight with a contrasting thread for extra character.

If you enjoy sewing, attach the tarts to felt bases for play food sets that are sturdy and quick to assemble.

I also like mixing textures — use a slightly fuzzy DK yarn for a rustic effect or a smooth acrylic for crisp, neat edges.

Common Mistakes & How to Fix Them

✗ Using a hook that is too large will create gaps where stuffing shows through; use the recommended 3½ mm hook or one size smaller for tighter stitches. ✗ Skipping counting stitches after increases can lead to incorrect stitch counts and uneven rounds; count each round carefully and mark the start of rounds with a marker. ✗ Stuffing too early or too much during joining will distort the pastry shape; stuff gradually when instructed (about 2/3 through joining) to keep the edges neat. ✗ Cutting the cherry yarn tail too short prevents neat attachment; leave a long tail and sew from the magic circle or push the tail inside the dome as instructed to secure it.

Mini Cherry Bakewell Pattern

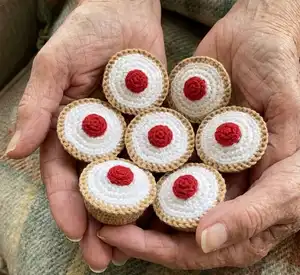
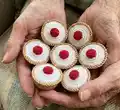
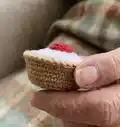
Make a delightful miniature Cherry Bakewell with this easy crochet pattern. You will create a tiny iced tart with a little cherry on top using DK weight yarn and simple crochet techniques. The pattern is perfect for gifts, play food, or display—ideal if you love making small, detailed projects. Clear rounds and finishing tips help you achieve neat, flat icing and crisp pastry edges.

Beginner Friendly 2-3 Hours

Materials Needed for Mini Cherry Bakewell Pattern

— Main Fabric

  • 01
    Paintbox Yarns Simply DK (100% Acrylic; 276m/302yds per 100g ball)
  • 02
    A: Paper White - 5g (for iced top)
  • 03
    B: Pillar Red - 5g (for cherry)
  • 04
    C: Light Caramel - 10g (for pastry base)
  • 05
    Small amounts of yarn for multiple sets (amounts shown are for ONE mini bakewell)

— Tools Required

  • 01
    Crochet hook size 3½ mm (E/4)
  • 02
    Stuffing
  • 03
    Tapestry needle for sewing in ends
  • 04
    Scissors

Progress Tracker

0% Complete

— Introduction :

Infos :

YOU WILL NEED: Paintbox Yarns Simply DK (100% Acrylic; 276m/302yds per 100g ball). A: Paper White, 5g. B: Pillar Red, 5g. C: Light Caramel, 10g. *NB. yarn amounts are for ONE mini bakewell, if you plan to make a set you will need more yarn. Crochet hook size 3½ mm (E/4). Stuffing. Tapestry needle for sewing in ends. Scissors.

Info :

TENSION: Specific tension is not too important for this pattern, as long as it is consistent throughout so that your top and base sections are the same size. If you are using different yarn I would suggest using a size smaller hook than the yarn suggests so that the stitches are slightly tighter, thus avoiding any gaps where stuffing could show through. Please be aware that if you use different yarns you may need more than what is specified for the Paintbox yarns.

Info :

SIZE INFORMATION: The Mini Cherry Bakewell measures 6.5cm diameter, and 3cm high.

Infos :

ABBREVIATIONS & STITCHES: This pattern is written in standard UK crochet terminology. mc - magic circle. ch - chain. ss - slip stitch. st - stitch. dc - double crochet.

— Iced top :

Round 1 :

with A dc7 into magic circle, join with ss to 1st dc (7).

Round 2 :

ch1, 2dc into same st, 2dc into each st around, join with ss to 1st dc (14).

Round 3 :

ch1, dc into same st, 2dc in next st, *dc, 2dc in next st* repeat from * to * 6 times, join with ss to 1st dc (21).

Round 4 :

ch1, dc into same st, dc, 2dc in next st, *dc2, 2dc in next st* repeat from * to * 6 times, join with ss to 1st dc (28).

Round 5 :

ch1, dc into same st, dc2, 2dc in next st, *dc3, 2dc in next st* repeat from * to * 6 times, join with ss to 1st dc (35). Fasten off and sew in ends.

— Cherry :

Round 1 :

with B dc5 into magic circle, join with ss to 1st dc (5).

Round 2 :

ch1, 2dc into same st, 2dc into each st around, join with ss to 1st dc (10).

Round 3 :

ch1, dc into same st, dc into each st around, join with ss to 1st dc (10). Fasten off and cut a tail long enough to sew the cherry to the iced top. Sew in the tail from the magic circle, but instead of cutting the yarn just push it inside the dome of the cherry (instead of using stuffing). Sew the cherry onto the iced top, fasten off and sew in ends.

— Pastry base :

Round 1 :

with C dc7 into magic circle, join with ss to 1st dc (7).

Round 2 :

ch1, 2dc into same st, 2dc into each st around, join with ss to 1st dc (14).

Round 3 :

ch1, dc into same st, 2dc in next st, *dc, 2dc in next st* repeat from * to * 6 times, join with ss to 1st dc (21).

Round 4 :

ch1, dc into same st, dc, 2dc in next st, *dc2, 2dc in next st* repeat from * to * 6 times, join with ss to 1st dc (28).

Round 5 :

ch1, dc into back loop only of same st, dc into back loop only of each stitch around, join with ss to 1st dc (28).

Round 6 :

ch1, dc into same st, dc into each st around, join with ss to 1st dc (28).

Round 7 :

ch1, dc into same st, dc2, 2dc in next st, *dc3, 2dc in next st* repeat from * to * 6 times, join with ss to 1st dc (35).

Round 8 :

ch1, dc into same st, dc into each st around, join with ss to 1st dc (35).

Round 9 :

join top and base together: with iced top and pastry base held together, right sides out, ch1 and dc into same st of base as well as through back loop only of top. Join base and top by working dc around the edge, making sure to hook through both loops of each base stitch and back loop only of each stitch around the top. When you have joined about 2/3, stuff before completing to close. Join with ss to 1st dc, fasten off and sew in ends.

Info :

Stuffing Tip: instead of regular toy stuffing, you could use quilt padding cut into small circles and layered to fill your pastry. This will give really straight edges, and a beautifully flat iced top!

Assembly Instructions

  • Sew the cherry onto the iced top using the long tail left from the magic circle; push the tail inside the dome instead of using stuffing to keep the cherry neat.
  • Join the iced top and pastry base by holding them together right sides out and working dc through the base stitch and back loop only of the top, stuffing before finishing about 2/3 of the join.
  • Fasten off and sew in all ends securely after joining is complete to ensure a tidy finish and no loose tails.
  • Use layered small circles of quilt padding or thin batting inside the pastry for a flat iced top and straight pastry edges instead of regular stuffing.
  • Sew the iced top and base edges evenly, making sure to hook through both loops of each base stitch and the back loop only of the top for a neat seam.

Important Notes

  • 💡Use consistent tension throughout to ensure the iced top and pastry base match in size and fit together cleanly.
  • 💡Leave a long tail on the cherry and sew from the magic circle, or push the tail inside the dome instead of using stuffing for a neat finish.
  • 💡Stuff the pastry only after joining about two thirds of the edge so you can shape and close the tart neatly without distorting the rim.
  • 💡Fasten off and sew in ends securely to prevent unraveling, and trim excess yarn closely for a tidy finish.

This Mini Cherry Bakewell pattern makes a charming set of tiny pastries perfect for gifting or display. The clear round-by-round instructions and handy stuffing tip help you achieve a beautifully flat iced top every time. Whether you're making one or a dozen, these little treats are sure to delight and bring a smile. 🧁 Handmade joy awaits! 🎀

You ask,

we answer.

FAQs

What size will the finished piece be?

The finished Mini Cherry Bakewell measures approximately 6.5 cm in diameter and 3 cm high when made with the recommended DK yarn and 3½ mm hook.

Can I use different yarn weights for this pattern?

Yes, you can use different yarn weights but the final size will change; use a suitably sized hook and consider going one size smaller than recommended to avoid gaps.

Do I need prior crochet experience for this pattern?

This pattern is beginner friendly and uses basic UK stitches like dc and ch, but familiarity with working in the round and increases will help you achieve the best results.

How long does this project typically take to complete?

Most makers can complete a single mini bakewell in about 2-3 hours, though time will vary depending on experience and finishing details.