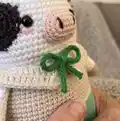
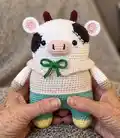
Make a sweet mini milk cow amigurumi you can finish in an afternoon. This friendly pattern walks you through head, body, legs, arms, ears, snout, horns and collar with clear rounds and symbol charts. Perfect for gifting or adding to your handmade toy collection, it includes materials, stitch abbreviations and assembly notes so you can create a polished finished doll.
Progress Tracker
0% Complete
— Head / Body / Legs :
Info :
Change the color of the yarn according to the SYMBOL PATTERNS. Changing the yarn color is not mentioned in the descriptive design.
Rnd 1 :
Use the White yarn to make MAGIC RING. scx6 in the yarn loop, tighten the loop [6 sts]
Rnd 2 :
(2-sc inc) x 6 [12]
Rnd 3 :
(scx1, 2-sc inc) x 6 [18]
Rnd 4 :
(scx2, 2-sc inc) x 6 [24]
Rnd 5 :
(scx3, 2-sc inc) x 6 [30]
Rnd 6 :
(scx4, 2-sc inc) x 6 [36]
Rnd 7 :
(scx5, 2-sc inc) x 6 [42]
Rnd 8 :
(scx6, 2-sc inc) x 6 [48]
Rnd 9-19 :
sc in all 48 st [48]
Rnd 20 :
sctbl in all 48 st [48]
Rnd 21-36 :
sc in all 48 st [48]
Info :
Place eyes between Rnd 13 and 14. Eyes location between Rnd 13 and 14.
Infos :
Cheek location between Rnd 14 and 15. Arms location between Rnd 20 and 21.
Info :
Divide the legs: To make a leg, identify the center space between the legs by the 6 stitches, and each leg identifies the other by 18. Use stitch markers to help.
Info :
Sc at the 31th st of the Rnd 36. This sc is the first st of the first leg (left leg). Continue working on the first leg (left leg).
Rnd 37-40 :
sc in all 18 st [18]
Rnd 41 :
(scx1, sc2tog) x 6 [12]
Info :
Fasten off, leaving a long tail. Stuff the leg. Using a yarn needle, weave the yarn tail through the front loop of each remaining st and pull tight to close.
Info :
Second leg (Right leg): Rejoin the Sky blue yarn to 7th back unworked st of Rnd 36. This sc is the first st for the second leg (right leg). Continue working the second leg the same way as the first leg from Rnd 37-42.
Info :
Using a yarn needle, sew the 6 sts between the legs to connect them together.
— Arm :
Info :
Make 2 arms. Use the Beige yarn to make MAGIC RING for each arm.
Rnd 1 :
scx5 in the yarn loop, tighten the loop [5 sts]
Rnd 2 :
(2-sc inc) x 5 [10]
Rnd 3-4 :
sc in all 10 st [10]
Rnd 5 :
sctbl in all 10 st [10]
Rnd 6-11 :
sc in all 10 st [10]
Info :
Fasten off, leaving a long tail for sewing. Flatten the ARM, do not stuff.
— Snout :
Info :
Use the Light peach yarn to make 4 chains for the snout.
Rnd 1 :
scx1 in second ch from hook, scx2 in the next chain, scx3 in the bottom chain, working up the other side-scx2, scx2 in the next chain, slst [10 sts]
Rnd 2 :
ch 1, scx4, 3-sc inc, scx4, 3-sc inc, slst [14]
Rnd 3-4 :
ch 1, sc in all 14 st, slst [14]
Info :
Fasten off, leaving a long tail for sewing. Fill in some stuffing to the snout. Then make a nose and mouth on the snout.
— Horn x2 :
Info :
Use the Dark brown yarn to make MAGIC RING for each horn.
Rnd 1 :
scx4 in the yarn loop, tighten the loop [4 sts]
Rnd 2 :
sc in all 4 st [4]
Rnd 3 :
2-sc inc, scx3 [5]
Rnd 4 :
2-sc inc, scx4 [6]
Info :
Fasten off, leaving a long tail for sewing. Do not stuff the horns.
— Collar :
Info :
Use the White yarn to make 49 chains for the collar.
Rnd 1 :
scx1 in second ch from hook, scx47 [48 sts]
Rnd 2 :
ch 3, turn, dc2tog in second & third st, hdc, scx40, hdc, dc3tog [48]
Info :
Fasten off, leaving a long tail for sewing. Please sew Collar in the Rnd 20. Place Collar in the center of sheep's face. Then sew 6 stitches to each side. Hang a metal bell on the green yarn and tie the ribbon.
— Ear x2 :
Info :
Make two Light peach inner ears and two White outer ears. Use Light peach yarn to make MAGIC RING.
Rnd 1 :
scx6 in the yarn loop, tighten the loop [6 sts]
Rnd 2 :
(2-sc inc) x 6 [12]
Info :
Fasten off, and make another Light peach ear, two White ears by the same way.
Rnd 3 (Edging) :
Locate Light peach colored ear part on the white ear, and then SC together with white yarn. [12]
Info :
Fasten off, leaving a long tail for sewing. Complete face details and doll assemblies by referring to illustrations showing location for each part and pictures in the following description.
This Milk Cow amigurumi pattern is designed to make a lovable mini companion you can treasure or gift. It includes clear rounds, symbol charts for colorwork, and step-by-step finishing notes to help you achieve a neat, professional look. Have fun stitching every little detail and enjoy the charm of your handmade cow! 🧶🐮