🧢 Beautiful ✨ Detailed πŸ’ Adorable

Meowth Amigurumi Pattern

Meowth Amigurumi Pattern
4.2β˜… Rating
5-7 Hours Time Needed
3.0K Made This
βœ‚οΈ

Intermediate Level

Ideal for those with basic crochet experience, featuring slightly more advanced stitches and techniques to expand your skills.

⏱️

Weekend Treat

Takes 5-7 hours, making it an enjoyable project to finish over a couple of days.

🧸

Cute Companion

An adorable friend to cherish, handcrafted with love to bring comfort and joy for years to come.

About This Meowth Amigurumi Pattern

This pattern creates a small Meowth-inspired amigurumi with needle-felted eyes, a curled gold tail tip, and a gold forehead plate. You will make a head, body, arms, legs, ears, tail, and small details like whiskers and fingers. It uses small hooks and DK yarn for a compact, well-shaped finished toy.

Meowth Amigurumi Pattern crochet pattern - detailed view of completed project

Needle felting is used for the eyes and colour detail on the ears; alternative methods are suggested if you prefer. Full stitch-by-stitch rounds and clear assembly guidance are included to help you finish a professional-looking figure.

Why You'll Love This Meowth Amigurumi Pattern

I absolutely love this pattern because it combines classic amigurumi construction with adorable character details that bring Meowth to life. I enjoyed designing the curled gold tail and the tiny gold forehead plate β€” they give the piece a lot of personality. The pattern balances shaping and simple repetition so it feels satisfying to make without being overwhelming. I also love the way needle-felted eyes create expression; they make each finished piece unique and expressive.

Meowth Amigurumi Pattern step 1 - construction progress Meowth Amigurumi Pattern step 2 - assembly progress Meowth Amigurumi Pattern step 3 - details and accessories Meowth Amigurumi Pattern step 4 - final assembly and finishing

Switch Things Up

I love how easy it is to customise this pattern by changing colours β€” try pastel shades for a softer, characterful friend or bold colours for a stylised version.

Want a larger Meowth? Use a bulkier yarn and a larger hook; the shaping rounds stay the same but the finished size will increase dramatically.

If you prefer not to needle felt, make the eyes from felt pieces sewn on or embroider them using stranded cotton for a flat but expressive look.

Swap the gold embroidery floss for metallic thread or sequined felt for a sparkly forehead plate that really stands out under light.

I often add wire inside the tail and legs for extra poseability β€” this helps the amigurumi stand or hold small props for display photos.

Try embroidering different mouth shapes to give Meowth a playful or grumpy personality β€” small adjustments to mouth placement make a big difference.

Add removable accessories like tiny scarves, a collar, or a mini coin using contrasting yarn to give each doll a unique outfit.

Experiment with eye placement to change expression: closer together for a mischievous look, or slightly further apart for a sweeter expression.

For a collector set, make a set of cats in coordinating colours and line them up on a small shelf or in a display box β€” they make great gifts.

I recommend making one prototype in scrap yarn first to practice assembly and placement before using your final yarn choices.

Common Mistakes & How to Fix Them

βœ— Skipping stitch markers during round work can make it hard to track the start of each round; place a marker at the first stitch of each round and move it as you go. βœ— Not stuffing gradually causes lumps and uneven shaping; add stuffing little by little and shape the piece as you continue crocheting to maintain an even silhouette. βœ— Forgetting to change colour exactly where instructed can leave visible joins; always change colour neatly at the start of the new round and weave in ends securely. βœ— Pulling your tension too tight on small hooks makes pieces stiff and hard to assemble; keep a consistent, moderate tension and practice on a small swatch if needed. βœ— Sewing pieces without pinning risks misaligned features; pin all parts in place and check against the reference photos before sewing permanently.

Meowth Amigurumi Pattern

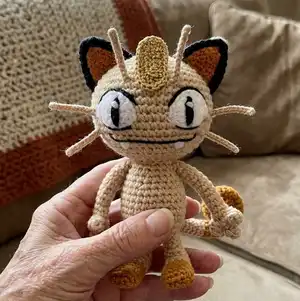
Make your own Meowth-inspired amigurumi with complete step-by-step instructions, from head shaping to the gold forehead plate and needle-felted eyes. This pattern uses Stylecraft Special DK with small hooks for a neat, collectible-sized toy. Follow the detailed rounds and assembly notes to create a polished, poseable figure perfect for gifting or display.

Intermediate 5-7 Hours

Materials Needed for Meowth Amigurumi Pattern

β€” Main Fabric

  • 01
    Stylecraft Special DK in Stone (main body colour)
  • 02
    Stylecraft Special DK in Gold (feet and tail tip)
  • 03
    Gold embroidery floss – Anchor colour no. 1037 (gold plate)
  • 04
    Stone coloured embroidery floss – DMC colour no. 842 (whiskers/eye details)
  • 05
    Polyester toy filling (for stuffing all parts)
  • 06
    Fibres in Black, White and a colour similar to Stylecraft Gold for needle felting (for eyes, ear detail and mouth)

β€” Tools Required

  • 01
    Crochet hook size 2mm
  • 02
    Crochet hook size 1.25mm
  • 03
    Scissors
  • 04
    Darning needle / yarn needle for sewing
  • 05
    Stitch markers (or scrap yarn)
  • 06
    Polyester stuffing
  • 07
    Wire (approx. 25cm long) for leg support (optional)
  • 08
    Pins to place pieces before sewing together
  • 09
    Needle felting tool (or Clover Needle Felt Pen)
  • 10
    Small pair of pliers for cutting/handling wire (optional)

Progress Tracker

0% Complete

β€” Head :

Info :

Yarn: Stone. ch4 – we will be working around the chains to make an oval shape.

Round 1 :

inc in second ch from hook, inc in the next two chains. Continue to the other side of the chains: inc in the back of the three chains (12)

Round 2 :

inc, dc 3, inc x 3, dc 3, inc x 2 (18)

Round 3 :

inc x 2, dc 6, inc x 3, dc 6, inc (24)

Round 4 :

(dc, inc) x 2, dc 6, (dc, inc) x 3, dc 6, dc, inc (30)

Round 5 :

(dc 2, inc) x 2, dc 6, (dc 2, inc) x 3, dc 6, dc 2, inc (36)

Round 6 :

(dc 3, inc) x 2, dc 6, (dc 3, inc) x 3, dc 6, dc 3, inc (42)

Round 7 :

dc 42

Round 8 :

(dc 4, inc) x 2, dc 6, (dc 4, inc) x 3, dc 6, dc 4, inc (48)

Round 9 :

dc 48

Round 10 :

(dc 5, inc) x 2, dc 6, (dc 5, inc) x 3, dc 6, dc 5, inc (54)

Round 11-13 :

dc 54

Round 14 :

(dc 5, dec) x 2, dc 6, (dc 5, dec) x 3, dc 6, dc 5, dec (48)

Round 15 :

dc 48

Round 16 :

(dc 4, dec) x 2, dc 6, (dc 4, dec) x 3, dc 6, dc 4, dec (42)

Info :

Start stuffing the head

Round 17 :

(dc 3, dec) x 2, dc 6, (dc 3, dec) x 3, dc 6, dc 3, dec (36)

Round 18 :

(dc 2, dec) x 2, dc 6, (dc 2, dec) x 3, dc 6, dc 2, dec (30)

Round 19 :

(dc, dec) x 2, dc 6, (dc, dec) x 3, dc 6, dc, dec (24)

Round 20 :

dec x 2, dc 6, dec x 3, dc 6, dec (18)

Info :

If you need to stuff the body some more, now's the time to add the bit of stuffing.

Round 21 :

dec x 2, dc 3, dec x 3, dc 3, dec (12)

Round 22 :

dec x 6 (6) Fasten off and sew in loose end.

β€” Body :

Info :

Yarn: Stone

Round 1 :

dc 4 in Magic Ring (4)

Round 2 :

inc in all sts around (8)

Round 3 :

(inc x 2, dc 2) x 2 (12)

Round 4 :

(dc, inc x 3, dc 2) x 2 (18)

Round 5 :

(dc 2, inc x 3, dc 4) x 2 (24)

Round 6-11 :

dc 24

Round 12 :

(dc 4, dec) x 4 (20)

Round 13-14 :

dc 20

Info :

Fasten off and leave a long end to sew the piece onto head. Stuff with fibre fill.

β€” Ears :

Info :

Yarn: Stone

Round 1 :

dc 6 in Magic Ring (6)

Round 2 :

dc 6

Round 3 :

inc in all sts around (12)

Round 4-5 :

dc 12

Round 6 :

(dc, inc) x 6 (18)

Round 7-8 :

dc 18

Info :

Fasten off and leave a long end to sew the piece onto head. Stuff lightly with fibre fill.

β€” Arms :

Info :

Yarn: Stone. Make 2

Round 1 :

dc 6 in Magic Ring (6)

Round 2 :

inc in all sts around (12)

Round 3 :

dec x 6 (6)

Round 4-14 :

dc 6

Info :

Fasten off and leave a long end to sew the piece onto body.

β€” Fingers :

Info :

Yarn: Stone. Make 6 (3 for each hand)

Round 1 :

dc 5 in Magic Ring (5)

Round 2 :

dc 5

Round 3 :

sl st in first dc

Info :

Fasten off and leave a long end to sew the fingers onto hands. Sew one finger to the bottom of the arm, and one finger on either side of this.

β€” Legs & Feet :

Info :

Yarn: Gold & Stone. Make 2. Starting with Gold, ch4 - we will be working around the chains to make an oval shape.

Round 1 :

inc in the second ch from hook, dc and inc in the next two chs. Repeat (inc, dc, inc) on the other side of the chains (10)

Round 2 :

(inc, dc 4) x 2 (12)

Round 3 :

dc 12

Round 4 :

(dec, dc 4) x 2 (10)

Round 5 :

dc 10

Round 6 :

(dec, dc 3) x 2 (8)

Round 7 :

dc 8

Info :

Change colour to Stone

Round 8-10 :

dc 8

Info :

For the next section we will be working in rows to create the heal – no need to fasten off, just continue as follows:

Row 11 (rs) :

dc 1, turn

Row 12 (ws) :

ch1, dc 4, turn

Row 13 (rs) :

ch1, dc 4, – we are now working in rounds again so keep going without turning: – dec in side of row and next dc from previous round, dc 2, dec in next dc and side of next row

Round 14 :

(dc 2, dec) x 2 (6)

Round 15-16 :

dc 6

Info :

Fasten off and leave a long end to sew the pieces onto body. I used a wire to make the legs a bit sturdier and for Meowth to be able to stand on its own.

β€” Tail :

Info :

Yarn: Gold & Stone. Starting with Gold

Round 1 :

dc 6 in Magic Ring (6)

Round 2 :

(inc, dc 2) x 2 (8)

Round 3-29 :

dc 8

Info :

Change colour to Stone

Round 30-41 :

dc 8

Info :

Fasten off and leave a long end to sew the piece onto body. Roll the Gold part of the tail together into a swirl, and leave the Stone part straight.

β€” Gold Plate :

Info :

Using Gold embroidery floss - I used Anchor colour no. 1037 – ch 6, and working around these chains continue:

Round 1 :

(inc, dc 3, inc) x 2 (14)

Round 2 :

(inc, dc 5, inc) x 2 (18)

Round 3 :

(inc x 2, dc 5, inc x 2) x 2 (26)

Info :

Fasten off and leave a long end to sew the piece onto Meowth's face.

β€” Whiskers :

Info :

Make 6. Using stone coloured embroidery floss and your 1.25mm hook, ch 12 (or your desired length)

Round 1 :

Sl st in second ch from hook and in the remaining ten sts.

Info :

Fasten off and leave a long end to sew the piece onto face. I preferred the look from using embroidery floss but you can also use the same yarn. Note that they will look a bit thicker.

β€” Assembly & Needle Felting :

Infos :

Assemble in the same order the pattern is written. I would recommend using a photo of Meowth as reference for best possible outcome. Pin all the pieces in place before sewing to make sure it looks right. Once all the pieces were pinned in place I made the eyes using black and white fibre and my Clover Needle Felt Pen tool. I also used the same method to create the black and gold pattern on the ears, and the mouth and teeth. Needle felting instructions are not included.

Assembly Instructions

  • Assemble in the same order the pattern is written; pin all pieces in place before sewing to ensure correct placement.
  • Sew the body to the head using the long tail left when fastening off the body, matching rounds and keeping the seam neat and tight.
  • Attach arms and legs to the body using the long ends left after fastening off, sewing securely with ladder stitch and reinforcing with extra stitches if needed.
  • Position ears on top of the head and sew in place; use the needle-felting method or embroidery to add the black and gold ear detail before final sewing if preferred.
  • Sew the gold plate to the forehead using the long tail left from the gold plate; position according to the photo reference and secure firmly.
  • Sew the tail to the lower back of the body and roll the gold section into a swirl before final attachment to create the signature curled tail tip.

Important Notes

  • πŸ’‘Use stitch markers to keep track of rounds and the start of each round, especially when changing rounds or shaping the head.
  • πŸ’‘Stuff gradually and evenly to maintain smooth shaping; overstuffing can distort the silhouette and under stuffing will leave gaps.
  • πŸ’‘Pin all parts in place and compare to reference photos before sewing to get symmetrical placement and correct proportions.
  • πŸ’‘Work with consistent tension on the small hooks to achieve the correct gauge and neat stitch definition.

This little Meowth amigurumi is designed to be a charming, compact collectible with characterful details and a curled gold tail tip. The pattern includes full rounds, colour-change notes, and needle-felting guidance for expressive eyes. Make one for a special gift or keep it as a unique shelf companion. 🧢✨🐱

You ask,

we answer.

FAQs

What size will the finished piece be?

The finished amigurumi measures approximately 12 cm tall, 7 cm wide, and about 9 cm from front to back including the tail when using the recommended yarn and hook sizes.

Can I use different yarn weights for this pattern?

Yes, you can use different yarn weights but this will change the final size and look. If you use thicker yarn choose larger hooks and test a swatch to estimate the new size.

Do I need needle felting to make the eyes?

Needle felting was used in the pattern to create the eyes and ear details, but you can substitute embroidered eyes or felt cutouts if you don’t want to needle felt.

How long does this project typically take to complete?

Most crocheters finish this project in 5-7 hours, depending on experience level and how much time is spent on needle felting and finishing details.