About This Manatee Friend Amigurumi Pattern
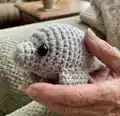
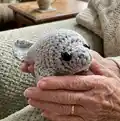
This pattern makes a small, chubby manatee amigurumi with a rounded body, little flippers and a flattened tail. It uses simple single crochet, increases and decreases to shape the body and tail. The instructions are written in US terms and include clear round-by-round counts for easy following.

Ideal for using leftover DK or chunky yarn, you can make a soft little pal in just a few hours. The pattern includes supply list, abbreviations and finishing notes for neat assembly.
Why You'll Love This Manatee Friend Amigurumi Pattern
I absolutely love this pattern because it turns simple stitches into a charming, tactile little friend you can make quickly. I enjoy how the shaping uses basic increases and decreases to create a smooth rounded body and expressive face. The pattern is forgiving and friendly to newer crocheters while still producing a polished result that feels special. I also love that it uses minimal supplies and can be customised with different yarns and hook sizes for a range of sizes and textures. Seeing the tiny manatees come to life when you add the eyes and sew on the fins always makes me smile.
Switch Things Up
I love changing up yarn to create very different textures; try a fluffy/boucle yarn for an ultra-soft, fuzzy manatee or a smooth cotton for a cleaner stitch definition.
You can make this pattern smaller or larger by switching yarn weight and hook size — a 3mm hook with DK will give a tinier manatee while a 5mm hook with chunky yarn will be much bigger and cuddlier.
I often experiment with eye placement to vary personality: moving the eyes slightly closer gives a cuter, more childlike face, whereas wider placement feels more realistic.
Try embroidering a tiny smile or nostrils for added character — a few small surface stitches can make a big difference in expression.
Colour swaps are fun: use two-tone yarn or gradient yarns to create a patterned back or belly for a whimsical look.
Make matching accessories like a tiny crocheted seaweed or shell to pose with your manatee for photography or gifting.
If you want poseable flippers, add a small length of craft wire inside the fin before finishing and sewing; wrap wire ends securely to avoid sharp points.
For a keychain, use thinner yarn and a smaller hook, then attach a keyring to the top with a few secure stitches.
I sometimes make a set of different sized manatees to form a family collection — stitch multiples with slight size variations for charming displays.
Don't be afraid to combine techniques: felt eyes, embroidered details, or tiny crocheted props all make your finished piece unique and personal.
Common Mistakes & How to Fix Them
✗ Placing safety eyes after stuffing can distort the placement and shape; insert and secure eyes between rounds 3 and 4 before heavy stuffing so they sit evenly.
✗ Skipping stitch counts after increases or decreases causes uneven shaping; count your stitches at the end of each round to maintain the correct stitch total.
✗ Overstuffing the body creates a lumpy, misshapen manatee; stuff gradually from the tail forward and check the shape frequently for smoothness.
✗ Using a hook that's too large for your yarn makes the stuffing show through; use a smaller hook (about 0.5-1.0mm smaller) than recommended for tighter stitches.
✗ Sewing fins in place without pinning can result in uneven placement; pin both fins and compare sides before sewing to ensure symmetry.