๐Ÿงถ Beautiful โœจ Detailed ๐Ÿ’ Adorable

Mallard Duck Amigurumi Pattern

Mallard Duck Amigurumi Pattern
4.6โ˜… Rating
5-7 Hours Time Needed
4.0K Made This
โœ‚๏ธ

Intermediate Level

Ideal for those with basic crochet experience, featuring slightly more advanced stitches and techniques to expand your skills.

โฑ๏ธ

Weekend Treat

Takes 5-7 hours, making it an enjoyable project to finish over a couple of days.

๐Ÿงธ

Cute Companion

An adorable friend to cherish, handcrafted with love to bring comfort and joy for years to come.

About This Mallard Duck Amigurumi Pattern

This pattern creates a charming mallard duck amigurumi using super bulky yarn and a 3.5mm hook. It includes no-sew body construction so you crochet from the body up to the head for a neat finish. The pattern covers the yellow duck, mallard color variation and a rooster variant with full round-by-round instructions. Photos and notes help you place eyes, feet and small features accurately.

Mallard Duck Amigurumi Pattern crochet pattern - detailed view of completed project

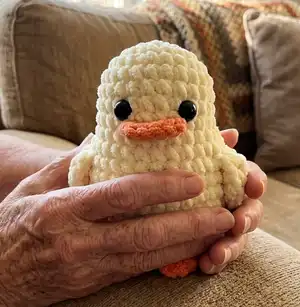
Perfect for crafters who enjoy quick, satisfying projects and cute collectibles. The instructions list all materials, stitch abbreviations and helpful tips for assembly.

Why You'll Love This Mallard Duck Amigurumi Pattern

I absolutely love this pattern because it transforms simple stitches and chunky yarn into a super cute little companion that works up quickly. I enjoy the no-sew construction โ€” it keeps the finish clean and saves time during assembly. The color-change row instructions let me customize each bird easily, creating different personalities like a yellow chick or a mallard. Working with super bulky yarn means the toy is tactile and cuddly, and I always feel excited to gift these to friends and family.

Mallard Duck Amigurumi Pattern step 1 - construction progress Mallard Duck Amigurumi Pattern step 2 - assembly progress Mallard Duck Amigurumi Pattern step 3 - details and accessories Mallard Duck Amigurumi Pattern step 4 - final assembly and finishing

Switch Things Up

I love varying the colors to give each duck its own personality; try pastel yellows, mint greens, or a speckled yarn for a textured look.

To make a mini keychain version, use fingering or sport weight yarn with a smaller hook and safety keyring attached to the top.

I sometimes add a tiny felt scarf or a crocheted hat to dress the duck up for the seasons โ€” these little accessories are quick and fun to make.

If you want a poseable figure, consider threading thin wire into the legs before stuffing to give a stable, poseable stance.

Swap the safety eyes for embroidered eyes or French knots for a fully child-safe toy suitable for small children.

Make a set of ducks in graduated sizes by changing yarn weight and hook size โ€” they look charming grouped together.

Try embroidering small wing details or adding a contrasting slip-stitch border around the body for an accent color band.

I sometimes use metallic or variegated yarn for the beak and feet to add a playful pop of color and sparkle.

For an extra-soft finish, run a lint shaver over the body for a plush, fuzzy surface after finishing (test on a scrap first).

If you prefer sewn-on parts, you can crochet pieces flat and sew them on instead of slip stitching; this allows slightly different placements and stronger attachment.

Common Mistakes & How to Fix Them

โœ— Skipping stitch markers during increases or color changes makes it hard to track rounds; place a marker at the start of each round and move it as you go. โœ— Not stuffing gradually leads to lumps or an uneven shape; stuff a little at a time and shape the body while you go for smooth curvature. โœ— Cutting the yarn too early when making legs will make attachment harder; keep the leg yarn tail long and do the two slip stitches into the body before trimming. โœ— Forgetting to count stitches after increases and decreases produces uneven shaping; count stitches frequently, especially after rounds with INC or DEC.

Mallard Duck Amigurumi Pattern

Create an adorable no-sew mallard duck amigurumi using super bulky yarn and simple stitches. This pattern guides you step-by-step through body, legs, wings and details so you can crochet a cute plush bird. Clear round-by-round instructions and helpful photos make assembly easy for makers who enjoy a cozy project. Perfect for gifting or collecting โ€” follow along and bring your duck to life.

Intermediate 5-7 Hours

Materials Needed for Mallard Duck Amigurumi Pattern

โ€” Main Fabric

  • 01
    Super Bulky yarn (Category 6) - main color (e.g., Yellow) for duck body
  • 02
    Super Bulky yarn (Category 6) - Orange for beak and feet (small amounts)
  • 03
    Super Bulky yarn (Category 6) - Green for mallard head (small amount)
  • 04
    Super Bulky yarn (Category 6) - Brown for mallard body (small amount)
  • 05
    Super Bulky yarn (Category 6) - White for accents and rooster body (small amount)
  • 06
    Super Bulky yarn (Category 6) - Red for rooster comb (small amount)

โ€” Tools Required

  • 01
    Crochet hook size 3.5mm (E)
  • 02
    Stitch marker
  • 03
    Sewing needle (yarn needle)
  • 04
    Scissors
  • 05
    Plastic safety eyes 8mm (for duck) and 6mm (for smaller pieces/rooster)
  • 06
    Hot glue gun
  • 07
    Fiberfill stuffing

Progress Tracker

0% Complete

โ€” Body & Head (Yellow) :

Row 1 :

6 SC in an MR (6)

Row 2 :

6 INC (12)

Row 3 :

(SC, INC) 6 times (18)

Row 4 :

(2 SC, INC) 6 times (24)

Row 5-8 :

24 SC (24)

Row 9 :

5 INC, 14 SC, 5 INC (34)

Row 10 :

9 SC, (5 Ch, turn: SC, HDC, 2 DC), Sk 2, 12 SC, (5 Ch, turn: SC, HDC, 2 DC), Sk 2, 9 SC (34)

Row 11 :

9 SC, 2 SC (Crochet into the two skip stitches in R10), 12 SC, 2 SC (Crochet into the two skip stitches in R10), 9 SC (34)

Row 12-16 :

34 SC (34)

Row 17 :

17 DEC (17)

Info :

*Stuffing*

Row 18 :

(SC, DEC) 5 times, 2 SC (12)

Row 19 :

6 DEC (6)

Info :

Weave in the yarn end and cut

โ€” Legs (MAKE 2) :

Row 1 :

Make 3 CH. Start in the second stitch from the hook: 2 SC (2)

Row 2-3 :

2 SC (2)

Infos :

Keep the yarn without cutting it. Crochet 2 Slip stitches into the body at the position of the feet. Attach eyes on rows 7 and 8, spaced 4 stitches apart.

โ€” Speculum :

Row 1 :

4 Slip stitch into the 4 stitches between rows 8 and 9 (the 4 stitches between the eyes), turn.

Row 2 :

Ch, 4 SC

Info :

Cut the yarn

โ€” Body & Head (Green Mallard Variation) :

Row 1 :

6 SC in an MR (6)

Row 2 :

6 INC (12)

Row 3 :

(SC, INC) 6 times (18)

Row 4 :

(2 SC, INC) 6 times (24)

Row 5-8 :

24 SC (24)

Info :

Change to White yarn

Row 9 :

5 INC, 14 SC, 5 INC (34)

Info :

Change to Brown yarn

Row 10 :

9 SC, (5 Ch, turn: SC, HDC, 2 DC), Sk 2, 12 SC, (5 Ch, turn: SC, HDC, 2 DC), Sk 2, 9 SC (34)

Row 11 :

9 SC, 2 SC (Crochet into the two skip stitches in R10), 12 SC, 2 SC (Crochet into the two skip stitches in R10), 9 SC (34)

Row 12-16 :

34 SC (34)

Row 17 :

17 DEC (17)

Info :

*Stuffing*

Row 18 :

(SC, DEC) 5 times, 2 SC (12)

Row 19 :

6 DEC (6)

Info :

Weave in the yarn end and cut

โ€” Wings: MAKE 2 :

Info :

Use white yarn

Instruction :

Make 4 chains, start with the second chain from the hook: INC, SC, 4SC in the last stitch, SC, INC, 2CH, Picot, CH, SLST in the first stitch

Info :

Weave in the yarn end and cut

โ€” Rooster Body (White Variant) :

Info :

Use white yarn. You'll switch to black yarn the text is in bold and underlined

Row 1 :

6 SC in an MR (6)

Row 2 :

6 INC (12)

Row 3 :

(SC, INC) 6 times (18)

Row 4 :

(2 SC, INC) 6 times (24)

Row 5 :

(3 SC, INC) 6 times (30)

Row 6 :

(4 SC, INC) 6 times (36)

Row 7-8 :

36SC (36)

Row 9 :

7SC, 4SC with the 1st arm, 14SC, 4SC with the 2nd arm, 7SC (36)

Row 10-11 :

36SC (36)

Instruction :

Make 6CH, SLST in the first st, repeat 3 times, crochet with 2 pieces together with 10SLST

Info :

*Stuffing*

Row 12 :

CH, 16SC (16)

Row 13 :

(3SC, INC) 4 times (20)

Row 14-15 :

20SC (20)

Row 16 :

(2 SC, DEC) 5 times (15)

Row 17 :

(SC, DEC) 5 times (10)

Row 18 :

DEC 5 times (5)

Info :

Weave in the yarn end and cut

โ€” Comb :

Info :

Use red yarn.

Instruction :

Crochet crest from R17 to R18. The starting point is straight from the tail going up: (3CH, DC in the same st, SLST in the next stitch) 3 times

Info :

Cut the yarn. Make the mouth with yellow yarn, 3 lines like this at R13. Attach the eyes between R14-R15, apart 3 stitches.

Assembly Instructions

  • Attach legs to the body by crocheting 2 slip stitches from the bottom of each leg into the body at the position of the feet and secure the yarn tail before cutting.
  • Position and attach the safety eyes between the rounds specified: for the duck attach eyes on rows 7 and 8 spaced 4 stitches apart, for the rooster attach eyes between rows 14-15 apart 3 stitches.
  • Sew or slip stitch the wings to each side of the body at the rounds where arms/wings were crocheted, checking photos for natural placement and symmetry.
  • Attach the speculum (beak detail) into the 4 stitches between rows 8 and 9 (the 4 stitches between the eyes), then secure and weave in ends.
  • For the rooster, sew the comb to the top starting at the tail-facing location described (crochet crest from R17 to R18) and add the yellow mouth lines at R13 as shown.

Important Notes

  • ๐Ÿ’กUse stitch markers to mark the beginning of each round, particularly when changing colors or shaping the head and body.
  • ๐Ÿ’กStuff gradually and firmly but not overstuffed; adjust stuffing while you close the body to keep the shape smooth.
  • ๐Ÿ’กKeep yarn tails long when making legs so you can slip stitch them directly into the body before cutting.
  • ๐Ÿ’กWeave in ends securely and trim excess yarn after confirming placement of eyes and details to avoid unraveling.

This delightful Mallard Duck pattern is perfect for quick handmade gifts and cozy decor. ๐Ÿงถ The no-sew body construction makes assembly simple and neat, ideal for makers who love efficient projects. ๐Ÿงต Make a flock in different colors, gift to friends, or keep one for your shelf โ€” these little ducks bring instant smiles. ๐Ÿฅ

You ask,

we answer.

FAQs

What size will the finished piece be?

The finished amigurumi measures approximately 10-12 cm tall when using super bulky yarn and a 3.5mm hook; exact size varies by tension and yarn.

Can I use different yarn weights for this pattern?

Yes, you can use different yarn weights, but this will change the final size significantly; choose an appropriate hook size for the yarn you use and expect different stitch counts to look denser or looser.

Do I need prior crochet experience for this pattern?

This pattern is rated intermediate and uses standard increases and decreases; basic familiarity with single crochet, increases, decreases and reading rounds is recommended.

How long does this project typically take to complete?

Most crocheters complete this project in 5-7 hours across a couple of sessions, though time may vary depending on experience and detail work like eyes and comb placement.