About This Magic Potion Amigurumi Pattern
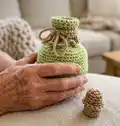
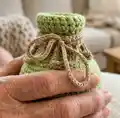
This pattern creates a small crocheted magic potion bottle with a removable cork and decorative hanging tendrils. It uses medium/worsted weight yarn and single crochet shaping to form the bottle, stopper, and embellishments. The finished item measures approximately 6 inches tall and 4 inches wide when made with the recommended hook and yarn.

Techniques used include increases, decreases, working in the back/front loops, and simple surface finishing for decoration. The pattern includes step-by-step rounds and handy photos to guide assembly.
Why You'll Love This Magic Potion Amigurumi Pattern
I absolutely love this pattern because it turns simple stitches into a delightful miniature prop full of character. I enjoy how easily the bottle and cork pair together, and the decorative tendrils give so much charm with minimal effort. I love that it is a quick project you can finish in an afternoon but still produces a polished handmade gift. I also appreciate that the pattern is flexible — you can change colors and sizes to make a whole collection of potions.
Switch Things Up
I love how easy it is to customize this bottle — I often change the yarn color to make different potion themes like healing green or love pink.
I sometimes switch yarn weight and hook size to create tiny keychain potions or chunky shelf potions; just remember to adjust stuffing and fittings.
I add beads or stitched labels to the bottle for extra character; a small embroidered label can tell a potion name or effect.
For a more rustic look I use natural fiber yarns and twine instead of tendrils, which looks great for fantasy or apothecary displays.
I make the cork from a contrasting color or even felt for a different texture and easier stuffing control.
If I want a non-removable stopper, I sew the cork slightly into the neck so it stays fixed as a single piece.
I sometimes embroider tiny symbols on the bottle body before assembly to personalize each potion.
To make a set, I vary sizes by changing hook and yarn and display them together — it creates a playful collection.
For a magical glow effect, I add a small LED tea light inside oversized versions (use safety precautions) or use sparkly metallic thread for accents.
I recommend experimenting with placement of the tendrils and trying different lengths — they can be short bows or long trailing loops depending on the look you want.
Common Mistakes & How to Fix Them
✗ Not counting your stitches after increases and decreases can lead to incorrect shaping; always count at the end of each round and compare with the number in parentheses.
✗ Forgetting to stuff the cork as you go results in a misshapen stopper; stuff gradually and try the cork in the bottle to adjust stuffing for a good fit.
✗ Skipping the FLO round for the bottle top can change how the roll-down looks; work Row 31 in the FLO as instructed to make rolling the top easier.
✗ Pulling yarn too tightly when weaving the closing tail can distort the bottom of the cork; weave evenly and pull gently to flatten the base without puckering.
✗ Not pinning decoration tendrils before sewing may lead to uneven placement; lay tendrils around the neck and pin or hold in place to check symmetry before securing.