🧢 Beautiful ✨ Detailed πŸ’ Adorable

Magic of Autumn Pine Cone Amigurumi Pattern

Magic of Autumn Pine Cone Amigurumi Pattern
4.8β˜… Rating
5-7 Hours Time Needed
1.9K Made This
βœ‚οΈ

Intermediate Level

Ideal for those with basic crochet experience, featuring slightly more advanced stitches and techniques to expand your skills.

⏱️

Weekend Treat

Takes 5-7 hours, making it an enjoyable project to finish over a couple of days.

🎁

Tiny Treasure

Small, sweet, and gift-worthy creations that fit perfectly in the palm of your hand with detailed charm.

About This Magic of Autumn Pine Cone Amigurumi Pattern

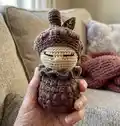
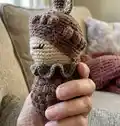
This pattern creates a charming little pine cone amigurumi about 14 cm tall, worked in continuous rounds for a neat finish. The textured bobble stitch gives the body a pine-cone look while a separate hat, stalk and leaf add delightful detail. Techniques used include magic ring, bobble stitch and simple embroidery for the face.

Magic of Autumn Pine Cone Amigurumi Pattern crochet pattern - detailed view of completed project

You will work mainly with a 2.5mm hook and cotton yarn, following exact round-by-round instructions. The pattern includes materials, abbreviations, photos, and an assembly section to finish your tiny autumn friend.

Why You'll Love This Magic of Autumn Pine Cone Amigurumi Pattern

I absolutely love this pattern because it turns simple stitches into a cozy little character full of autumn personality. I enjoy how the bobble stitch creates a beautiful textured body that really resembles a pine cone. I love the small scale β€” it makes the piece perfect for gifts, keychains, or seasonal displays. I also appreciate that the pattern is modular: the head, body, hat, leaf and stalk are worked separately and sewn together, which makes assembly satisfying and precise. Making one always brightens my day and I hope you feel that same joy while crocheting it.

Magic of Autumn Pine Cone Amigurumi Pattern step 1 - construction progress Magic of Autumn Pine Cone Amigurumi Pattern step 2 - assembly progress Magic of Autumn Pine Cone Amigurumi Pattern step 3 - details and accessories Magic of Autumn Pine Cone Amigurumi Pattern step 4 - final assembly and finishing

Switch Things Up

I love customizing this pattern with different color palettes; try soft pastels for a whimsical look or rich browns and greens for a realistic autumn pine cone.

You can change the size by using thicker yarn and a larger hook for a chunky version or thinner yarn and a smaller hook for a mini keychain-sized pine cone.

I often vary the bobble stitch density: repeating the bobble loops 5 times instead of 4 creates deeper texture and more pronounced scales.

Try embroidering the leaf veins with metallic thread for a subtle shimmer that catches light; it elevates the finished piece beautifully.

Swap the collar color or make a tiny crocheted scarf to give each pine cone its own personality and seasonal theme.

I sometimes add a small loop at the top of the hat to turn the pine cone into an ornament for holiday displays.

Consider using safety eyes for a different look, or embroider closed eyes for a sleepy, delicate expression as shown in the pattern photos.

To make a set, mix the original yarns and the alternative variation colors listed in the pattern for coordinated, collectible pine cones.

I also like to stuff the pieces slightly less for a softer, more floppy toy suitable for babies, keeping safety in mind for small parts.

For advanced customization, add a tiny wire inside the stalk for poseable display, or create small accessories like a crocheted basket or acorn to accompany the pine cone.

Common Mistakes & How to Fix Them

βœ— Skipping the stitch marker during continuous rounds leads to misplaced increases and decreases; always place and move a marker at the beginning of each round to stay on track. βœ— Stuffing too early or unevenly can distort shaping; stuff the piece gradually and firmly at the recommended stages to keep a smooth silhouette. βœ— Not counting stitches after increases or decreases causes incorrect stitch counts in subsequent rounds; count your stitches after each round and before shaping changes. βœ— Pulling the yarn too tightly while making bobble stitches makes them small and stiff; maintain even tension and experiment with repeating loops (5 times) for thicker bobbles. βœ— Forgetting to leave a long yarn tail for sewing can make assembly difficult; fasten off leaving enough yarn for secure sewing and hiding the ends.

Magic of Autumn Pine Cone Amigurumi Pattern

Create a tiny, enchanting pine cone amigurumi that captures the charm of autumn. This pattern guides you step-by-step through crocheting the head, body, hat, leaf, stalk and collar with clear rounds and helpful photos. Perfect for gifting or decorating, you will love the textured bobble stitch that gives the pine cone its cozy look. Gather your yarn and hook and enjoy crafting this delightful 14 cm friend.

Intermediate 5-7 Hours

Materials Needed for Magic of Autumn Pine Cone Amigurumi Pattern

β€” Main Fabric

  • 01
    Scheepjes Catona n604 - 1 x 25 grams (color for face/details)
  • 02
    Scheepjes Catona n507 - 1 x 50 grams (main brown body/hat)
  • 03
    Scheepjes Catona n6387 - 1 x 25 grams (green for leaf/embroidery accents)
  • 04
    Alternative variation: Scheepjes Stone Washed n804 - 1 x 50 grams (main light variation)
  • 05
    Alternative variation: Scheepjes Catona n157 - 1 x 50 grams (accent color option)
  • 06
    Alternative variation: Scheepjes Catona n504 - 1 x 25 grams (accent color option)
  • 07
    Cotton yarn as main yarn (use quantities above per color for one pine cone)
  • 08
    Yarn for embroidering (small amount for facial details and leaf veins)

β€” Tools Required

  • 01
    Crochet hook size 2.5mm
  • 02
    Yarn needle
  • 03
    Fiberfill (polyester stuffing)
  • 04
    Scissors
  • 05
    Stitch marker(s)
  • 06
    Cotton yarn (Scheepjes Catona or equivalent)
  • 07
    Embroidery thread or small yarn for facial features

Progress Tracker

0% Complete

β€” Bobble stitch :

Info :

Yarn over, pull through all 5 loops at once; - Single crochet in next stitch; - Repeat the number of times indicated.

Info :

It is possible to vary the thickness of the booble stitch. For exemple, to obtain more relief, we can repeat the work 5 times instead of 4 to have 6 loops on the hook.

β€” Useful tips :

Infos :

Each part is worked in continuous rounds (do not join rounds with a slip stitch) unless instructed otherwise in the pattern. Use a stitch marker to mark the beginning of each round. This will helps you when counting your stitches to compare it with the pattern. The color of the round/row will be indicated with a square just before the round/row instructions.

β€” Head :

Round 1 :

6sc in a magic ring (6)

Round 2 :

inc x 6 (12)

Round 3 :

(1sc, inc) x 6 (18)

Round 4 :

(2sc, inc) x 6 (24)

Round 5 :

(3sc, inc) x 6 (30)

Round 6 :

(4sc, inc) x 6 (36)

Round 7 :

(5sc, inc) x 6 (42)

Round 8 :

(6sc, inc) x 6 (48)

Round 9-15 :

Sc in all st [7 rounds] (48)

Round 16 :

(6sc, dec) x 6 (42)

Round 17 :

(5sc, dec) x 6 (36)

Round 18 :

(4sc, dec) x 6 (30)

Round 19 :

(3sc, dec) x 6 (24)

Info :

Fasten off and leaving enough yarn for sewing. Stuff firmly.

β€” Leaf :

Round 1 :

4sc in a magic ring (4)

Round 2 :

(1sc, inc) x 2 (6)

Round 3 :

(2sc, inc) x 2 (8)

Round 4 :

(3sc, inc) x 2 (10)

Round 5 :

(4sc, inc) x 2 (12)

Round 6-8 :

Sc in all st [3 rounds] (12)

Round 9 :

(2sc, dec) x 3 (9)

Round 10 :

(1sc, dec) x 3 (6)

Info :

Fasten off and leaving enough yarn for sewing. Do not stuff.

β€” Collar :

Info :

Work in rows with green yarn: Ch27, start in the 2nd ch from the hook.

Round 1 :

26sc, ch2, turn (26)

Round 2 :

3Dc in all st, ch1, turn (78)

Round 3 :

1Hdc in all st (78)

Info :

Fasten off and leaving enough yarn for sewing.

β€” Body :

Round 1 :

6sc in a magic ring (6)

Round 2 :

inc x 6 (12)

Round 3 :

inc x 12 (24)

Round 4 :

(BS, 1sc) x 12 (24)

Round 5 :

(1sc, inc) x 12 (36)

Round 6 :

(BS, 1sc) x 18 (36)

Round 7 :

(2sc, inc) x 12 (48)

Round 8 :

(BS, 1sc) x 24 (48)

Round 9 :

Sc in the back loop of all st (48)

Round 10 :

(BS, 1sc) x 24 (48)

Round 11 :

(2sc, dec) x 12 (36)

Round 12 :

(BS, 1sc) x 18 (36)

Round 13 :

Sc in all st (36)

Round 14 :

(BS, 1sc) x 18 (36)

Round 15 :

(4sc, dec) x 6 (30)

Round 16 :

(BS, 1sc) x 15 (30)

Round 17 :

(3sc, dec) x 6 (24)

Round 18 :

(BS, 1sc) x 12 (24)

Round 19 :

Sc in all st (24)

Info :

Fasten off and hide the yarn. Stuff firmly.

β€” Stalk :

Round 1 :

6sc in a magic ring (6)

Round 2 :

inc x 6 (12)

Round 3 :

(3sc, inc) x 3 (15)

Round 4 :

Sc in the back loop of all st (15)

Round 5 :

Sc in all st (15)

Round 6 :

(3sc, dec) x 3 (12)

Round 7 :

Sc in all st (12)

Round 8 :

(2sc, dec) x 3 (9)

Round 9-11 :

Sc in all st [3 rounds] (9)

Info :

Fasten off and leaving enough yarn for sewing. Stuff firmly.

β€” Hat :

Round 1 :

6sc in a magic ring (6)

Round 2 :

inc x 6 (12)

Round 3 :

inc x 12 (24)

Round 4 :

(BS, 1sc) x 12 (24)

Round 5 :

(1sc, inc) x 12 (36)

Round 6 :

(BS, 1sc) x 18 (36)

Round 7 :

(2sc, inc) x 12 (48)

Round 8 :

(BS, 1sc) x 24 (48)

Round 9 :

(3sc, inc) x 12 (60)

Round 10 :

(BS, 1sc) x 30 (60)

Round 11 :

(3sc, dec) x 12 (48)

Round 12 :

(6sc, dec) x 6 (42)

Round 13 :

(5sc, dec) x 6 (36)

Round 14 :

(4sc, dec) x 6 (30)

Info :

Fasten off and hide the yarn.

β€” Assembling :

Info :

With golden thread, embroider the veins of the leaf.

Info :

Sew the stalk to the top of the hat.

Info :

Sew the leaf between the stalk and the hat.

Info :

Sew the head and body together.

Info :

Embroider the nose between round 14 and round 15, 3 sts long. Embroider the base of the eyes between round 13 and round 14, 3 sts long. Embroider the lashes one row above.

Info :

You can use blush to color the cheeks.

Info :

Attach the collar around the neck and put the hat on the head.

Assembly Instructions

  • With golden thread, embroider the veins of the leaf before attaching it to the hat for a neat finish.
  • Sew the stalk to the top center of the hat so it stands upright and is secure for display.
  • Position and sew the leaf between the stalk and the hat, tucking the leaf base under the stalk for stability.
  • Sew the head to the top opening of the body aligning the neck area and secure with a whipstitch.
  • Embroider the nose between round 14 and round 15 (3 sts long), and embroider the base of the eyes between round 13 and round 14 (3 sts long).
  • Attach the collar around the neck and place the hat on the head, adjusting placement before final stitching.

Important Notes

  • πŸ’‘Work each part in continuous rounds; do not join rounds with a slip stitch unless specified for rows.
  • πŸ’‘Use a stitch marker to mark the beginning of each round to make counting and shaping accurate.
  • πŸ’‘Stuff firmly but gradually at shaping stages; overstuffing can distort the textured bobble pattern.
  • πŸ’‘Leave long tails when fastening off to make sewing parts together easier and neater.

Congratulations on making your little pine cone companion! This tiny treasure brings autumn charm to any shelf or nursery and makes a lovely handmade gift. Keep creating and sharing your crafts with joy and warmth. πŸ‚πŸ§Άβœ¨

You ask,

we answer.

FAQs

What size will the finished piece be?

The finished amigurumi measures about 14 cm tall when using the recommended yarn (Scheepjes Catona) and a 2.5mm hook.

Can I use different yarn weights for this pattern?

Yes, you can use different yarn weights, but the final size will change; choose an appropriate hook size for the yarn you select.

Do I need prior crochet experience for this pattern?

This pattern is rated intermediate, so familiarity with magic ring, bobble stitch and basic increases/decreases is recommended.

How long does this project typically take to complete?

Most crocheters finish this project in 5-7 hours, depending on experience and how many details (embroidery, leaf veins) you add.