Bring classic Looney Tunes characters to life with these charming crochet patterns. Youll create Tweety, Sylvester, Bugs Bunny and friends using worsted weight yarn and clear step-by-step rounds. This collection is ideal for crafters who love playful details and sewing assembly to make collectible plush pals.
Progress Tracker
0% Complete
— Tweety :
Finished Size :
10" (25.5 cm)
Materials :
Worsted Weight Yarn: Yellow - 2-1/2 ounces, 140 yards (70 grams, 128 meters). Orange - 1-1/2 ounces, 85 yards (40 grams, 77.5 meters). Black - 2 yards (2 meters). Crochet hook, size F (3.75 mm) or size needed for gauge. Polyester fiberfill. Small amounts of Black, Lt Blue and White felt. Clear-drying craft glue. Yarn needle.
Gauge :
16 sc and 16 rows = 4" (10 cm)
Gauge Swatch :
4" (10 cm) square. With Yellow, ch 17. Row 1: Sc in second ch from hook and in each ch across: 16 sc. Rows 2-16: Ch 1, turn; sc in each sc across. Finish off.
— Body :
Rnd 1 :
(Right side): With Yellow, ch 2, 8 sc in second ch from hook; do not join, place marker.
Rnd 2 :
2 Sc in each sc around: 16 sc.
Rnd 3 :
(Sc in next sc, 2 sc in next sc) around: 24 sc.
Rnd 4 :
(Sc in next 11 sc, 2 sc in next sc) twice: 26 sc.
Rnd 5-9 :
Sc in each sc around.
Rnd 10 :
[Decrease (see Sc Decrease, page 35), sc in next 11 sc] twice: 24 sc.
Rnd 11 :
Sc in next 5 sc, decrease, sc in next 10 sc, decrease, sc in next 5 sc: 22 sc.
Rnd 12 :
(Decrease, sc in next 9 sc) twice: 20 sc.
Rnd 13 :
Sc in next 3 sc, decrease, sc in next 8 sc, decrease, sc in next 5 sc: 18 sc.
Rnd 14 :
(Sc in next 7 sc, decrease) twice: 16 sc.
Rnd 15 :
Sc in next 4 sc, decrease, sc in next 6 sc, decrease, sc in next 2 sc: 14 sc.
Rnd 16 :
(Decrease, sc in next 5 sc) twice; slip st in next sc, finish off: 12 sts.
— Head :
Rnd 1 :
(Right side): Sc in second ch from hook and in next 2 chs, 3 sc in last ch; working in free loops of beginning ch (Fig. 1, page 35), sc in next 2 chs, 2 sc in next ch; do not join, place marker: 10 sc.
Rnd 2 :
2 Sc in next sc, sc in next 2 sc, 2 sc in each of next 3 sc, sc in next 2 sc, 2 sc in each of next 2 sc: 16 sc.
Rnd 3 :
2 Sc in next sc, sc in next 4 sc, 2 sc in each of next 4 sc, sc in next 4 sc, 2 sc in each of next 3 sc: 24 sc.
Rnd 4 :
Sc in next sc, 2 sc in next sc, sc in next 4 sc, (2 sc in next sc, sc in next sc) 3 times, 2 sc in next sc, sc in next 5 sc, (2 sc in next sc, sc in next sc) 3 times: 32 sc.
Rnd 5 :
Sc in next 6 sc, loop a short piece of contrasting color yarn around last sc made to mark front of Head, sc in next 4 sc, (2 sc in next sc, sc in next 2 sc) twice, (2 sc in next sc, sc in next 3 sc) 3 times, 2 sc in next sc, sc in next 2 sc, 2 sc in next sc: 39 sc.
Rnd 6 :
Sc in next 12 sc, (2 sc in next sc, sc in next 2 sc) around: 48 sc.
Rnd 7-9 :
Sc in each sc around.
Rnd 10 :
(Decrease, sc in next 14 sc) around: 45 sc.
Rnd 11 :
Sc in next 5 sc, decrease, (sc in next 13 sc, decrease) twice, sc in next 8 sc: 42 sc.
Rnd 12 :
(Sc in next 12 sc, decrease) around: 39 sc.
Rnd 13 :
Sc in next 6 sc, decrease, (sc in next 11 sc, decrease) twice, sc in next 5 sc: 36 sc.
Rnd 14 :
(Decrease, sc in next 10 sc) around: 33 sc.
Rnd 15 :
Sc in next 2 sc, decrease, (sc in next 9 sc, decrease) twice, sc in next 7 sc: 30 sc.
Rnd 16 :
(Decrease, sc in next 8 sc) around: 27 sc.
Rnd 17 :
Sc in next 4 sc, decrease, (sc in next 7 sc, decrease) twice, sc in next 3 sc: 24 sc.
Rnd 18-21 :
Sc in each sc around.
Rnd 22 :
Decrease around; slip st in next sc, finish off leaving a long end for sewing: 12 sts.
Info :
Stuff Head firmly with polyester fiberfill, making front of Head flat and back more rounded. Stuff Body firmly with polyester fiberfill, adding extra stuffing to "bottom" area. Sew Head to Body, adding extra polyester fiberfill before closing to make neck firm.
— Cheek (Make 2) :
Rnd 1 :
(Right side): With Yellow, ch 2, 8 sc in second ch from hook; do not join, place marker.
Rnd 2 :
2 Sc in each sc around: 16 sc.
Rnd 3 :
(2 Sc in next sc, sc in next 3 sc) around; slip st in next sc, finish off leaving a long end for sewing: 20 sts.
Info :
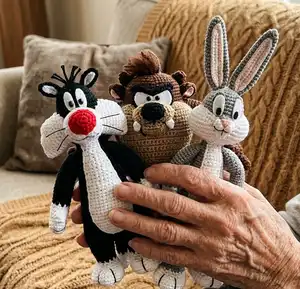
Using photo as a guide for placement, sew Cheeks to Rnds 18-21 of Head, leaving 3 sts between Cheeks and adding polyester fiberfill before closing.
— Beak :
Rnd 1 :
Sc in second ch from hook and in next 2 chs, 5 sc in last ch; working in free loops of beginning ch, sc in next 3 chs, 2 sc in last ch; join with slip st to first sc, finish off: 13 sc.
Info :
Fold Beak in half widthwise with wider end on top. Sew Beak to Head between Cheeks.
— Foot and Leg (Make 2) :
Row 1 :
Sc in second ch from hook and in last ch: 2 sc.
Rows 2 and 3 :
Ch 1, turn; sc in each sc.
Row 4 :
Ch 1, turn; 2 sc in each sc: 4 sc.
Rows 5 and 6 :
Ch 1, turn; sc in each sc across.
Row 7 :
Ch 1, turn; 2 sc in first sc, sc in next 2 sc, 2 sc in last sc: 6 sc.
Row 8 :
Ch 1, turn; sc in each sc across.
Row 9 :
Ch 1, turn; decrease 3 times; do not finish off: 3 sc.
Info :
Sides: Rnd 1 (Right side): Ch 1, turn; sc in first sc, 2 sc in next sc, sc in last sc; work 8 sc evenly spaced across end of rows; working in free loops of beginning ch, sc in next 2 chs; work 8 sc evenly spaced across end of rows; join with slip st to first sc: 22 sc. Rnd 2: Ch 1, do not turn; hdc in first sc, 2 hdc in each of next 2 sc, hdc in next 4 sc, sc in next 12 sc, hdc in last 3 sc; join with slip st to first hdc: 24 sts. Rnd 3: Ch 1, hdc in first 9 hdc, sc in next 12 hdc, hdc in last 3 hdc; join with slip st to first hdc; do not finish off.
Info :
Finish: Sew remaining sts closed. Stuff Arm with polyester fiberfill. Flatten Arm, having thumbs at side, and sew across beginning ch to close; sew Arm to Body with thumbs pointing upward.
— Tail :
With Yellow :
and leaving a long end for sewing, ch 6; join with slip st to form a ring.
Rnd 1 :
(Right side): Ch 1, sc in each ch around; do not join, place marker: 6 sc.
Rnd 2-3 :
Sc in each sc around.
Rnd 4 :
(Decrease, sc in next sc) twice; slip st in next sc, finish off leaving a long end for sewing.
Info :
Sew remaining sts closed, forming a point. Using photo as a guide, flatten Tail and sew beginning ch to Body at center back of Rnd 8.
— Eye Patterns & Finishing :
Eye Patterns :
Trace eye patterns and cut 2 pieces of each pattern from felt. Using photo as a guide, glue White eyes to face, placing bottom just to the outside of halfway point between Cheek and Beak; glue Lt Blue pieces to White and Black pieces to Lt Blue pieces.
Finishing :
For hair, cut one 10" (25.5 cm) length and one 5" (12.5 cm) length of Black. Tie the short length in a knot around the other length, about 2-1/2" (6.5 cm) from one end. Trim the ends of the short length to about 1-1/2" (4 cm) and 2" (5 cm). Thread yarn needle with the long end. Insert needle around st at center of Rnd 2 at front of Head and secure yarn at the knot. Insert the needle inside the Head and push it out the back so the yarn does not show; cut the end close to the Head. Cut a 16" (40.5 cm) length of Black and separate plies in half. Thread needle with 2 ply and add eyelashes using 3 straight stitches and eyebrows using one straight stitch for each eye.
— Sylvester :
Materials :
Worsted Weight Yarn: Black - 4-1/2 ounces, 255 yards (130 grams, 233 meters). White - 3-1/2 ounces, 200 yards (100 grams, 183 meters). Red - 8 yards (7.5 meters). Crochet hook, size F (3.75 mm) or size needed for gauge. Polyester fiberfill. Plastic animal whiskers or black wire. Small amounts of Black and White felt. Clear-drying craft glue. Yarn needle.
Gauge :
16 sc and 16 rows = 4" (10 cm)
— Sylvester Body :
With Black :
ch 15; join with slip st to form a ring.
Rnd 1 :
(Right side): Ch 1, sc in each ch around; do not join, place marker (see Markers, page 35): 15 sc.
Rnd 2 :
2 Sc in next sc, sc in next 6 sc, 2 sc in next sc, sc in next 7 sc: 17 sc.
Rnd 3 :
Sc in next 4 sc, 2 sc in next sc, sc in each sc around: 18 sc.
Rnd 4 :
(2 Sc in next sc, sc in next 8 sc) twice: 20 sc.
Rnd 5 :
Sc in next 14 sc, 2 sc in next sc, sc in next 5 sc: 21 sc.
Rnd 6 :
2 Sc in next sc, sc in next 9 sc, 2 sc in next sc, sc in each sc around: 23 sc.
Rnd 7 :
Sc in next 6 sc, 2 sc in next sc, sc in each sc around: 24 sc.
Rnd 8 :
(2 Sc in next sc, sc in next 11 sc) twice: 26 sc.
Rnd 9 :
Sc in next 18 sc, 2 sc in next sc, sc in each sc around: 27 sc.
Rnd 10 :
2 Sc in next sc, sc in next 13 sc, 2 sc in next sc, sc in each sc around: 29 sc.
Rnd 11 :
Sc in next 8 sc, 2 sc in next sc, sc in each sc around: 30 sc.
Rnd 12 :
(2 Sc in next sc, sc in next 14 sc) twice: 32 sc.
Rnd 13 :
Sc in next 22 sc, 2 sc in next sc, sc in each sc around: 33 sc.
Rnd 14 :
2 Sc in next sc, sc in next 15 sc, 2 sc in next sc, sc in each sc around: 35 sc.
Rnd 15 :
Sc in next 10 sc, 2 sc in next sc, sc in each sc around: 36 sc.
Rnd 16 :
2 Sc in next sc, sc in each sc around: 37 sc.
Rnd 17 :
Sc in next 18 sc, 2 sc in next sc, sc in each sc around: 38 sc.
Rnd 18 :
Sc in next 8 sc, 2 sc in next sc, sc in each sc around: 39 sc.
Rnd 19 :
Sc in next 24 sc, 2 sc in next sc, sc in each sc around: 40 sc.
Rnd 20 :
2 Sc in next sc, sc in each sc around: 41 sc.
Rnd 21 :
Sc in next 20 sc, 2 sc in next sc, sc in each sc around: 42 sc.
Rnd 22 :
Sc in next 10 sc, 2 sc in next sc, sc in each sc around: 43 sc.
Rnd 23 :
Sc in next 26 sc, 2 sc in next sc, sc in each sc around: 44 sc.
Rnd 24 :
2 Sc in next sc, sc in each sc around: 45 sc.
Rnd 25 :
Sc in next 24 sc, 2 sc in next sc, sc in each sc around: 46 sc.
Rnd 26 :
Sc in next 12 sc, 2 sc in next sc, sc in each sc around: 47 sc.
Rnd 27 :
Sc in next 30 sc, 2 sc in next sc, sc in each sc around: 48 sc.
Rnd 28 :
[Decrease (see Sc Decrease, page 35), sc in next 14 sc] 3 times: 45 sc.
Rnd 29 :
Sc in next 5 sc, decrease, (sc in next 13 sc, decrease) twice, sc in next 8 sc: 42 sc.
Rnd 30 :
(Sc in next 12 sc, decrease) around: 39 sc.
Rnd 31 :
Sc in next 6 sc, decrease, (sc in next 11 sc, decrease) twice, sc in next 5 sc: 36 sc.
Info :
Stuff Body firmly with polyester fiberfill, then continue to stuff Body as you work.
Rnd 32 :
(Decrease, sc in next 10 sc) around: 33 sc.
Rnd 33 :
Sc in next 2 sc, decrease, (sc in next 9 sc, decrease) twice, sc in next 7 sc: 30 sc.
Rnd 34 :
(Decrease, sc in next 8 sc) around: 27 sc.
Rnd 35 :
Sc in next 4 sc, decrease, (sc in next 7 sc, decrease) twice, sc in next 3 sc: 24 sc.
Rnd 36 :
(Decrease, sc in next 6 sc) around: 21 sc.
Rnd 37 :
Sc in next 3 sc, decrease, (sc in next 5 sc, decrease) twice, sc in next 2 sc: 18 sc.
Rnd 38 :
(Decrease, sc in next 4 sc) 3 times: 15 sc.
Rnd 39 :
Sc in next 2 sc, decrease, (sc in next 3 sc, decrease) twice; sc in next sc; finish off leaving a long end for sewing: 12 sc.
Info :
Finish stuffing Body with polyester fiberfill, shaping Body to be more rounded at one side to make Sylvester's chubby bottom. Sew opening at bottom closed. Note: Loop a short piece of yarn around stitch to mark back.
— Sylvester Tummy :
Row 1 :
(Right side): Sc in second ch from hook and in last ch: 2 sc.
Row 2 :
Ch 1, turn; 2 sc in each sc: 4 sc.
Rows 3 and 4 :
Ch 1, turn; 2 sc in first sc, sc in next ch, 2 sc in next ch as shown in pattern; follow written rows in pattern for rows 3-4 and continue to Row 27 as printed in booklet.
— Sylvester Leg (Make 2) :
Leg :
With Black, ch 14; join with slip st to form a ring.
Rnd 1 :
(Right side): Ch 1, sc in each ch around; do not join, place marker: 14 sc.
Rnd 2 :
Sc in each sc around.
Begin working in rows :
Row 1: 2 Sc in next sc, sc in next sc, slip st in next sc, leave remaining 11 sc unworked. Row 2: Ch 1, turn; skip first slip st, (2 sc in next sc, sc in next sc) twice, slip st in next sc: 7 sts. Continue following row instructions in pattern for shaping and then resume in rounds as printed in the booklet.
— Sylvester Feet & Instep :
Sole (Make 2) :
With White ch 2, 8 sc in second ch from hook; join with slip st to first sc. Rnd 2: Ch 1, sc in first sc, 3 sc in next sc, sc in next sc, 3 sc in next sc, sc in next 3 sc, join with slip st to first sc: 14 sc. Rnds 3-5: Ch 1, sc in each sc around working groups and join with slip st to first sc: 32 sc. Finish off.
Instep :
With White, ch 14; join with slip st to form a ring. Rnd 1 Right side: Ch 1, sc in first 2 chs, 3 sc in next ch, sc in next 2 chs, 2 sc in next ch, sc in next 2 chs, 3 sc in next ch, sc in last ch; join with slip st to first sc: 21 sc. Rnd 2: Ch 1, sc in first 3 sc, 3 sc in next sc, sc in next 5 sc, 3 sc in next sc, sc in next 3 sc, 2 sc in last 2 sc; join with slip st to first sc: 29 sc. Continue Rnd 3 and Rnd 4 as printed in pattern to form instep and toes then sew Instep to Sole and finish as printed.
— Head (Sylvester) :
Head :
Rnd 1 (Right side): With Black, ch 2, 4 sc in second ch from hook; do not join, place marker. Rnd 2: 2 Sc in each sc around: 8 sc. Rnd 3: (2 Sc in next sc, sc in next sc) around: 12 sc. Rnd 4: (2 Sc in next sc, sc in next 2 sc) around: 16 sc. Rnd 5: Sc in next 2 sc, 2 sc in next sc, (sc in next 3 sc, 2 sc in next sc) 3 times, sc in next sc: 20 sc. Rnd 6: (2 Sc in next sc, sc in next 4 sc) around: 24 sc. Rnd 7: Sc in next 2 sc, 2 sc in next sc, (sc in next 5 sc, 2 sc in next sc) 3 times, sc in next 3 sc: 28 sc. Rnd 8: (2 Sc in next sc, sc in next 6 sc) around: 32 sc. Rnd 9: Sc in next 3 sc, 2 sc in next sc, (sc in next 7 sc, 2 sc in next sc) 3 times, sc in next 4 sc: 36 sc. Rnds 10-13: Sc in each sc around. Rnd 14: (Decrease, sc in next 4 sc) around: 30 sc. Rnd 15: Sc in next 2 sc, decrease, (sc in next 3 sc, decrease) 5 times, sc in next sc: 24 sc. Rnd 16: (Decrease, sc in next 2 sc) around: 18 sc. Rnd 17: (Sc in next sc, decrease) around: 12 sc. Rnd 18: Sc in each sc around; slip st in next sc, finish off leaving long end for sewing. Stuff Head firmly with polyester fiberfill.
Info :
Furry Cheeks: Make 2 with White; follow rounds to Rnd 9 then begin working in rows to shape cheek panels and sew to muzzle area as shown in photos. Muzzle and Nose instructions and Border joining details are included in pattern pages for finishing. Follow head assembly notes to attach muzzle, nose, ears and add whiskers.
— Bugs Bunny :
Materials :
Worsted Weight Yarn: Grey - 5 ounces, 285 yards (140 grams, 260.5 meters). White - 3 ounces, 170 yards (90 grams, 155.5 meters). Peach - 16 yards (14.5 meters). Dk Peach - 3 yards (2.5 meters). Black - 6 yards (5.5 meters). Crochet hook, size F (3.75 mm) or size needed for gauge. Polyester fiberfill. Plastic animal whiskers or black wire. Small amounts of Black and White felt. Small amount of white craft foam sheet. Black marker. Clear-drying craft glue. Yarn needle.
Gauge :
16 sc and 16 rows = 4" (10 cm)
First Leg :
With Grey and leaving a long end for sewing, ch 11; join with slip st to form a ring. Rnd 1 (Right side): Ch 1, sc in each ch around; do not join, place marker: 11 sc. Rnds 2-12: Sc in each sc around. Rnd 13: Sc in each sc around; slip st in next sc, finish off.
Second Leg :
Work same as First Leg through Rnd 12. Rnd 13: Sc in each sc around; do not finish off; continue to mark beginning of rnd. Body and Crotch sections continue on in rounds and rows as shown in the booklet.
Foot :
Make 2 soles with White ch 10 and follow round/row sequence printed in pattern to create soles, insteps and toes. Sew foot and leg pieces together and attach to body following finishing notes; shape toes by threading doubled black yarn and pulling to define toes as described in pattern.
Info :
Head, muzzle, ears, nose and eye patterns for Bugs are provided in the booklet along with detailed assembly instructions to sew muzzle to head, attach furry cheeks, sew ears and embroider mouth lines. Use photo guide for placement of whiskers and tuft of hair on top of head.
This Looney Tunes collection turns your favorite cartoon characters into cuddly crochet companions with personality and charm. Each pattern includes complete rounds, shaping and finishing notes so you can craft timeless toys to display or gift. Pick your color palette, gather worsted weight yarn and get ready for a delightful crocheting session. 🧶 Happy hooking and enjoy creating these classic pals! 🧵