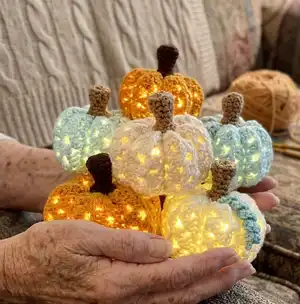
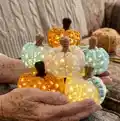
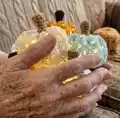
Make charming lighted pumpkins in three sizes using simple granny-cluster stitches and a medium worsted yarn. This pattern guides you step-by-step to crochet the pumpkin shell, add a cozy stem and leaf, and tuck in a battery fairy light for a warm glow. Youll enjoy quick rounds and satisfying assembly as you create seasonal decor or thoughtful handmade gifts.
Progress Tracker
0% Complete
— Terminology :
Info :
All instructions are in Standard/US terms. Abbreviations: ch chain. sc single crochet. sc2tog single crochet 2 together. sl st slip stitch. sk st skip stitch. hdc half double crochet. dc double crochet. FL front loop of stitch (the loop closest to you). BL back loop of stitch (the loop farthest away from you). [ ] work instructions within brackets as many times as directed across the row. ( ) work instructions within parentheses as many times as directed in the next st. Magic Circle: use to begin first round of a circular pattern; alternative to ch 2 and working into second chain from hook.
— How to Make a Magic Circle :
Info :
1. Form the yarn into a circle. 2. Cross the top thread under the circle and pull through as though youre about to create a slip knot, but do not tighten the circle. 3. Insert hook into the loop. 4. While pinching the yarn tail and circle firmly together, ch 1. This chain helps secure the yarn, and does not count as a stitch. 5. Crochet the first rows stitches (ex: 6 sc) into the circle, being sure to crochet over both strands of yarn. 6. Pinch the yarn tail firmly between your thumb and forefinger, and pull tightly until circle closes. 7. Finished! The first round of the pattern is now complete with a clean, tight center.
— LARGE PUMPKIN :
Info :
Hook size: US H8/5.00mm. Yarn: Caron One Pound in Cream or Red Heart Super Saver in Gold. Turning chains do not count as stitches. Begin by working ch 14.
Row 1 :
sc in second chain from hook and in next st, 2 sc, sc, [2 sc in next 2 st, sc] 2 times, 2 sc, sc in last 2 st. Ch 1, turn. (19 st) (Fig. L-1)
Row 2 :
sc in first two st, ch 1, sk st, [3 dc in next st, ch 1, sk 2 st] 4 times, 3 dc in next st, ch 1, sk st, sc in last 2 st. Ch 1, turn. (2 sc on each end + 5 granny clusters) (Fig. L-2)
Row 3 :
sc in first two st, ch 1, dc in first ch-1 space, ch 1, [sk 3 st, 3 dc in next ch-1 space, ch 1] 4 times, sk 3 st, dc in last ch-1 space, ch 1, sc in last two st. Ch 1, turn. (2 sc on each end + 4 granny clusters) (Fig. L-3)
Row 4 :
sc in first two st, ch 1, sk first ch and dc st, [3 dc in next ch-1 space, ch 1, sk 3 st] 4 times, 3 dc in next ch-1 space, ch 1, sk last dc and ch-1 space, sc in last 2 st. Ch 1, turn. (2 sc on each end + 5 granny clusters) (Fig. L-4)
Row 5 :
sc in first two st, ch 1, dc in first ch-1 space, ch 1, [sk 3 st, 3 dc in next ch-1 space, ch 1] 4 times, sk 3 st, dc in last ch-1 space, ch 1, sc in last two st. Ch 1, turn. (2 sc on each end + 4 granny clusters) (Fig. L-5)
Row 6 :
— (for this decrease row, do not count ch-1 spaces as stitches; skip over them as though they dont exist) — sc in first 2 st, [sc2tog, sc] 5 times, sc in last st. Ch 1, turn. (13 stitches) (Fig. L-6)
Row 7 :
— working in front loops only — sc in first 2 st, 2 sc, sc, [2 sc in next 2 st, sc] 2 times, 2 sc, sc in last 2 st. Ch 1, turn. (19 st)
Row 8 :
— working in both loops from now on — sc in first two st, ch 1, sk st, [3 dc in next st, ch 1, sk 2 st] 4 times, 3 dc in next st, ch 1, sk st, sc in last 2 st. Ch 1, turn. (2 sc on each end + 5 granny clusters)
Row 9 :
sc in first two st, ch 1, dc in first ch-1 space, ch 1, [sk 3 st, 3 dc in next ch-1 space, ch 1] 4 times, sk 3 st, dc in last ch-1 space, ch 1, sc in last two st. Ch 1, turn. (2 sc on each end + 4 granny clusters)
Row 10 :
sc in first two st, ch 1, sk first ch-1 space and dc st, [3 dc in next ch-1 space, ch 1, sk 3 st] 4 times, 3 dc in next ch-1 space, ch 1, sk last dc and ch-1 space, sc in last 2 st. Ch 1, turn. (2 sc on each end + 5 granny clusters)
Row 11 :
sc in first two st, ch 1, dc in first ch-1 space, ch 1, [sk 3 st, 3 dc in next ch-1 space, ch 1] 4 times, sk 3 st, dc in last ch-1 space, ch 1, sc in last two st. Ch 1, turn. (2 sc on each end + 4 granny clusters)
Row 12 :
— (for this decrease row, do not count ch-1 spaces as stitches; skip over them as though they dont exist) — sc in first 2 st, [sc2tog, sc] 5 times, sc in last st. Ch 1, turn. (13 stitches) (Fig. L-7)
Row 13 :
— working in front loops only — sc in first 2 st, 2 sc, sc, [2 sc in next 2 st, sc] 2 times, 2 sc, sc in last 2 st. Ch 1, turn. (19 st)
Row 14 :
— working in both loops from now on — sc in first two st, ch 1, sk st, [3 dc in next st, ch 1, sk 2 st] 4 times, 3 dc in next st, ch 1, sk st, sc in last 2 st. Ch 1, turn. (2 sc on each end + 5 granny clusters)
Row 15 :
sc in first two st, ch 1, dc in first ch-1 space, ch 1, [sk 3 st, 3 dc in next ch-1 space, ch 1] 4 times, sk 3 st, dc in last ch-1 space, ch 1, sc in last two st. Ch 1, turn. (2 sc on each end + 4 granny clusters)
Row 16 :
sc in first two st, ch 1, sk first ch-1 space and dc st, [3 dc in next ch-1 space, ch 1, sk 3 st] 4 times, 3 dc in next ch-1 space, ch 1, sk last dc and ch-1 space, sc in last 2 st. Ch 1, turn. (2 sc on each end + 5 granny clusters)
Row 17 :
sc in first two st, ch 1, dc in first ch-1 space, ch 1, [sk 3 st, 3 dc in next ch-1 space, ch 1] 4 times, sk 3 st, dc in last ch-1 space, ch 1, sc in last two st. Ch 1, turn. (2 sc on each end + 4 granny clusters)
Row 18 :
— (for this decrease row, do not count ch-1 spaces as stitches; skip over them as though they dont exist) — sc in first 2 st, [sc2tog, sc] 5 times, sc in last st. Ch 1, turn. (13 stitches)
Row 19 :
— working in front loops only — sc in first 2 st, 2 sc, sc, [2 sc in next 2 st, sc] 2 times, 2 sc, sc in last 2 st. Ch 1, turn. (19 st)
Row 20 :
— working in both loops from now on — sc in first two st, ch 1, sk st, [3 dc in next st, ch 1, sk 2 st] 4 times, 3 dc in next st, ch 1, sk st, sc in last 2 st. Ch 1, turn. (2 sc on each end + 5 granny clusters)
Row 21 :
sc in first two st, ch 1, dc in first ch-1 space, ch 1, [sk 3 st, 3 dc in next ch-1 space, ch 1] 4 times, sk 3 st, dc in last ch-1 space, ch 1, sc in last two st. Ch 1, turn. (2 sc on each end + 4 granny clusters)
Row 22 :
sc in first two st, ch 1, sk first ch-1 space and dc st, [3 dc in next ch-1 space, ch 1, sk 3 st] 4 times, 3 dc in next ch-1 space, ch 1, sk last dc and ch-1 space, sc in last 2 st. Ch 1, turn. (2 sc on each end + 5 granny clusters)
Row 23 :
sc in first two st, ch 1, dc in first ch-1 space, ch 1, [sk 3 st, 3 dc in next ch-1 space, ch 1] 4 times, sk 3 st, dc in last ch-1 space, ch 1, sc in last two st. Ch 1, turn. (2 sc on each end + 4 granny clusters)
Row 24 :
— (for this decrease row, do not count ch-1 spaces as stitches; skip over them as though they dont exist) — sc in first 2 st, [sc2tog, sc] 5 times, sc in last st. Ch 1, turn. (13 stitches)
Row 25 :
— working in front loops only — sc in first 2 st, 2 sc, sc, [2 sc in next 2 st, sc] 2 times, 2 sc, sc in last 2 st. Ch 1, turn. (19 st)
Row 26 :
— working in both loops from now on — sc in first two st, ch 1, sk st, [3 dc in next st, ch 1, sk 2 st] 4 times, 3 dc in next st, ch 1, sk st, sc in last 2 st. Ch 1, turn. (2 sc on each end + 5 granny clusters)
Row 27 :
sc in first two st, ch 1, dc in first ch-1 space, ch 1, [sk 3 st, 3 dc in next ch-1 space, ch 1] 4 times, sk 3 st, dc in last ch-1 space, ch 1, sc in last two st. Ch 1, turn. (2 sc on each end + 4 granny clusters)
Row 28 :
sc in first two st, ch 1, sk first ch-1 space and dc st, [3 dc in next ch-1 space, ch 1, sk 3 st] 4 times, 3 dc in next ch-1 space, ch 1, sk last dc and ch-1 space, sc in last 2 st. Ch 1, turn. (2 sc on each end + 5 granny clusters)
Row 29 :
sc in first two st, ch 1, dc in first ch-1 space, ch 1, [sk 3 st, 3 dc in next ch-1 space, ch 1] 4 times, sk 3 st, dc in last ch-1 space, ch 1, sc in last two st. Ch 1, turn. (2 sc on each end + 4 granny clusters)
Row 30 :
— (for this decrease row, do not count ch-1 spaces as stitches; skip over them as though they dont exist) — sc in first 2 st, [sc2tog, sc] 5 times, sc in last st. Ch 1, turn. (13 stitches)
Row 31 :
— working in front loops only — sc in first 2 st, 2 sc, sc, [2 sc in next 2 st, sc] 2 times, 2 sc, sc in last 2 st. Ch 1, turn. (19 st)
Row 32 :
— working in both loops from now on — sc in first two st, ch 1, sk st, [3 dc in next st, ch 1, sk 2 st] 4 times, 3 dc in next st, ch 1, sk st, sc in last 2 st. Ch 1, turn. (2 sc on each end + 5 granny clusters)
Row 33 :
sc in first two st, ch 1, dc in first ch-1 space, ch 1, [sk 3 st, 3 dc in next ch-1 space, ch 1] 4 times, sk 3 st, dc in last ch-1 space, ch 1, sc in last two st. Ch 1, turn. (2 sc on each end + 4 granny clusters)
Row 34 :
sc in first two st, ch 1, sk first ch-1 space and dc st, [3 dc in next ch-1 space, ch 1, sk 3 st] 4 times, 3 dc in next ch-1 space, ch 1, sk last dc and ch-1 space, sc in last 2 st. Ch 1, turn. (2 sc on each end + 5 granny clusters)
Row 35 :
sc in first two st, ch 1, dc in first ch-1 space, ch 1, [sk 3 st, 3 dc in next ch-1 space, ch 1] 4 times, sk 3 st, dc in last ch-1 space, ch 1, sc in last two st. Ch 1, turn. (2 sc on each end + 4 granny clusters)
Row 36 :
— (for this decrease row, do not count ch-1 spaces as stitches; skip over them as though they dont exist) — sc in first 2 st, [sc2tog, sc] 5 times, sc in last st. Ch 1, turn. (13 stitches)
Info :
Finish off, leaving 14" yarn tail. (Fig. L-8 & L-9) See assembly instructions beginning on page 27.
— MEDIUM PUMPKIN :
Info :
Hook size: US H8/5.00mm. Yarn: Caron One Pound in Off White or Pale Green. Turning chains do not count as stitches. Begin by working ch 12.
Row 1 :
sc in second ch from hook and in next st, 2 sc, sc, 2 sc in next 3 st, sc, 2 sc, sc in last 2 st. Ch 1, turn. (16 st) (Fig. M-1)
Row 2 :
sc in first two st, ch 1, sk st, [3 dc in next st, ch 1, sk 2 st] 3 times, 3 dc in next st, ch 1, sk st, sc in last 2 st. Ch 1, turn. (2 sc on each end + 4 granny clusters) (Fig. M-2)
Row 3 :
sc in first two st, ch 1, dc in first ch-1 space, ch 1, [sk 3 st, 3 dc in next ch-1 space, ch 1] 3 times, sk 3 st, dc in last ch-1 space, ch 1, sc in last two st. Ch 1, turn. (2 sc on each end + 3 granny clusters) (Fig. M-3)
Row 4 :
sc in first two st, ch 1, sk first ch and dc st, [3 dc in next ch-1 space, ch 1, sk 3 st] 3 times, 3 dc in next ch-1 space, ch 1, sk last dc and ch-1 space, sc in last 2 st. Ch 1, turn. (2 sc on each end + 4 granny clusters) (Fig. M-4)
Row 5 :
— (for this decrease row, do not count ch-1 spaces as stitches; skip over them as though they dont exist) — sc in first 2 st, sc2tog, sc, sc2tog 3 times, sc, sc2tog, sc in last two st. Ch 1, turn. (11 stitches) (Fig. M-5)
Row 6 :
— working in back loops only — sc in next 2 st, 2 sc, sc, 2 sc in next 3 stitches, sc, 2 sc, sc in last 2 st. Ch 1, turn. (16 st)
Row 7 :
— working in both loops from now on — sc in first two st, ch 1, sk st, [3 dc in next st, ch 1, sk 2 st] 3 times, 3 dc in next st, ch 1, sk st, sc in last 2 st. Ch 1, turn. (2 sc on each end + 4 granny clusters)
Row 8 :
sc in first two st, ch 1, dc in first ch-1 space, ch 1, [sk 3 st, 3 dc in next ch-1 space, ch 1] 3 times, sk 3 st, dc in last ch-1 space, ch 1, sc in last two st. Ch 1, turn. (2 sc on each end + 3 granny clusters)
Row 9 :
sc in first two st, ch 1, sk first ch-1 space and dc st, [3 dc in next ch-1 space, ch 1, sk 3 st] 3 times, 3 dc in next ch-1 space, ch 1, sk last dc and ch-1 space, sc in last 2 st. Ch 1, turn. (2 sc on each end + 4 granny clusters)
Row 10 :
— (for this decrease row, do not count ch-1 spaces as stitches; skip over them as though they dont exist) — sc in first 2 st, sc2tog, sc, sc2tog 3 times, sc, sc2tog, sc in last two st. Ch 1, turn. (11 stitches) (Fig. M-6)
Info :
Finish off, leaving 14" yarn tail. (Fig. M-7) See assembly instructions beginning on page 27.
— SMALL PUMPKIN :
Info :
Hook size: US H8/5.00mm. Yarn: Red Heart Super Saver in Gold or Cornmeal. Turning chains do not count as stitches. Begin by working ch 8.
Row 1 :
sc in second chain from hook, 2 sc in next 2 st, sc, 2 sc in next 2 st, sc in last st. Ch 1, turn. (11 st) (Fig. S-1)
Row 2 :
sc, ch 1, sk st, [3 hdc in next st, ch 1, sk 2 st] 2 times, 3 hdc in next st, ch 1, sk st, sc in last st. Ch 1, turn. (1 sc in each end + 3 granny clusters) (Fig. S-2)
Row 3 :
sc in first st, ch 1, hdc in first ch-1 space, ch 1, [sk 3 st, 3 hdc in next ch-1 space, ch 1] 2 times, sk 3 st, hdc in last ch-1 space, ch 1, sc in last st. Ch 1, turn. (1 sc on each end + 2 granny clusters) (Fig. S-3)
Row 4 :
sc, ch 1, sk first ch-1 space and hdc, [3 hdc in next ch-1 space, ch 1, sk 3 st] 2 times, 3 hdc in next ch-1 space, ch 1, sk last hdc and ch-1 space, sc in last st. Ch 1, turn. (1 sc in each end + 3 granny clusters) (Fig. S-4)
Row 5 :
— (for this decrease row, do not count ch-1 spaces as stitches; skip over them as though they dont exist) — sc in first st, sc2tog 2 times, sc, sc2tog 2 times, sc in last st. Ch 1, turn. (7 stitches) (Fig. S-5)
Row 6 :
— working in back loops only — sc, 2 sc in next 2 st, sc, 2 sc in next 2 st, sc in last st. Ch 1, turn. (11 st)
Row 7 :
sc, ch 1, sk st, [3 hdc in next st, ch 1, sk 2 st] 2 times, 3 hdc in next st, ch 1, sk st, sc in last st. Ch 1, turn. (1 sc in each end + 3 granny clusters)
Row 8 :
sc in first st, ch 1, hdc in first ch-1 space, ch 1, [sk 3 st, 3 hdc in next ch-1 space, ch 1] 2 times, sk 3 st, hdc in last ch-1 space, ch 1, sc in last st. Ch 1, turn. (1 sc on each end + 2 granny clusters)
Row 9 :
sc, ch 1, sk first ch-1 space and hdc, [3 hdc in next ch-1 space, ch 1, sk 3 st] 2 times, 3 hdc in next ch-1 space, ch 1, sk last hdc and ch-1 space, sc in last st. Ch 1, turn. (1 sc in each end + 3 granny clusters)
Row 10 :
— (for this decrease row, do not count ch-1 spaces as stitches; skip over them as though they dont exist) — sc in first st, sc2tog 2 times, sc, sc2tog 2 times, sc in last st. Ch 1, turn. (7 stitches)
Row 11 :
— working in front loops only — sc, 2 sc in next 2 st, sc, 2 sc in next 2 st, sc in last st. Ch 1, turn. (11 st)
Row 12 :
sc, ch 1, sk st, [3 hdc in next st, ch 1, sk 2 st] 2 times, 3 hdc in next st, ch 1, sk st, sc in last st. Ch 1, turn. (1 sc in each end + 3 granny clusters)
Row 13 :
sc in first st, ch 1, hdc in first ch-1 space, ch 1, [sk 3 st, 3 hdc in next ch-1 space, ch 1] 2 times, sk 3 st, hdc in last ch-1 space, ch 1, sc in last st. Ch 1, turn. (1 sc on each end + 2 granny clusters)
Row 14 :
sc in first st, ch 1, sk first ch-1 space and hdc, [3 hdc in next ch-1 space, ch 1, sk 3 st] 2 times, 3 hdc in next ch-1 space, ch 1, sk last hdc and ch-1 space, sc in last st. Ch 1, turn. (1 sc in each end + 3 granny clusters)
Row 15 :
— (for this decrease row, do not count ch-1 spaces as stitches; skip over them as though they dont exist) — sc in first st, sc2tog 2 times, sc, sc2tog 2 times, sc in last st. Ch 1, turn. (7 stitches)
Info :
Finish off, leaving 14" yarn tail. See assembly instructions beginning on page 27.
These little lighted pumpkins add instant seasonal charm to any shelf, mantle, or table centerpiece. Theyre quick to make, customizable in color, and glow beautifully with battery fairy lights. Create an entire set in coordinating shades to make a warm handmade display this season. 🧶🕯️