🧢 Beautiful ✨ Detailed πŸ’ Adorable

Lavender plant Pattern

Lavender plant Pattern
4.0β˜… Rating
2-3 Hours Time Needed
3.1K Made This
βœ‚οΈ

Beginner Friendly Level

Perfect for those just starting their crochet journey, with clear instructions and simple techniques

⏱️

Bite-Sized Project

Finishes in 2-4 hoursβ€”perfect for an afternoon of creative relaxation.

🏑

Cozy Accent

A warm touch for your space that transforms ordinary corners into inviting nooks filled with handmade charm.

About This Lavender plant Pattern

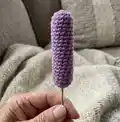
This pattern makes a small, realistic-looking lavender flowerhead using DK weight yarn and simple stitches. You will chain a foundation, work textured loops along both sides, and finish by attaching a wire stem for display. The result is a charming, delicate plant perfect for arrangements or gifts.

Lavender plant Pattern crochet pattern - detailed view of completed project

The instructions are written in US crochet terms and designed for confident beginners. Minimal materials are required and the assembly is straightforward.

Why You'll Love This Lavender plant Pattern

I absolutely love this pattern because it creates a beautiful, realistic lavender flower with very few materials and simple stitches. I enjoy how quickly a finished bloom comes together, making it perfect for gift-making or last-minute decor. The pattern is forgiving of tension, so I find it relaxing to work on while watching TV or chatting. I also love that the wire stem makes the finished piece poseable and easy to combine into arrangements.

Lavender plant Pattern step 1 - construction progress Lavender plant Pattern step 2 - assembly progress Lavender plant Pattern step 3 - details and accessories Lavender plant Pattern step 4 - final assembly and finishing

Switch Things Up

I love experimenting with different yarn weights to change the size and texture of the lavender flowerhead.

You can use a thicker DK or worsted yarn and a larger hook to make chunky, statement blooms.

I sometimes substitute cotton yarn for a firmer finish that holds shape better in arrangements.

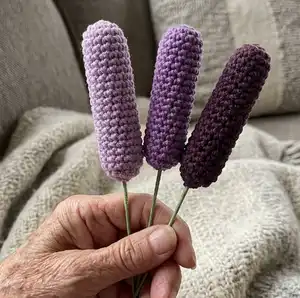
Try using variegated purple yarn for a more natural, tonal effect across the petals.

I like to add a tiny dab of glue or a few stitches of embroidery for a darker centre for added detail.

Wrap floral tape or green embroidery thread around the wire to create a more realistic stem finish.

I often make multiple flowerheads and cluster them together on separate wires to form a fuller bouquet.

Consider adding tiny crocheted leaves using green DK yarn to enhance realism and coverage on the stem.

For a mini keychain, use thinner yarn and a smaller hook then attach a split ring to the base of the wire instead of making a long stem.

I also enjoy dyeing small amounts of yarn slightly lighter or darker to achieve ombre bouquets that look hand-gathered and natural.

Common Mistakes & How to Fix Them

βœ— Skipping the final slip stitch at the end of round 1 can leave your chain edge loose and unfinished; always slst into the final chain to secure the row. βœ— Not working into the opposite side of the chain will make your piece flat and incomplete; after finishing the first side, flip and work along the opposite side as instructed. βœ— Cutting the yarn too short at the end will make it hard to sew the wire in place; leave a long tail so you can wrap and secure the bent wire end properly. βœ— Pulling loops too loosely for the ch-6 loops will cause the petals to look floppy; keep consistent tension so each ch-6 loop creates a neat petal.

Lavender plant Pattern

Create a delicate crocheted lavender plant to brighten any space. This quick, approachable pattern guides you through simple chains and single crochet stitches to make realistic-looking flowerheads. Perfect for gifting, home decor, or adding to a small bouquet, you will love how fast the piece comes together. Follow the clear assembly steps to secure the wire stem and shape the flowerhead.

Beginner Friendly 2-3 Hours

Materials Needed for Lavender plant Pattern

β€” Main Fabric

  • 01
    DK (size 3) yarn - approximately 10 g purple shade (main flowerhead yarn)

β€” Tools Required

  • 01
    Crochet hook size 3.5 mm
  • 02
    Yarn needle
  • 03
    Scissors
  • 04
    Flower wire for the stem
  • 05
    Small piece of tape (to secure stem)

Progress Tracker

0% Complete

β€” Materials & Notes :

Info :

You will need: 3.5 mm crochet hook. Yarn needle, Scissors. Flower wire for the stem. DK (size 3) yarn approximately: 10 g purple shade.

Infos :

Level of difficulty: Confident Beginner. Crochet language: US Crochet terms. Gauge/tension is not important for this pattern as long as your stitches are tight and without gaps. If you struggle getting tight enough stitches, try a smaller hook.

Info :

This pattern requires basic knowledge of the following crochet stitches: Slip stitch. Chain. Single crochet.

β€” Lavender plant :

Info :

With purple yarn.

Round 1 :

Start by creating a slip knot and chain 50.

Round 1 :

Skip one from the hook, sc into each chain until one chain remains. Sc 5, slst into the final chain.

Info :

You will now be working on the opposite side of the chain.

Round 2 :

*ch 6, sc into the next stitch*, repeat from * to * until the end of the row, ch 6, sc into the opposite side of your work and repeat from * to * on the other side until you reach the first ch-6, slst and fasten off. Cut yarn but leave a long tail.

β€” Assembly :

Info :

From the top end (where you finished your crocheting), start feeding the flower wire through the row 1 sc stitches, going in one and out next. Bend the top part of the wire so that your plant will not pop out of the top.

Info :

Using the end tail of your yarn, sew over the bent end of the wire a few times to keep it in place.

Info :

Push and twist the flowerhead towards the top. To finish off, add a little bit of tape to the stem just below the flowerhead to keep it in place.

Info :

Happy crocheting!

Assembly Instructions

  • From the top end (where you finished your crocheting), feed the flower wire through the row 1 sc stitches, inserting it in one stitch and out the next to run the wire through the base of the flowerhead.
  • Bend the top part of the wire so that the bent end sits inside the flowerhead and will not pop out of the top.
  • Using the long end tail of your yarn, sew over and around the bent end of the wire a few times to secure it firmly in place.
  • Push and twist the crocheted flowerhead towards the top of the wire so it sits naturally on the stem.
  • Finish by wrapping a little piece of tape around the stem just below the flowerhead to keep everything in position and secure.

Important Notes

  • πŸ’‘Gauge/tension is not important for this pattern as long as your stitches are tight and without gaps.
  • πŸ’‘If you struggle getting tight enough stitches, try a smaller hook or firmer tension to improve stitch definition.
  • πŸ’‘Leave a long tail when fastening off so you have enough yarn to sew and secure the wire inside the flowerhead.
  • πŸ’‘You can use different yarn weights and a suitable sized hook, but the finished size will vary with yarn and hook choice.

This pretty Lavender plant pattern is a quick and satisfying make that brings a calming, handcrafted accent to any space. Create a bunch for bouquets or use them as gift toppers to impress friends and family. Enjoy the simple stitches, easy assembly, and the charming result you can display anywhere. 🧢🌿

You ask,

we answer.

FAQs

What size will the finished piece be?

The finished lavender head measures a few centimeters long (size varies by yarn/hook), but exact size will depend on your tension and the yarn used.

Can I use different yarn weights for this pattern?

Yes, you can use different yarn weights but this will affect the final size; choose an appropriate hook for your yarn and expect a larger or smaller bloom.

Do I need prior crochet experience for this pattern?

This pattern is rated beginner friendly, so basic knowledge of chain, single crochet, and slip stitch is sufficient to complete the project.

How long does this project typically take to complete?

Most crafters finish a single lavender head in about 2-3 hours including assembly and wiring, though times may vary by experience.