🧢 Beautiful ✨ Detailed πŸ’ Adorable

Lavender Pattern

Lavender Pattern
4.4β˜… Rating
2-3 Hours Time Needed
1.9K Made This
βœ‚οΈ

Beginner Friendly Level

Perfect for those just starting their crochet journey, with clear instructions and simple techniques

⏱️

Bite-Sized Project

Finishes in 2-4 hoursβ€”perfect for an afternoon of creative relaxation.

🏑

Cozy Accent

A warm touch for your space that transforms ordinary corners into inviting nooks filled with handmade charm.

About This Lavender Pattern

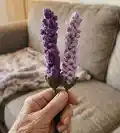
This pattern teaches you how to crochet delicate lavender stalks and optional leaves, then attach them to floral wire to create a realistic bouquet. It uses weight 4 yarn and basic stitches like chains, treble crochet, slip stitch and half double crochet. The design is beginner-friendly but yields beautiful, detailed results that look stunning in bunches or vases. You can make single stems or entire bouquets for gifts and home decor.

Lavender Pattern crochet pattern - detailed view of completed project

Instructions are written in US terms with clear step-by-step directions and photos to guide you. Chains determine length so you can easily customize each stalk to your preferred size.

Why You'll Love This Lavender Pattern

I absolutely love this pattern because it turns simple stitches into a charming, realistic lavender bouquet that brightens any room. I enjoy how quickly a single stalk can be made, allowing you to create a full bunch in one afternoon. I appreciate that the pattern is beginner-friendly yet produces detailed texture using basic techniques. I love offering customization ideas β€” different purples, variegated yarn, or shorter stems β€” so every finished bouquet feels unique and personal.

Lavender Pattern step 1 - construction progress Lavender Pattern step 2 - assembly progress Lavender Pattern step 3 - details and accessories Lavender Pattern step 4 - final assembly and finishing

Switch Things Up

I love to change up the look by using variegated or ombre purple yarn to give each lavender stalk a natural color variation.

I sometimes make miniature versions by using a lighter weight yarn and a smaller hook to create tiny lavender sprigs for keychains or charms.

I also like to substitute wooden skewers for floral wire when making decorative stems that do not need to bend or be repositioned often.

I often add scented essential oil drops to the yarn or wire wrapping to create a real lavender scent experience for the bouquet.

I recommend experimenting with chain length β€” shorter chains make compact buds while longer chains give a more dramatic stalk for bouquets.

I sometimes embroider tiny French knots or use beads among the loops for a sparkling, decorative finish on special-occasion bouquets.

I also try making the leaves in different greens or using felt leaves for a sturdier look that stands up in arrangements.

I occasionally wrap the finished stems with floral tape over the yarn for a professional florist finish and extra durability.

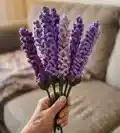
I like to arrange mixed-color bunches with various purple shades and greens; this contrast adds depth and makes bouquets more visually interesting.

I often gift sets of three stems tied with a small ribbon, but you can change it up with larger bouquets wrapped in decorative paper and mesh for a market-ready presentation.

Common Mistakes & How to Fix Them

βœ— Not leaving a long enough tail when you fasten off can make attaching the lavender to the wire difficult; leave at least a 6 inch tail and use a darning needle to weave ends securely. βœ— Making your magic ring too small will prevent the floral wire from fitting through the center; leave the center hole large enough for your chosen wire or adjust tension while closing the MR. βœ— Using a thicker yarn than recommended will create bulky chain loops and obscure detail; use weight 4 acrylic yarn as suggested to preserve the delicate loops and texture. βœ— Forgetting to glue the ends of the yarn down on the wire will let your wrapping unwind over time; use a small amount of hot glue at each end and press the yarn down while it sets.

Lavender Pattern

Create a beautiful handmade lavender bouquet using this easy crochet pattern. This pattern guides you step-by-step to crochet lavender stalks and optional leaves, then assemble them onto floral wire for a lasting arrangement. Perfect for gifting, home decor, or market sales, you can customize lengths and colors to suit your style. Follow the clear instructions and materials list to get started today.

Beginner Friendly 2-3 Hours

Materials Needed for Lavender Pattern

β€” Main Fabric

  • 01
    Weight 4 acrylic yarn (#4) - Purple (amount varies by how many stems you make)
  • 02
    Weight 4 acrylic yarn (#4) - Green (small amount for stems and leaves)
  • 03
    Suggested yarn examples: Big Twist Value or Red Heart Super Saver

β€” Tools Required

  • 01
    Crochet hook size 4.0mm
  • 02
    Darning needle (yarn needle) for weaving in ends
  • 03
    Scissors
  • 04
    Hot glue and hot glue gun
  • 05
    Floral wire stems (2mm, 15" long) OR wooden skewers as an alternative
  • 06
    Ribbon for finishing bouquets
  • 07
    Decorative paper and mesh for wrapping bouquets

Progress Tracker

0% Complete

β€” Lavender Pattern :

Step 1 :

Ch 63*

Step 2 :

In the fourth chain from the hook, place 4 TR, ch 3, sl st to the same ch you started with.

Step 3 :

Sl st to the next ch. [Ch 7. Sl st back to the same ch you started with. Sl st to the next stitch.] Repeat [_] down the entire length of your chain.

Step 4 :

FO once you reach the last ch. Leave a 6" tail. Using a darning needle, weave in the end.

Info :

* The length of your chain will alter the length of your lavender. If you want a shorter lavender, chain fewer stitches.

β€” Lavender Leaf :

Step 1 :

Place 5 HDC in a MR. After the fifth HDC, sl st to the top of your first HDC to form a ring. Pull the end of the MR tail tightly to close the circle. Make sure to leave the center hole large enough for your floral wire to fit through.

Step 2 :

Ch 6. Working down the chain, 4 sl st, 1 sc in the last chain. Sl st to the next stitch from the MR. Repeat this process until you have 5 leaves. FO and leave a tail of a few inches. Using a darning needle, weave in the ends.

Info :

Working down the chain: 4 sl st, 1 sc, sl st to the next st of the MR. Create 5 leaves.

β€” Lavender Assembly :

Step 1 :

Cut your floral wire to your desired length.

Step 2 :

Put a small amount of hot glue on one end of the floral wire. Before the glue dries, place your green yarn on the glue to attach it.

Step 3 :

Twist the floral wire to wind the green yarn around the entire length of the wire.

Step 4 :

Place a small amount of hot glue on the other end of the wire, cut your green yarn, and glue it down.

Step 5 :

Place a small amount of hot glue on the end of the lavender where you made the 4 treble crochet stitches. Attach the lavender to the end of the floral wire.

Step 6 :

Wind the lavender around the floral wire. Make sure the chain loops face outwards. Once you reach the end of the lavender, glue the end down to the floral to secure it.

Step 7 :

**OPTIONAL:** With the correct side of your work facing upwards, insert the stem through the center of the magic ring. Make sure the correct side faces upwards so the leaves curl upwards and inwards.

Step 8 :

**OPTIONAL:** Place a small amount of hot glue in a circle around the MR. Slide the leaf upwards to the bottom of the lavender stalk to glue it in place.

Infos :

Make sure the center hole of the MR is large enough for your floral wire to pass through. Use hot glue sparingly to avoid visible glue lumps. Wind yarn tightly on the wire so wrapping does not loosen over time.

Assembly Instructions

  • Cut the floral wire to your desired stem length, then secure one end with a small amount of hot glue and press the green yarn onto the glue to begin wrapping.
  • Twist or wrap green yarn around the entire length of the floral wire, securing both ends with hot glue so the yarn does not unravel during handling.
  • Attach each crocheted lavender stalk by adding a small dab of hot glue to the end with the 4 TR stitches and pressing onto the tip of the floral wire until secure.
  • Wind the lavender stalk along the wire with the chain loops facing outwards, then glue the tail end of the lavender down to the wrapped wire to lock it in place.
  • Optional: slide an assembled leaf up over the base by adding hot glue in a circle around the magic ring and positioning the leaf at the bottom of the lavender stalk.
  • Arrange multiple finished stems into a bouquet, trim any excess wire, and wrap the stems with ribbon and decorative paper or mesh to finish.

Important Notes

  • πŸ’‘Please read pages 3-4 in full before starting the pattern to familiarize yourself with materials and abbreviations.
  • πŸ’‘This pattern is written in US crochet terminology and is suited for beginners with basic stitch knowledge.
  • πŸ’‘Use Weight 4 acrylic yarn as recommended; using thicker yarn will make the lavender too chunky and lose the chain loop details.
  • πŸ’‘Leave the center hole of the magic ring large enough for your floral wire to pass through comfortably before tightening.
  • πŸ’‘Chain length controls lavender stalk length; chain fewer stitches for a shorter flower and more for a longer stalk.

This Lavender Pattern creates long-lasting, handmade lavender bouquets perfect for decor or gifts. Make single stems or full bunches to brighten a room and enjoy hours of relaxing crochet time. Customize colors and lengths to suit any style, then finish with ribbon and decorative paper for a beautiful presentation. πŸ§ΆπŸ’œπŸŒΏ

You ask,

we answer.

FAQs

What size will the finished lavender stalk be?

The length of each lavender stalk depends on your starting chain; the pattern uses Ch 63 as an example, but you can chain fewer stitches for a shorter stalk or more for a longer one.

Can I use a different yarn weight or hook size?

You can use different yarns, but using a thicker yarn will make the lavender bulky and lose detail; the pattern is designed for Weight 4 yarn with a 4.0mm hook for best results.

Do I need to use floral wire or can I use wooden skewers?

Floral wire stems (2mm, 15" long) are recommended for flexibility and realism, but wooden skewers work as an alternative if you do not have wire.

How long does it take to make a bouquet?

Most crafters can complete several lavender stems and assemble a small bouquet in about 2-3 hours, depending on experience and the number of stems.