🧢 Beautiful ✨ Detailed πŸ’ Adorable

Kangaroo Amigurumi Pattern

Kangaroo Amigurumi Pattern
4.3β˜… Rating
12-15 Hours Time Needed
1.2K Made This
βœ‚οΈ

Intermediate Level

Ideal for those with basic crochet experience, featuring slightly more advanced stitches and techniques to expand your skills.

⏱️

Multi-Day Project

A rewarding 12+ hour journeyβ€”perfect for dedicated crafters who love detailed work.

πŸ₯

Charming Critter

Delightful animal designs with sweet details that capture the essence of your favorite woodland and farmyard friends.

About This Kangaroo Amigurumi Pattern

This pattern creates a soft velvet kangaroo with a baby in her pouch, worked mostly in single crochet with detailed shaping and photo guidance. You will crochet legs, tail, crotch, body, hands and a head, plus add wire for posable arms and a sturdy finish. The instructions include yarn types, hook sizes, and step-by-step rounds to assemble a 55 cm finished toy.

Kangaroo Amigurumi Pattern crochet pattern - detailed view of completed project

Designed with clear photos and notes for positioning and sewing, this pattern helps you achieve neat joins and a balanced pose. Suitable for crocheters familiar with basic increases, decreases and amigurumi assembly.

Why You'll Love This Kangaroo Amigurumi Pattern

I absolutely love this pattern because it transforms simple stitches into a character full of personality and charm. I enjoy the structured approach to joining the legs and forming the body β€” the diagrams make positioning reliable and repeatable. The addition of wire for the hands gives this kangaroo a playful, posable quality that I find incredibly satisfying. Every time I finish one I appreciate the mix of shaping and assembly that produces such a polished, cuddly toy.

Kangaroo Amigurumi Pattern step 1 - construction progress Kangaroo Amigurumi Pattern step 2 - assembly progress Kangaroo Amigurumi Pattern step 3 - details and accessories Kangaroo Amigurumi Pattern step 4 - final assembly and finishing

Switch Things Up

I love how flexible this kangaroo pattern is for customization β€” you can change yarn color to create different character personalities, for example gray for a koala-like friend or pastel shades for a nursery toy.

I sometimes swap the velvet yarn for a fluffy acrylic to create a super-soft, baby-friendly version; using a bulkier yarn and larger hook will make a chunky, huggable kangaroo.

I often add embroidered details or felt accessories like a tiny scarf, hat or even a crocheted baby blanket inside the pouch for seasonal variations and gifting.

If you want a keychain or mini version, try thinner yarn and a smaller hook to scale the toy down and use a strong keyring loop at the top.

I like to experiment with different eye styles: crocheted eyes for a soft look, safety eyes for durability (if suitable), or embroidered eyes for a child-safe finish.

To give your kangaroo a more animated pose, add or remove wire in the arms and tail, or use thicker wire for more rigid poses β€” just remember to tape the wire ends well.

Change the pouch size or make the baby removable so the kangaroo can 'feed' or carry different tiny toys β€” it adds play value for kids.

I recommend trying contrast colors for the belly and inner ears to highlight the facial features and add visual interest to the final piece.

For a holiday-themed kangaroo, crochet a tiny Santa hat or add appliques like hearts for Valentine’s Day β€” small accessories make the pattern fun and giftable.

When making multiple kangaroos, I like to mix yarn textures and eye treatments to make a whole family set with different sizes and personalities.

Common Mistakes & How to Fix Them

βœ— Skipping stitch markers when joining legs will cause uneven stitch distribution; mark the join points before sewing and count stitches to ensure symmetry. βœ— Overstuffing early in the shaping process can distort the silhouette; stuff gradually and check shaping often to maintain the intended curves. βœ— Using the wrong hook size for different sections can change proportions drastically; switch to the specified hook sizes (No3/No3.5) for the correct gauge and fit. βœ— Forgetting to secure wire ends leads to poking and instability; wrap the wire ends with adhesive tape before inserting and secure well inside the hand. βœ— Ignoring the position of the working thread during joins will misplace increases; follow the photo guidance and reposition the working thread before continuing each round.

Kangaroo Amigurumi Pattern

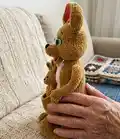
Make an adorable handcrafted kangaroo and its baby using soft velvet yarn and clear, photo-led instructions. This pattern walks you through crocheting legs, tail, body, hands and head, plus how to assemble and add wire for posability. Perfect for gift-making or adding a charming plush friend to your collection. Follow step-by-step rounds and helpful photos to guide you.

Intermediate 12-15 Hours

Materials Needed for Kangaroo Amigurumi Pattern

β€” Main Fabric

  • 01
    Velvet yarn Dolphin Baby, Color 80330 (brown) - main color, 4 1/4 skeins (4 skeins needed for a large kangaroo and 1/4 skein for a baby)
  • 02
    Velvet yarn Dolphin Baby, Color 80353 (light powder) - 0.5 skeins for the belly and muzzle
  • 03
    Velvet yarn Dolphin Baby, Color 80311 (black) - a little for nose and mouth decoration
  • 04
    Velvet yarn Dolphin Baby, Color 80318 (red) - a little for the tongue
  • 05
    Velvet yarn Dolphin Baby, Color 80332 (coral) - 1/4 skein for ears
  • 06
    Dolphin Baby yarn specifications: 100 g, 120 m, 100% polyester
  • 07
    Kamtex mercerized cotton for sewing parts - 50 g, 200 m, 100% cotton (colors: brown, black, red, milky) for seams and strong joins
  • 08
    YarnArt Jeans for crocheting eyes: Color 53 (black), Color 63 (emerald), Color 62 (white) - small amounts
  • 09
    YarnArt Jeans specifications: 50 g, 160 m, 55% cotton, 45% acrylic
  • 10
    Polyester stuffing (holofiber) - amount as needed to fill body, legs and head
  • 11
    Wire: 1 mm wire, approximately 200 cm (78.74 inches) to form arm frames
  • 12
    Sewing threads in black for facial details

β€” Tools Required

  • 01
    Crochet hook No3 (US D)
  • 02
    Crochet hook No3.5 (US E)
  • 03
    Crochet hook No1.5 (US 8) for the eyes
  • 04
    Stitch markers
  • 05
    Thin sewing needle and a thicker needle for ears and longer needle for needle sculpting
  • 06
    Scissors
  • 07
    Yarn/tapestry needle for sewing pieces
  • 08
    Lighter (to process yarn tips)
  • 09
    Adhesive tape to wrap wire ends
  • 10
    Wire cutters and pliers for wire shaping
  • 11
    Polyester stuffing (holofiber)
  • 12
    Pins for assembly

Progress Tracker

0% Complete

β€” Legs :

Info :

Take Himalaya Dolphin Baby yarn, color 80330 (brown color), crochet hook β„–3.5 (US E).

Round 1 :

make a foundation chain 21ch, work 2 sc into the second chain from the hook, work 9 sc more, next 9 hdc, work 4 hdc into one chain, turn and work on the other side 9 hdc more, 9 sc, work 2 sc into one ch (44)

Info :

x - single crochet (sc), T - half double crochet (hdc).

Round 2 :

2 inc (sc), 9 sc, 9 hdc, 4 inc (hdc), 9 hdc, 9 sc, 2 inc (sc) (52)

Round 3 :

(1 sc, 1 inc (sc))*2, 9 sc, 9 hdc, (1 hdc, 1 inc (hdc))*4, 9 hdc, 9 sc, (1 sc, 1 inc (sc))*2 (60)

Round 4 :

60 sl sts (60)

Round 5 :

60 sc in BLO (60)

Round 6-8 :

60 sc (60) - repeat 3 times

Round 9 :

crochet hook β„–3 (US D), 24 sc, (1 sc, 1 dec)*4, 24 sc (56)

Round 10 :

crochet hook β„–3 (US D), 24 sc, 4 dec, 24 sc (52)

Info :

Please observe photo: position of stitches - there ought to be a total of 18 stitches on the back portion, while the front portion should have 34 stitches (toes part).

Round 11-12 :

use the crochet hook β„–3.5 (US E) starting from this round and for the next rounds, 18 sc (18). Proceed to fill the toy with stuffing material at this point.

Round 13 :

(5 sc, 1 inc)*3 (21)

Round 14 :

(6 sc, 1 inc)*3 (24)

Round 15 :

(3 sc, 1 inc)*6 (30)

Round 16 :

(4 sc, 1 inc)*6 (36)

Round 17 :

15 sc, 2 inc, 19 sc (38)

Round 18 :

15 sc, (1 sc, 1 inc)*2, 19 sc (40)

Round 19 :

12 sc, (1 sc, 1 inc)*6, 16 sc (46)

Info :

Fasten off, cut off. Stuff it. The first leg has been completed, and the second leg will be crocheted in a similar manner.

β€” Tail :

Info :

Take Himalaya Dolphin Baby yarn, color 80330 (brown color), crochet hook β„–3.5 (US E). Stuff as you go every 3-4 cm (1-2 inch).

Round 1 :

6 sc in MR (6)

Round 2 :

6 sc (6)

Round 3 :

5 sc, 1 inc (7)

Round 4 :

7 sc (7)

Round 5 :

6 sc, 1 inc (8)

Round 6 :

8 sc (8)

Round 7 :

7 sc, 1 inc (9)

Round 8 :

9 sc (9)

Round 9 :

8 sc, 1 inc (10)

Round 10 :

10 sc (10)

Round 11 :

9 sc, 1 inc (11)

Round 12 :

11 sc (11)

Round 13 :

10 sc, 1 inc (12)

Round 14 :

12 sc (12)

Round 15 :

11 sc, 1 inc (13)

Round 16 :

13 sc (13)

Round 17 :

12 sc, 1 inc (14)

Round 18 :

14 sc (14)

Round 19 :

13 sc, 1 inc (15)

Round 20 :

15 sc (15)

Round 21 :

14 sc, 1 inc (16)

Round 22 :

16 sc (16)

Round 23 :

15 sc, 1 inc (17)

Round 24 :

17 sc (17)

Round 25 :

16 sc, 1 inc (18)

Round 26 :

18 sc (18)

Round 27 :

17 sc, 1 inc (19)

Round 28 :

19 sc (19)

Round 29 :

18 sc, 1 inc (20)

Round 30 :

20 sc (20)

Round 31 :

19 sc, 1 inc (21)

Round 32 :

21 sc (21)

Round 33 :

20 sc, 1 inc (22)

Round 34 :

22 sc (22)

Round 35 :

21 sc, 1 inc (23)

Round 36 :

23 sc (23)

Round 37 :

22 sc, 1 inc (24)

Round 38 :

24 sc (24)

Round 39 :

23 sc, 1 inc (25)

Round 40 :

25 sc (25)

Round 41 :

24 sc, 1 inc (26)

Round 42 :

26 sc (26)

Info :

Fasten off, cut off.

β€” The crotch :

Info :

Take Himalaya Dolphin Baby yarn, color 80330 (brown color), crochet hook β„–3.5 (US E). Do not cut off after these increases; you will join legs and continue.

Round 1 :

8 sc in MR (8)

Round 2 :

8 inc (16)

Round 3 :

(1 sc, 1 inc)*8 (24)

Round 4 :

(2 sc, 1 inc)*8 (32)

Round 5 :

(3 sc, 1 inc)*8 (40)

Round 6 :

(4 sc, 1 inc)*8 (48)

Info :

We will sew the legs to the crotch: mark points where legs will join using four markers; join 8 stitches on each side as depicted in the diagram.

β€” We connect the legs, form the body :

Round 7-9 :

108 sc (108) repeat 3 times; that is, we crochet 10 sc on the back, 38 sc on the left leg, 16 sc on the crotch, 38 sc on the right leg, 6 sc on the back.

Round 10 :

32 sc, (1 sc, 1 dec)*6, 16 sc, (1 sc, 1 dec)*6, 24 sc (96) (16 sc should be in the middle of the front)

Round 11 :

96+26-10-10=102 sc (102). Adjust the position of the working thread as shown in photos.

Round 12 :

6 sc, 1 dec, (11 sc, 1 dec)*3, 55 sc (98)

Round 13 :

5 sc, 1 dec, (10 sc, 1 dec)*3, 55 sc (94)

Round 14 :

4 sc, 1 dec, (9 sc, 1 dec)*3, 55 sc (90)

Round 15 :

(13 sc, 1 dec)*6 (84)

Round 16 :

(12 sc, 1 dec)*6 (78)

Round 17 :

(11 sc, 1 dec)*6 (72)

Round 18 :

(10 sc, 1 dec)*6 (66)

Round 19 :

(9 sc, 1 dec)*6 (60)

Round 20-32 :

60 sc (60) - repeat 13 times

Round 32 :

35 sc, (1 sc, 1 inc)*10, 5 sc (70)

Round 33-36 :

70 sc (70) - repeat 4 times

Info :

We put the body aside, we will crochet hands next.

β€” Hands :

Info :

Take Himalaya Dolphin Baby yarn, color 80330 (brown color), crochet hook β„–3.5 (US E).

Round 1 :

foundation chain 6ch, work 1 sc into the second chain from the hook, work 4 sc more

Round 2 :

make ch 6, work 1 sc into the second chain from the hook, work 4 sc

Round 3 :

make ch 6, work 1 sc into the second chain from the hook, work 4 sc

Round 4 :

we crochet along the edge 8 sc

Round 5 :

making a ring: we have a round of 8 sts. Next, we crochet 8 sc in FLO, turn, continue crocheting other side 8 sc in FLO. Thus, a round of 16 sc (16)

Round 6 :

(2 sc, 1 dec)*4 (12)

Round 7 :

(4 sc, 1 dec)*2 (10)

Round 8 :

10 sc (10)

Round 9-11 :

10 sc (10) - repeat 3 times

Round 12 :

(4 sc, 1 inc)*2 (12)

Round 13-16 :

12 sc (12) - repeat 4 times

Round 17 :

(5 sc, 1 inc)*2 (14)

Round 18-21 :

14 sc (14) - repeat 4 times

Round 22 :

(6 sc, 1 inc)*2 (16)

Round 23-27 :

16 sc (16) - repeat 5 times

Info :

At this point, it is necessary to insert a wire. Prepare two pieces of wire, each measuring 100 cm (40 inches) in length. Twist the two pieces together to obtain a wire with two strands. Wrap the edge of the wire with adhesive tape and insert it into the hand. During crocheting, make sure to loosely fill the hand.

Round 9-11 (wire section) :

10 sc (10) - repeat 3 times

Round 12 :

(4 sc, 1 inc)*2 (12)

Round 13-16 :

12 sc (12) - repeat 4 times

Round 17 :

(5 sc, 1 inc)*2 (14)

Round 18-21 :

14 sc (14) - repeat 4 times

Round 22 :

(6 sc, 1 inc)*2 (16)

Round 23-27 :

16 sc (16) - repeat 5 times

Info :

Fasten off, cut off. Make 2 pieces.

β€” Connect the body and the hands :

Info :

Connect the hands to the body using three stitches, stitching with a semi-cotton thread that matches the color of the yarn. Refer to the diagram for stitch distribution: sew in 3 loops at each arm join as shown.

β€” Body (continued) :

Round 37 :

use the crochet hook β„–3 (US D) starting from this round and for the next rounds, crochet 29 sc on the back, 13 sc on the left arm, 2 sc, (1 sc,1 dec)*10, 2 sc on the chest, 13 sc on the right arm, 1 sc on the back. Stuff the toy as you go (80)

Round 38 :

28 sc, (3 sc, 1 dec)*3, 22 sc, (1 dec, 3 sc)*3 (74)

Round 39 :

28 sc, (2 sc, 1 dec)*3, 22 sc, (1 dec, 2 sc)*3 (68)

Round 40 :

28 sc, (1 sc, 1 dec)*3, (6 sc, 1 dec)*2, 6 sc, (1 dec, 1 sc)*3 (60)

Round 41 :

(13 sc, 1 dec)*4 (56)

Round 42 :

(5 sc, 1 dec)*8 (48)

Round 43 :

(4 sc, 1 dec)*8 (40)

Round 44 :

(3 sc, 1 dec)*8 (32)

Round 45 :

(2 sc, 1 dec)*8 (24)

Info :

At this point insert wire into the body neck area as shown in photos to shape and support the head. Wrap wire ends with tape.

β€” Head :

Info :

Don't cut off, we continue to crochet. From the 46th round we use the hook β„–3.5 (US E).

Round 46 :

24 sc (24)

Assembly Instructions

  • Sew the two legs to the crotch by aligning the marked points and joining 8 stitches on each side; use Kamtex yarn in brown to sew securely and evenly.
  • Mark 10 stitches on the tail from the back and in the middle, then sew the tail onto the toy using brown Kamtex thread; adjust the working thread position if needed by undoing 2 stitches.
  • Insert the prepared wire (twisted two 100 cm pieces) into each hand, wrap the wire ends with adhesive tape and loosely stuff the hand before finishing; stitch the hands to the body with three stitches each.
  • Attach the head to the neck opening, align the neck stitches with the body top and sew evenly around, stuffing the head as you go for smooth shaping.

Important Notes

  • πŸ’‘Use stitch markers to keep track of rounds and join points, especially when sewing legs and aligning the crotch-to-body stitch counts.
  • πŸ’‘Stuff gradually and consistently; overstuffing can widen joins and distort shaping, while under-stuffing gives a floppy result.
  • πŸ’‘Wrap wire ends with adhesive tape before inserting into limbs or the body to prevent poking and to secure the wire inside the crochet piece.

This sweet kangaroo and baby amigurumi combines plush velvet yarn with thoughtful shaping and assembly to become a cherished handmade companion. It makes a wonderful gift for kids or a delightful decor piece for your home. Follow the photo steps and enjoy creating this lovable critter. 🧢🐾

You ask,

we answer.

FAQs

What size will the finished piece be?

The finished kangaroo measures approximately 55 cm (21.65 inches) when using the recommended yarn and hook sizes; the baby measures about 19 cm (7.48 inches).

Can I use different yarn weights for this pattern?

Yes, you can use different yarn weights but this will affect the final size and texture; adjust hook size accordingly and test gauge on a small swatch before continuing.

Do I need wire for this project?

Wire is recommended for the hands to make them posable; the pattern uses 1 mm wire, approximately 200 cm, twisted and wrapped with tape before insertion.

What level of experience is recommended?

This pattern is rated intermediate due to shaping, joining multiple parts, and wire insertion; familiarity with increases, decreases and amigurumi assembly is helpful.

How long does this project typically take to complete?

Most crafters will finish this multi-piece project in 12-15 hours depending on experience and time spent on assembly and finishing details.