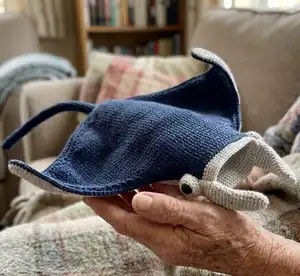
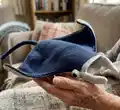
Make Jacque the Manta Ray with this detailed crochet amigurumi pattern. Youll create a sweet, realistic manta ray with a soft body, cephalic fins, eyes and an optional handkerchief accessory. Clear step-by-step instructions, photos and finishing tips guide you through assembly so you can enjoy a beautiful handmade toy. Perfect for gifting or adding a nautical friend to your collection.
Progress Tracker
0% Complete
— Body / Wings :
Infos :
The body/wings are worked in turning rows - chain 1 and turn at the end of each row unless otherwise stated. Make 2 - one in navy blue and one in gray (or your choice colors). The 2 pieces will be seamed together to create the body.
Row 1 :
ch 7. sc in the 2nd back bump from hk and in each of the next 5 [6]
Row 2 :
inc 2, sc across until the last 2 st of row, inc 2 [10]
Row 3 :
sc in each st across [10]
Row 4-45 :
repeat rows 2 & 3. As needed, refer to the chart at right as you go along to be sure your rows have the correct stitch count. Each increase row will increase by 4 stitches.
Row 46 :
inc 3, sc across until the last 3 st of row, inc 3 [100]
Row 47 :
sc in each st across [100]
Row 48-53 :
repeat rows 46 & 47. As needed, refer to the chart at right as you go along to be sure your rows have the correct stitch count. Each increase row will increase by 6 stitches. FASTEN OFF. PHOTO 01
Row 54 :
count 25 stitches in from each wingtip and place a stitch marker there. Slip knot onto hook and rejoin in the 26th stitch from where you fastened off. Sc in next 67 st across (up to where you stitch marked on the other side) [67] PHOTO 02
Row 55 :
dec 2, sc across until the last 4 st of row, dec 2 [63]
Row 56 :
sc in each st across [63]
Row 57-72 :
repeat rows 55 & 56. As needed, refer to chart at right as you go along to be sure your rows have the correct stitch count. Each decrease row will decrease by 4 stitches.
Row 73 :
dec, sc 27, dec [29]
Row 74 :
sc in each st across [29]
Row 75 :
dec, sc 25, dec [27]
Row 76-82 :
sc in each row across [27]
Row 83 :
sc in each stitch around the entire piece, up to the opposite side of the mouth. Fasten off. PHOTO 03
Info :
Stitch count by row (reference chart): R4: [14]. R5: [14]. R6: [18]. R7: [18]. R8: [22]. R9: [22]. R10: [26]. R11: [26]. R12: [30]. R13: [30]. R14: [34]. R15: [34]. R16: [38]. R17: [38]. R18: [42]. R19: [42]. R20: [46]. R21: [46]. R22: [50]. R23: [50]. R24: [54]. R25: [54]. R26: [58]. R27: [58]. R28: [62]. R29: [62]. R30: [66]. R31: [66]. R32: [70]. R33: [70]. R34: [74]. R35: [74]. R36: [78]. R37: [78]. R38: [82]. R39: [82]. R40: [86]. R41: [86]. R42: [90]. R43: [90]. R44: [94]. R45: [94]. R48: [106]. R49: [106]. R50: [112]. R51: [112]. R52: [118]. R53: [118]. R54-R72: refer to chart for continued stitch counts as you progress.
— Tail :
Infos :
Make 2 pieces - one in navy blue and one in gray (just as you did the body/wings). To start the tail, find the most narrow end of the body which has a count of 6 st across PHOTO 04.
Row 1 :
Slip knot onto your hook and rejoin the yarn to the body by making a sc in the 3rd stitch from the right (4th stitch from the left). Sc in the next st, ch 1, turn [2] PHOTO 05
Row 2 :
dec the two stitches you just made [1] PHOTO 06
Row 3 :
fsc 50 [50] Fasten off. PHOTO 07
— Mouth :
Infos :
The mouth is crocheted in continuous rounds using the gray yarn. You will begin by making a chain and will crochet around the chain - making an oval shape.
Rnd 1 :
ch 9, sc in 2nd ch from hook and in next 6 st, inc in last st. Continue on the other side of chain - sc in next 7 st, inc in last st [18]
Rnd 2 :
inc, sc 7, inc 2, sc 7, inc [22]
Rnd 3 :
inc, sc 9, inc 2, sc 9, inc [26]
Rnd 4 :
inc, sc 11, inc 2, sc 11, inc [30]
Rnd 5 :
inc, sc 13, inc 2, sc 13, inc [34]
Rnd 6 :
inc, sc 15, inc 2, sc 15, inc [38]
Rnd 7 :
inc, sc 17, inc 2, sc 17, inc [42]
Rnd 8 :
inc, sc 19, inc 2, sc 19, inc [46]
Rnd 9 :
inc, sc 21, inc 2, sc 21, inc [50]
Rnd 10 :
inc, sc 23, inc 2, sc 23, inc [54] PHOTO 08
Rnd 11-20 :
sc in each st around [54] PHOTO 09
Info :
Fasten off and weave in ends. Flip inside out so the wrong side will be facing the inside of the body and you will be looking into the mouth on the right side of the fabric. PHOTO 10
— Cephalic Fins :
Infos :
The cephalic fins are crocheted in continuous rounds using the gray yarn - make 2. They will be flattened and then sewn on to the mouth.
Rnd 1 :
st 6 in a magic circle [6]
Rnd 2 :
inc in each st around [12]
Rnd 3 :
(sc in next st, inc in next st) x6 [18]
Rnd 4-20 :
sc in each st around [18]
Info :
Fasten off with a sl st, leaving a long tail for sewing on. Flatten the cephalic fins. PHOTOS 11 & 12
— Eyes :
Infos :
The eyes are crocheted in continuous rounds using the gray yarn - make 2. Use 12mm safety eyes.
Rnd 1 :
st 6 sc in a magic circle [6]
Rnd 2 :
inc in each st around [12]
Rnd 4-5 :
sc in each st around [18]
Info :
Fasten off with a sl st, leaving a long tail for sewing on. Insert safety eyes into the middle of the magic circle. Stuff eyes lightly. PHOTOS 13 & 14
— Handkerchief :
Infos :
The handkerchief is crocheted in rows using yellow and light blue yarn. Chain 1 and turn after each row up to and including row 26.
Start :
Start with the yellow yarn
Row 1 :
ch 2, sc in 2nd ch from hook [1]
Row 4 :
inc, sc across until the final st of the row, inc [6]
Row 5-26 :
repeat row 4, alternating colors every 2 rows. You will begin and end each row with an increase stitch, therefore each row will increase by 2 stitches. Row 26 will end with 50 stitches. PHOTO 15 at row 12
Row 27 :
with yellow, inc in next st, sc in next 50 st, ch 36, turn PHOTO 16
Row 28 :
sc in 2nd chain from hook and in next 35 chains. Continue along the long edge of the handkerchief with 49 st, ch 36, turn
Row 29 :
sc in 2nd ch from hook and in next 35 chains, continue down along the left "v" edge of the handkerchief and up the other side of the "v", weaving in ends as you go or crocheting over the ends so as to tuck them into the border. PHOTO 17 Fasten off with a sl st to the top corner.
Info :
Weave in ends. PHOTO 18
— Assembly :
Join the body/wings/tail :
Put blue and gray sides on top of each other, with the wrong sides together (inside). With the blue yarn, slip knot onto your hook. Insert your hook into the first stitch at the left corner of the mouth from top to bottom - with the blue color being the top. PHOTO 19 Single crochet around the entire body and tail - up to the opposite side of the mouth.
Info :
To assist you, I recommend using stitch markers at regular intervals around the body before you start to crochet around. PHOTO 20 This will hold the two pieces together and ensure your stitch counts are the same on each piece so it will crochet together evenly and so you can address any discrepancies in stitch count (increase or decrease) as you go along.
Finish Join :
Fasten off and weave in ends. PHOTO 21.
Add wire to the tail (optional) :
Use a 14 gauge craft wire, cut to length and push into the tail to make it rigid. Use electrical tape on each end to soften the tips. Curl one end which will rest at the base of the tail to prevent the wire from slipping out the tip of the tail or down into the body of the ray. PHOTOS 22, 23, & 24
Shape & Stuff the body :
The middle part of the body is stuffed and the wings remain flat. In order to do this, we create a V-shaped cavity to stuff. Find a straight instrument (I used a stuffing dowel) and lay it across the top of the body from edge of tail to edge of mouth PHOTO 25. Place 5 stitch markers along the length of the dowel which is where you will place 5 small stitches to join the top and bottom of the wings in order to create the cavity. Do this on the other side of the mouth/tail. Using blue yarn, create small stitches through the body at the stitch markers. PHOTO 26 You have now created the cavity. Stuff the body cavity.
Join mouth to body :
Place mouth inside of the opening of the body where the mouth goes. Use the gray yarn for joining the mouth to the body as follows:
Rnd 1 :
Beginning at the corner of the mouth, insert your hook top to bottom (outside to inside) and crochet around through both layers [54] PHOTO 27 & 28
Rnd 2-4 :
sc in each st around to extend the mouth [54] Fasten off and weave in ends.
Sew on cephalic fins :
Sew on the cephalic fins to the sides of the mouth where the gray meets the blue. PHOTO 29, 30, 31 & 32
Sew on eyes :
Sew on the eyes to the sides of the mouth/body over where you just sewed on the cephalic fins. PHOTO 33, 34 & 35.
Finish :
Tie the handkerchief around Jacque's neck. Well done! Admire your incredible crochet skills and enjoy this adorable Manta Ray.
This manta ray pattern combines simple crochet techniques with thoughtful shaping to create a charming marine companion. Perfect for gifting, decorating a nursery, or adding to an ocean-themed toy collection. Have fun customizing colors and accessories to make Jacque your own. 🧶🐚