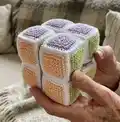
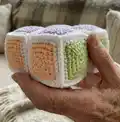
Make a tactile, twistable Infinity Cube fidget toy with this detailed crochet pattern. You will create colorful little cubes and assemble them into a movable puzzle that is perfect for sensory play or a mindful desk toy. The pattern includes full step-by-step instructions, color recommendations, and assembly photos so you can follow along easily. Ideal for makers who enjoy small projects with lots of rewarding finishing work.
Progress Tracker
0% Complete
— Notes :
Info :
You can use any yarn and a suitable hook. If you work with other colors than indicated in the pattern, I would recommend you to write down which color you use and which color you are replacing with. The size of the finished toy from the indicated materials is ~10 cm. Pattern is written in US crochet terms.
— Abbreviations :
Infos :
ar - amigurumi ring. sc - single crochet. hdc - half double crochet. inc3 - increase (1 sc, 1 hdc, 1 sc)*in one stitch. ch - chain. sl st - slip stitch. (...) - the number in brackets at the end of the row means the number of stitches in the row. (...)* - repeat n times.
— Materials and tools :
Infos :
Yarn: YarnArt Jeans 75 (blue), YarnArt Jeans 72 (purple), YarnArt Jeans 53 (light green), YarnArt Jeans 23 (carrot), YarnArt Jeans 88 (yellow), YarnArt Jeans 73 (peach), Alize Cotton Gold 55 (white). - Crochet hook № 2. - Holofiber filler. - Sewing needle. - Scissors.
— Square :
Info :
Note! Inc3 - (1 sc, 1 hdc, 1 sc)*in one stitch. All inc3 are in the corners of the square. In the last row (when you work along the edge of the square with white yarn): inc3 - 3 sc in one stitch. Make 8 squares of each color. In total, you should have 48 squares.
Round 1 :
7 sc in ar, sl st, ch (8)
Round 2 :
inc3 in the next stitch (count ch as sc when you count stitches in the rows), (sc, inc3)*3, sl st in ch of the beginning of the row, ch (16)
Round 3 :
inc3 in the next stitch, (3 sc, inc3)*3, 2 sc, sl st in ch of the beginning of the row, ch (24)
Round 4 :
inc3 in the next stitch, (5 sc, inc3)*3, 4 sc, sl st in ch of the beginning of the row (32)
Info :
Fasten off, cut the thread. Hide the end of the thread when you work along the edge of the square with white yarn.
Round 5 :
Attach a white thread to any of the sides of the square and work along the edge of the square with sc, make inc3 in the corners of the square (3 sc (!) in one stitch). Finish with a needle (see photo) and fasten the thread from the inside. As a result - on the sides of the square you should have (7 sc + 3sc (on the tops))*4 ( 40 )
— Cube assembly :
Info :
Now you need to make 8 cubes. Work with sc to connect two squares. When you work in the corners that have already been connected, make addition sl st through sc in the corner to "sharp" the corner. Fasten the thread tails and hide them inside of the cube.
Item Name (Cube making scheme) :
Follow the cube making scheme for color placement: center square color and adjacent face colors are shown in the provided diagram (peach, purple, carrot, blue, light green, yellow). Assemble squares into cube faces according to scheme before final seaming.
Info :
Making sl st in the corner: when connecting edges and corners, use sl st to secure corners and make them sharp. See photos for method of sl st through corner sc to refine the corner shape.
Info :
Attaching the yarn to the corner: attach white yarn at a corner and work along the white edge to join squares, using sc along edges and sl st in corner points where needed.
Info :
When you have one side left open, fill the cube with holofiber. Do not fill tightly (this is important!!!) in order not to deform the cube. After the cube is assembled, give the part the correct shape with your hands.
— Cubes connection :
Part 1 :
Make 2 parts, each of them has 4 cubes. Assemble 4 cubes as shown in the photo. The faces of the same color of all the cubes are directed in the same direction (the photo is signed in which direction and which color). The places where the cubes are sewed together are shown by dashes and arrows. Sew with simple seam "stitch to stitch" in sc of the white yarn row.
Part 2 :
Assemble the second group of 4 cubes mirroring part 1 so that the side faces of the same color of all the cubes are directed in the same direction. Do not sew part 1 and part 2 together yet.
Info :
Now, assemble part 1 and part 2, as in the photo below. The side faces of the same color of all the cubes are directed in the same direction (in the photo it is signed, in which direction which color). The color of the upper and lower faces is the same. At this stage, we do not sew anything.
Info :
At the final stage, we need to turn the toy 180' (two parts at the same time) so that the upper faces are at the bottom. Check the photo below. Sew in places marked with a stroke.
Info :
Your cube is almost ready! Now, to make your cube more dynamic, I advise you to steam it with an iron. Pass the iron along all the faces, giving the cube the correct shape (do not press the iron too much, it can deform the side faces). Pay special attention to the seams between the cubes, apply steam to them several times to make them soft, to make easy to play with the cube.
Info :
Done! Now you can twist it, fold it, turn it! And also - develop imagination, fine motor skills, study colors and shapes with your child. Or just get away from the outside world and calm down. I hope you enjoyed the process of creating this mysterious toy! Happy crocheting!
This cute Infinity Cube pattern turns small crochet squares into a magical, movable toy full of color and tactile joy. Perfect as a thoughtful handmade gift or a calming fidget for yourself or a child. The step-by-step instructions and photos make assembly easy, and the results are truly satisfying. 🧶🎁