๐Ÿงถ Beautiful โœจ Detailed ๐Ÿ’ Adorable

Ice Cream Turtle Amigurumi Pattern

Ice Cream Turtle Amigurumi Pattern
4.5โ˜… Rating
5-7 Hours Time Needed
3.5K Made This
โœ‚๏ธ

Intermediate Level

Ideal for those with basic crochet experience, featuring slightly more advanced stitches and techniques to expand your skills.

โฑ๏ธ

Weekend Treat

Takes 5-7 hours, making it an enjoyable project to finish over a couple of days.

๐Ÿงธ

Cute Companion

An adorable friend to cherish, handcrafted with love to bring comfort and joy for years to come.

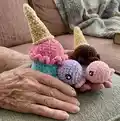
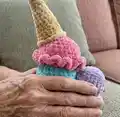
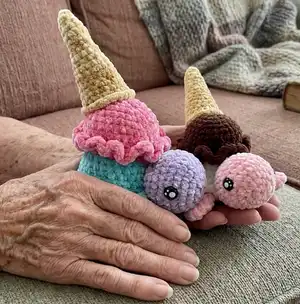
About This Ice Cream Turtle Amigurumi Pattern

This pattern creates a charming ice cream themed turtle amigurumi with layered scoops, a cone, and little legs and tail. It uses bulky chenille-style yarn for a soft, plush finish and clear round-by-round instructions. The design includes tips for attaching pieces and shaping the shell for a whimsical result.

Ice Cream Turtle Amigurumi Pattern crochet pattern - detailed view of completed project

You will work simple increases, decreases, and some back/front loop techniques to shape the scoops and body. The pattern includes assembly notes and placement guidance to help you achieve the cutest finish.

Why You'll Love This Ice Cream Turtle Amigurumi Pattern

I absolutely love this pattern because it turns basic amigurumi techniques into a playful, food-inspired character that brings a smile. I enjoy how the layered scoops and ruffled details give each turtle so much personality. The texture from the chenille yarn makes it irresistibly soft and perfect for gifting. I also love that the pattern is flexible โ€” you can mix colors and create many different flavor combinations for endless variety.

Ice Cream Turtle Amigurumi Pattern step 1 - construction progress Ice Cream Turtle Amigurumi Pattern step 2 - assembly progress Ice Cream Turtle Amigurumi Pattern step 3 - details and accessories Ice Cream Turtle Amigurumi Pattern step 4 - final assembly and finishing

Switch Things Up

I love how easy it is to customize this pattern by simply changing the scoop colors โ€” try pastel tones for a soft nursery palette or bright, bold hues for a playful theme.

To make a smaller or larger turtle, change your yarn weight and hook size: a thinner yarn with a smaller hook makes a tiny keychain version, while bulky yarn with a larger hook creates a cuddlier toy.

I often experiment with different eye types: safety eyes look professional, embroidered eyes add softness, and felt appliques give a whimsical look.

Try adding surface embroidery or small felt sprinkles to the scoops for extra detail and personality.

Swap the cone placement or angle to create unique poses โ€” sewing it centered, off to the side, or tilted forward changes the character instantly.

For more texture, use a contrasting yarn in the BLO rows to create a scalloped shell edge or ruffle that looks like melting ice cream.

If you want a posable version, consider inserting thin wire into the legs before stuffing to make them adjustable.

Make themed sets by matching scoop colors to holidays โ€” orange and black for Halloween, red and green for Christmas, or pastel Easter shades.

Turn this into a family by changing one element slightly for each turtle โ€” different cones, eye styles, or ruffle sizes make each one unique.

I recommend trying small embellishments like tiny bows, embroidered smiles, or felt toppings to make each turtle a personal, gift-ready creation.

Common Mistakes & How to Fix Them

โœ— Not using stitch markers with fluffy chenille yarn will make it hard to find your first stitch; place a stitch marker at the start of each round to keep track and move it up as you crochet. โœ— Forgetting to stuff gradually can lead to lumps and misshapen scoops; add stuffing a little at a time while shaping to maintain an even, round appearance. โœ— Leaving too short a tail when finishing the head will make sewing difficult; leave an 8-9 inch tail for sewing so you have secure, manageable length to attach pieces. โœ— Attaching legs without checking curve orientation can make your turtle look lopsided; position legs with the curve on the right for the first two and on the left for the second two as directed, and pin before stitching.

Ice Cream Turtle Amigurumi Pattern

Make a whimsical Ice Cream Turtle amigurumi that combines fluffy yarn and simple shaping to create a cuddly, food-inspired toy. You will enjoy layering colorful ice cream scoops, sewing on a crunchy cone, and attaching cute little legs and a tail. This pattern is friendly and clear, perfect for crocheters wanting a fun, finished toy to gift or display.

Intermediate 5-7 Hours

Materials Needed for Ice Cream Turtle Amigurumi Pattern

โ€” Main Fabric

  • 01
    Premier Just Chenille - White (Size 6) - for scoop layers (Neapolitan scheme)
  • 02
    Premier Just Chenille - Pink (Size 6) - for head and legs (Neapolitan scheme)
  • 03
    Estako Velvet - Brown (no size listed) - for top scoop (Neapolitan scheme)
  • 04
    Premier Just Chenille - Aqua (Size 6) - for scoops (Cotton Candy scheme)
  • 05
    Premier Just Chenille - Lavender (Size 6) - for head/legs (Cotton Candy scheme)
  • 06
    Premier Just Chenille - Flamingo (Size 6) - for top scoop (Cotton Candy scheme)
  • 07
    Bernat Velvet - Soft Sunshine (Size 5) - for cone

โ€” Tools Required

  • 01
    Crochet hook size 3.5mm (E)
  • 02
    Safety eyes 12mm (2 pieces)
  • 03
    Tapestry needle for sewing
  • 04
    Scissors
  • 05
    Poly-fil stuffing
  • 06
    Stitch markers (recommended for fluffy yarn)
  • 07
    Pins for assembly (optional)

Progress Tracker

0% Complete

โ€” Supplies :

Info :

Hook: 3.5mm / E. Yarn: Size 5-6 Bulky Yarn. ~ Neapolitan Color Scheme: Premier Just Chenille - White and Pink (Size 6), Estako Velvet - Brown (No Size listed, but is similar to the other yarn brands used). ~ Cotton Candy Color Scheme: Premier Just Chenille - Aqua, Lavender, and Flamingo (size 6). ~ Bernat Velvet - Soft Sunshine (Size 5). Note: The Premier Just Chenille yarn is very similar in size to the Bernat Velvet used, it is not a super bulky yarn like what you typically expect with a size 6 yarn. It is much thinner than Bernat Blanket, which is a size 6 as well. Safety Eyes: 12mm. Tapestry Needle, Scissors, Poly-Fil for stuffing.

Info :

Finished Size: Approximately 6 inches long, 6 inches wide, 7 inches tall.

Infos :

Abbreviations (US Terms): CH: Chain. MR: Magic Ring. SC: Single Crochet. HDC: Half Double Crochet. INC: Increase. DEC: Decrease. FLO: Front Loops Only. BLO: Back Loops Only. SlSt: Slip Stitch. St: Stitch. R: Row. BO: Bind Off. (#): # of stitches in the round. Note: If you are not used to using 'Fluffy/Chunky' yarn, I suggest using stitch markers to help you find your stitches and/or rows until you have practiced enough to be able to 'feel' for them.

โ€” Front Legs :

Round 1 :

8SC in MR (8)

Round 2 :

Inc (16)

Round 3 :

SC, Inc (24)

Round 4 :

3SC, Inc (30)

Info :

SlSt into next St. Fold your circle in half to make a half circle, SC around the half circle through both stitches. BO, there is no need to leave a tail for sewing, you will SC the legs into a round of the body.

โ€” Back Legs :

Round 1 :

8SC in MR (8)

Round 2 :

Inc (16)

Round 3 :

SC, Inc (24)

Info :

SlSt into next St. Fold your circle in half to make a half circle. SC around the half circle through both stitches. BO, there is no need to leave a tail for sewing, you will SC the legs into a round of the body.

โ€” Tail :

Round 1 :

3SC in MR (3)

Round 2 :

Inc (6)

Round 3-5 :

SC (6)

Info :

SlSt, BO, there is no need to leave a tail for sewing, you will SC the tail piece into a round of the body.

โ€” Head :

Round 1 :

8SC in MR (8)

Round 2 :

Inc (16)

Round 3 :

SC, Inc (24)

Round 4 :

3SC, Inc (30)

Round 5-8 :

SC (30)

Round 9 :

SC, Dec (20)

Round 10 :

2SC, Dec (15)

Info :

SlSt, leave a long tail for sewing. I leave about 8-9 inches to be safe, but I usually have a lot left over.

Info :

Add eyes and stuff the head. I added my eyes at around rows 5-6 and about 9-10 stitches apart.

โ€” Shell/Body :

Info :

Begin with the top ice cream scoop color. Brown (Neapolitan) or Flamingo (Cotton Candy).

Round 1 :

8 SC in MR (8)

Round 2 :

Inc (16)

Round 3 :

SC, Inc (24)

Round 4 :

3SC, Inc (30)

Round 5-9 :

SC (30)

Round 10 :

Working in FLO, 3HDC in each stitch, SlSt into the first HDC and BO (90) *You will not touch this row again*

Round 11 :

Attach the same color yarn with a SC into the first stitch of the BLO of R9 and SC around in the rest of the back loops (30)

Round 12 :

SC, Dec (20)

Info :

Color change to the second ice cream scoop color using your preferred method. White (Neapolitan) or Aqua (Cotton Candy). Add stuffing to the first scoop.

Round 13 :

SC (20)

Round 14 :

SC, Inc (30)

Round 15-19 :

SC (30)

Round 20 :

Working in FLO, 3HDC in each stitch, SlSt into the first HDC and BO

Round 21 :

Attach the same color yarn with a SC into the first stitch of the BLO of R19 and SC around in the rest of the back loops (30)

Round 22 :

Grab your legs and tail, this is the row you will SC your pieces into. You place your pieces in front of the stitches of the body, pushing your hook through the leg/tail first then through the body stitch. When crocheting the legs on, looking down at your work, you want the curve of the leg on your right for the first two legs and on your left for the second two. See photos to help with placement.

Infos :

3SC. Grab a front leg, attach with 3SC. 4SC. Grab a back leg, attach with 2SC. 1SC. Grab the tail, attach with 4SC. 1SC. Grab the second back leg, attach with 2SC. 4SC. Grab the second front leg, attach with 3SC. 3SC. (30)

Round 23 :

SC, Dec (20)

Info :

Add stuffing

Round 24 :

2SC, Dec (15)

Round 25 :

3SC, Dec (12)

Info :

Add any additional stuffing as desired

Round 26 :

Dec (6)

Info :

SlSt, cut yarn leaving a short tail to sew the hole closed. Weave the yarn tail back and forth into the stitches around then pull tight to close. Tie to secure and weave the rest of the yarn tail into the body.

Info :

Sew the head onto the body. I placed the head on the bottom ice cream scoop, underneath the ruffle of the top scoop and evenly in between the two front legs.

โ€” Cone :

Info :

Using tan color (Bernat - Soft Sunshine)

Round 1 :

6SC in MR (6)

Round 2-3 :

SC (6)

Round 4 :

SC, Inc (9)

Info :

Begin lightly stuffing as you go

Round 5-7 :

SC (9)

Round 8 :

2SC, Inc (12)

Round 9-10 :

SC (12)

Round 11 :

2SC, Inc (16)

Round 12-15 :

SC (16)

Round 16 :

SC, Inc (24)

Round 17 :

SC in FLO (24)

Info :

SlSt, BO, leave a long tail for sewing. I leave about 8-9 inches to be safe, but I usually have a lot left over. Add any additional stuffing desired.

Info :

Sew the cone onto the top ice cream scoop slightly off to the side or wherever you prefer. I sew into row 16, so that row 17 is a lip on the cone to add a little more detail, however, feel free to sew into the last row (row 17) if that is your preference.

Assembly Instructions

  • Attach legs and tail into Round 22 of the body by placing pieces in front of the body stitches, pushing the hook through the leg/tail first then through the body stitch, and SC to secure according to the sequence provided.
  • Sew the head onto the bottom ice cream scoop (underneath the ruffle of the top scoop) and position it evenly between the two front legs using the long tail left from the head.
  • Sew the cone onto the top ice cream scoop slightly off to the side or wherever you prefer; sewing into row 16 will leave row 17 as a lip for extra detail.
  • Add safety eyes to the head around rows 5-6, approximately 9-10 stitches apart, then stuff the head before closing and sewing to the body.
  • Weave in all yarn tails securely into the body after closing openings and reinforce attachment points by stitching through several rounds for stability.

Important Notes

  • ๐Ÿ’กUse stitch markers to keep track of rounds when working with fluffy chenille yarn, as it can be difficult to find stitches by sight alone.
  • ๐Ÿ’กStuff gradually and evenly to avoid lumps and to get a smooth, round scoop shape; add or reduce stuffing as desired for firmness.
  • ๐Ÿ’กLeave a long tail (about 8-9 inches) when finishing pieces you will sew, so you have enough length to attach them securely.
  • ๐Ÿ’กWhen attaching legs, orient the curve as directed and pin pieces in place before sewing to ensure symmetry and correct placement.

This sweet Ice Cream Turtle pattern blends playful design with soft chenille textures for an irresistible handmade toy. Mix and match flavors and colors to create a whole family of dessert turtles to gift or collect. The finished amigurumi is cuddly and full of charm โ€” perfect for nurseries, shelves, or present boxes. ๐Ÿฆ๐Ÿงถ

You ask,

we answer.

FAQs

What size will the finished piece be?

The finished amigurumi measures approximately 6 inches long, 6 inches wide, and 7 inches tall using the recommended yarn and hook size.

Can I use different yarn weights for this pattern?

Yes, you can use different yarn weights, but the final size and texture will change; choose an appropriate hook for your yarn and expect a different finished scale.

Do I need prior crochet experience for this pattern?

This pattern is rated intermediate and assumes familiarity with single crochet, increases, decreases, working in front/back loops, and basic seaming.

How long does this project typically take to complete?

Most crocheters complete this project in about 5-7 hours, though time may vary depending on experience and how many decorative options you add.