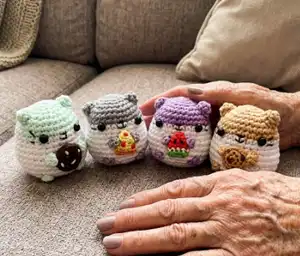
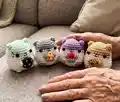
Make a delightful set of tiny Hungry Hamsters complete with tiny snacks and accessories. This pattern guides you through crocheting a palm-sized hamster and mini versions using small hooks and mercerized thread. With clear rounds, snack patterns (cookies, pizza, strawberry, acorn) and assembly steps, you can create a charming collection to give as gifts or keep for display. Perfect for crafters who enjoy micro crochet and cute amigurumi details.
Progress Tracker
0% Complete
— Materials and Tools Used :
Info :
For Mini Hamster: Monaco Mercerized Cotton Thread. 1.10mm Crochet Hook. (2) Safety eyes 3mm. For snacks: DMC Embroidery threads. 0.75mm Crochet Hook.
Info :
For Palm-sized Hamster: Monaco Acrylic Yarn (3-ply). 2.25mm Crochet Hook. (2) Safety eyes 6mm. For snacks: Monaco Mercerized Cotton Thread. 1.10mm Crochet Hook.
Info :
General: Stitch Marker. Black embroidery/sewing threads. Tapestry/sewing needle. Toy stuffing. Scissors.
Info :
GAUGE: When crocheting the pattern for the snacks, go for a hook that is 3-4 sizes smaller than the one you're using for the hamster's body.
Info :
TERMINOLOGY: This pattern uses US terminology and is worked in a continuous round.
Info :
FINISHED SIZE: My palm-sized hamsters came out approximately 6cm tall and mini hamsters came out 3 cm tall. For demonstration purposes, the sample pictures are of palm-sized hamster.
— Abbreviations :
Infos :
MR - Magic ring/circle. R- round. ch - chain. st - stitch. BLO - back loops only. sc- single crochet. inc - increase. dec - invisible decrease. (..) - number of stitches in the round. s2color - switch to *color*
— Head/Body :
R6-7 :
sc around [2 rounds] (30)
R8-9 :
s2white sc around [2 rounds] (30)
Info :
Insert eyes between Rounds 8 & 9 (about 6 stitches apart).
R11-12 :
sc around [2 rounds] (36)
Info :
Start filling with polyfill until semi-firm.
Info :
Finish off and add more stuffing until body is well-shaped. Sew close.
Info :
Note: the top of the safety eyes should slightly touch the colored portion. If there are some white gaps between the eyes, use larger sized eyes or insert them higher up between rounds 7 & 8 instead.
— Legs :
Info :
Using 2.25mm hook. Legs - Make 4 in beige. Leave some allowance before you start your chain.
Item Name (P1) :
Ch 2 and hdc in 2nd ch from hook.
Info :
Finish off and leave long tail for sewing
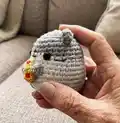
— Ears :
Info :
Ears - Make 2 in beige.
R1 :
Ch2, 4sc in 2nd ch from hook (4)
Info :
Cut thread and leave long tail for sewing
— Tail :
Info :
Tail - Make in beige.
R1 :
Ch2, 4sc in 2nd ch from hook (4)
Info :
Cut thread and leave long tail for sewing
— Cookie A (using 2.25mm hook) :
R1 :
In MR, ch2 then 8 hdc around (8)
R2 :
Sl st in each st around (8)
Info :
Leave long yarn tail for sewing. With brown yarn, sew on small chocolate chips.
— Cookie 2 (using smaller hook and yarn as hamster) :
Info :
Finish off and leave long tail for sewing. With dark brown thread/yarn, sew small triangles to make choco chips. Sew close.
— Mini Watermelon/ Pizza :
Info :
Note: circle color indicate color change of round for Watermelon or Pizza
Info :
Finish off and leave long tail for sewing. Flatten triangle, making sure that the yarn tail is situated on the side.
Info :
For the watermelon slice, sew on some black thread to put watermelon seeds (this part is optional).
Info :
For the pizza slice, embroider 3-4 pepperoni slices with red thread. Sew 4-5 times over the same stitch (careful not to make them overlap). Embroider peppers by sewing green thread 2-3 times diagonally randomly on the pizza.
Info :
Sew close the pizza/watermelon slice close by threading the yarn tail through the back loops of the last round.
— Mini Strawberry (using 1.10mm hook) :
Info :
Stuff lightly and finish off with long tail for sewing. Embroider strawberry seeds with white yarn and sew close. Do not cut off yarn tail so you can use it to sew on to the hamster.
— Strawberry leaf :
Info :
Make in green. In a magic ring, *ch 2 then sl st in the 2nd ch from hook. Sl st again into the magic ring*. Repeat ** 4 more times. Leave long tail for sewing and sew on top of strawberry.
— Mini Acorn (using 1.10mm hook) :
Info :
Finish off. Do not sew close.
— Acorn cap - Make in dark brown :
Info :
Finish off with long thread for sewing and sew the front loops of the acorn cap to the edge of the acorn. Embroider a French knot to the top as the nub.
— Assembly :
Info :
Note: Attach the individual parts to the body with sewing pins first to make sure you're happy with the placement.
1. Mouth :
With black sewing thread or yarn, sew a small dash (-) between the eyes between R7&8. Sew a vertical line ( | ) from the center of the nose down. Sew on 2 diagonal lines (v) to give him a tiny smile.
2. Whiskers :
Sew two diagonal lines beside the eyes to make the whiskers.
3. Ears :
Sew the ears to the top of the head about 6 stitches apart.
4. Sew on the snack of choice :
Sew the snack on the center of the belly.
5. Sew the hands :
Sew the hands as if they are holding the snack. If you want your sewing to be extra unnoticeable you can use sewing thread in a similar shade to keep it securely in place.
6. Count 2 rounds down from the hands :
Sew the legs horizontally facing towards the belly. They should align with the eyes.
7. Sew the tail :
Sew the tail on the back of the hamster around R15.
These little Hungry Hamsters were designed to bring instant smiles and tiny cuddles to your day. Create a collection of personalities by changing colors and snacks, then share them as sweet handmade gifts or keep them on display. Happy crocheting and enjoy every tiny stitch! 🧶🧸