๐Ÿงถ Beautiful โœจ Detailed ๐Ÿ’ Adorable

Horse Amigurumi Pattern

Horse Amigurumi Pattern
4.7โ˜… Rating
5-7 Hours Time Needed
3.3K Made This
โœ‚๏ธ

Intermediate Level

Ideal for those with basic crochet experience, featuring slightly more advanced stitches and techniques to expand your skills.

โฑ๏ธ

Weekend Treat

Takes 5-7 hours, making it an enjoyable project to finish over a couple of days.

๐Ÿงธ

Cute Companion

An adorable friend to cherish, handcrafted with love to bring comfort and joy for years to come.

About This Horse Amigurumi Pattern

This pattern creates a soft, velvet yarn horse amigurumi approximately 11.40" (29 cm) tall when made with the recommended yarn and hook. The design features color-changing face detail, sewn-on legs, and a full mane and tail made from sport-weight yarn. Clear round-by-round instructions and photo references help you shape the head, body and limbs precisely.

Horse Amigurumi Pattern crochet pattern - detailed view of completed project

The pattern uses spiral rounds, safety eyes and needle sculpting to give expression and character to the face. Youll find specific instructions for attaching the mane and tail and finishing touches like nostrils and eyelashes.

Why You'll Love This Horse Amigurumi Pattern

I absolutely love this pattern because it turns simple materials into a characterful, huggable horse with a few thoughtful shaping steps. I enjoy how the color-changing detail on the face gives each horse a unique personality. The mane and tail technique lets me customize length and fullness, which is always fun to experiment with. Every time I finish one, I appreciate the small, neat details like sculpting the eyes and embroidered nostrils that bring the toy to life.

Horse Amigurumi Pattern step 1 - construction progress Horse Amigurumi Pattern step 2 - assembly progress Horse Amigurumi Pattern step 3 - details and accessories Horse Amigurumi Pattern step 4 - final assembly and finishing

Switch Things Up

I love how easy it is to change the personality of this horse just by swapping colors โ€” try a palomino palette or greys for a foal look.

To make a smaller version, use a thinner yarn and smaller hooks; the mane bundles can be proportionally shorter for a miniature style.

For a larger, cuddlier horse, use a bulkier velvet yarn and a larger hook and increase the number of mane bundles for a fuller look.

I often add little accessories like a tiny saddle, scarf, or crocheted blanket to make each horse unique and gift-ready.

If you want a poseable toy, consider inserting a thin wire into the legs before finishing so you can shape poses carefully.

Experiment with different eye sizes and styles โ€” safety eyes, embroidered eyes, or French knot highlights all change the expression dramatically.

Change the mane attachment pattern to braids or a topknot for playful hairstyles; braid bundles together before attaching for a stylized look.

Try embroidering small markings like stars or socks on the legs for more character and visual interest.

Use contrasting yarn for the bridle or make a decorative ribbon halter instead of the velvet bridle shown in the photos.

I also like to add weighted beads into the bottom of the body to help the toy sit upright more securely; place them inside a small felt pouch before stuffing.

Common Mistakes & How to Fix Them

โœ— Not inserting safety eyes at the correct rounds can result in misplacement on the face; insert the safety eyes between rounds 9 and 10 of the head and double-check spacing before securing. โœ— Forgetting to stuff gradually leads to lumps and uneven shaping; stuff the head, legs and body progressively while you crochet, shaping as you go for smooth curves. โœ— Ignoring color change instructions on the head will give messy edges; follow the alternate stitch sequence for white (W) and main color (M) exactly and check photos for correct transitions. โœ— Crocheting too loosely with velvet yarn causes holes and loose stuffing; maintain a slightly tighter tension and use recommended hook sizes (try one size smaller if you crochet weakly). โœ— Skipping to weave in yarn ends when joining legs and forelegs will leave visible tails; weave ends on the wrong side of the body after joining the legs as described and shown in photos.

Horse Amigurumi Pattern

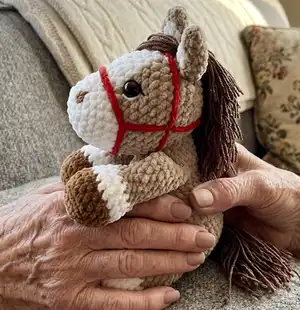
Make an adorable velvet yarn horse that measures about 11.4" (29 cm) using soft super-bulky yarn and easy shaping techniques. This pattern guides you step-by-step through crocheting the head, body, legs, ears, mane and tail with clear rounds and helpful finishing tips. Youll get a cuddly, poseable toy perfect for gifting or decorating your home. Enjoy crafting this charming little horse and personalize colors to make it your own.

Intermediate 5-7 Hours

Materials Needed for Horse Amigurumi Pattern

โ€” Main Fabric

  • 01
    Super Bulky/Super Chunky/14ply velvet yarn (Himalaya Dolphin Baby or analogue) 100g/120m per skein - Main color consumption ~65 g
  • 02
    White velvet yarn consumption ~25 g
  • 03
    Dark yarn for hooves consumption ~18 g
  • 04
    Sport weight/4ply yarn (YarnArt Jeans or analogue) 50g/160m for mane and tail ~15 g
  • 05
    Any 4ply black yarn (50g/160m) for face decoration ~30 cm
  • 06
    Small amounts of brown velvet yarn for nostrils and details ~few grams

โ€” Tools Required

  • 01
    Crochet hook size 4 mm (use one size smaller if you crochet loosely)
  • 02
    Crochet hook size 5 mm for attaching mane and tail strands
  • 03
    Stitch markers
  • 04
    Safety eyes 14 mm black (2 pcs)
  • 05
    Polyester toy filling (fiberfill) ~100 g
  • 06
    Needle with a large eye for sewing pieces
  • 07
    Scissors
  • 08
    Yarn needle for weaving in ends
  • 09
    Pins for assembly (optional)

Progress Tracker

0% Complete

Info :

Crochet all pieces in spiral rounds.

โ€” Head :

Info :

Start with white yarn.

Round 1 :

6sc in MR

Round 2 :

6inc (12)

Round 3 :

(1sc, inc)x6 (18)

Round 4 :

(2sc, inc)x6 (24)

Round 5-6 :

24sc (2 rounds)

Round 7 :

(4sc, inc)x4, 4sc (28)

Round 8 :

28sc

Info :

Add the main yarn. Next alternate stitches in white color (W) and main color (M).

Round 9 :

3sc (M), 6inc (W), 19sc (M) (34) (color changing - photo 1)

Round 10 :

5sc (M), 9sc (W), 20sc (M) (34)

Round 11 :

6sc (M), 7sc (W), 21sc (M) (34)

Round 12 :

7sc (M), 5sc (W), 22sc (M) (34)

Round 13 :

8sc (M), 3sc (W), 23sc (M) (34)

Round 14 :

8sc (M), 3sc (W), 23sc (M) (34)

Info :

Further crochet only with the main yarn.

Round 15 :

(5sc, dec)x4, 6sc (30)

Info :

Insert safety eyes between rounds 9 and 10 (photos 6-8).

Round 16 :

30sc

Round 17 :

(4sc, dec)x5 (25)

Info :

Stuff in the process.

Round 18 :

(3sc, dec)x5 (20)

Round 19 :

(2sc, dec)x5 (15)

Round 20 :

(1sc, dec)x5 (10)

Round 21 :

2dec, then take a needle with a wide eye and grab the front loop of each stitch, thread the yarn tail and tighten it a little. So the hole is closed, fasten off and weave in the ends. (photos 9-11)

Info :

Color changing photos and securing safety eyes are shown in the photo sequence; follow images for placement and wrong/right side views.

โ€” Securing and Sculpting :

Info :

Color changing: work photos 1-5 for changing from white to main color cleanly; wrong side photo demonstrates how color strands sit on the inside.

Info :

Securing safety eyes: photos 6-8 show installing 14mm safety eyes and checking placement before final backing.

Info :

Tighten the hole with a needle: photos 9-11 show using a needle to close small holes neatly and finish the head opening.

Info :

Needle Sculpting: Tightening with white velvet or cotton yarn helps define eye sockets and facial contours; follow photos 17-26 for needle sculpting steps.

Info :

Whites of the eyes: embroider with white velvet yarn to add eye highlights (see photos 27-29).

Info :

Eyelashes: embroider with a black cotton thread as shown in photos 30-32.

Info :

Nostrils: embroider with brown velvet yarn in rounds 3-4 of the head (photos 33-35).

โ€” Ears (make 2) :

Info :

Start with the main yarn.

Round 1 :

5sc in MR

Round 2 :

(1sc, inc)x2, 1sc (7)

Round 3 :

7sc

Round 4 :

1sc (M), inc (W), (1sc, inc, 2sc, inc) (M) (10)

Round 5 :

inc (M), 3sc (W), (inc, 5sc) (M) (12)

Round 6-7 :

2sc (M), 3sc (W), 7sc (M) (12) (2 rounds)

Info :

Fold the ear in half at the base, grab the stitches at the edges of the last round and crochet them together with sl st, as shown in the photo. Leave the yarn tail for sewing pieces. (photos 12-15). Sew the ears to the head in the place where the white color ends.

โ€” Forelegs (make 2) :

Info :

Start with dark yarn for hooves.

Round 1 :

6sc in MR

Round 2 :

6inc (12)

Round 3 :

(1sc, inc)x6 (18)

Round 4 :

BLO 18 sc

Round 5-6 :

18sc (2 rounds)

Info :

Change color to white.

Round 7 :

BLO 18 sc

Round 8 :

(3 sc, dec)x3, 3 sc (15)

Round 9 :

15 sc

Info :

Stuff the leg to the middle (in halfway).

Info :

Change color to the main.

Round 10 :

(3sc, dec)x3 (12)

Round 11-18 :

12sc (8 rounds)

Round 19 :

Fold the leg in half and crochet 6 sc through both sides. Leave a small yarn end. (photos 39-41)

โ€” Hind legs (make 2) :

Info :

Start with dark yarn for hooves.

Round 1 :

6sc in MR

Round 2 :

6inc (12)

Round 3 :

(1sc, inc)x6 (18)

Round 4 :

BLO 18 sc

Round 5-6 :

18 sc (2 rounds)

Round 7 :

BLO 18 sc

Info :

Change color to white.

Round 8 :

(3sc, dec)x3, 3sc (15)

Round 9 :

15 sc

Info :

Stuff the leg (only 2/3 of it).

Round 10 :

(3sc, dec)x3 (12)

Round 11-13 :

12sc (3 rounds)

Info :

Change color to main.

Round 14-18 :

12sc (5 rounds)

Round 19 :

Fold the leg in half and crochet 6 sc through both sides. Leave a small yarn end.

โ€” Body :

Info :

Crochet with the main yarn.

Round 1 :

6sc in MR

Round 2 :

6inc (12)

Round 3 :

(1sc, inc)x6 (18)

Round 4 :

(2sc, inc)x6 (24)

Round 5 :

(3sc, inc)x6 (30)

Round 6 :

(4sc, inc)x6 (36)

Round 7 :

(5sc, inc)x6 (42)

Round 8 :

6sc, 6sc with the hind leg, 15 sc, 6sc with the second hind leg, 9sc (42) (photos 43-44)

Info :

Weave in the yarn ends on the wrong side of the body (photo 45).

Round 9-13 :

42sc (5 rounds)

Round 14 :

32sc (3sc, dec)x2 (40)

Round 15 :

3sc, dec, 35sc (39)

Round 16 :

(5sc, dec)x5, 4sc (34)

Round 17 :

34sc

Round 18 :

(4sc, dec)x5, 4sc (29)

Round 19 :

29sc

Round 20 :

(3sc, dec)x5, 4sc (24)

Round 21 :

5sc, 6sc with the foreleg, 5 sc, 6sc with the second foreleg, 2sc (24)

Info :

Weave in the ends as described above. Stuff the body in the process.

Round 22 :

(2sc, dec)x6 (18)

Round 23-24 :

18sc (2 rounds)

Round 25 :

7sc, 8 sl st, 3sc (18)

Round 26 :

7sc, sl st

Info :

Fasten off, leave a long end for sewing pieces.

โ€” Bridle :

Info :

Make with velvet yarn. Use ~50 cm of thin velvet yarn and follow photos 36-38 for placement around the head. Attach and secure with a knot or small stitches on the wrong side of the head.

โ€” Mane & Tail :

Info :

For the mane we need 4ply yarn (50g/160m): 2 bundles of strands 24cm long and 14 bundles of strands 17cm long (1 bundle consists of 10 strands); Cardboard pieces 8.5cm and 12cm wide.

Info :

Fold the strands in half. Attach 2 long bundles 24cm in front of the ears on one line - this will be the bangs. Attach 14 bundles 17 cm each to each other tightly, 2 bundles in a row (the mane will consist of 8 rows).

Info :

For the tail we need 4 bundles of strands 24cm long (1 bundle consists of 10 strands). Fold them in half. Attach the bundles in the shape of a rhombus: one on the top, then 2 together and 1 on the bottom. The tail consists of 4 bundles arranged in 4 rows.

Info :

Attach mane and tail bundles using hook size 5 mm. Trim and shape mane and tail as shown in photos 51-64.

โ€” Finishing & Assembly :

Info :

Sew the head to the body aligning the base of the head opening with the top of the body; secure with strong whipstitches and weave in ends (photos 46-50 show assembly sequence).

Info :

Attach legs: sew forelegs to the body between rounds indicated in the body instructions and hind legs where specified in round 8 of the body. Check photos 43-48 for placement and visual reference.

Info :

Add embroidered nostrils and eyelashes, secure bridle, then arrange mane and tail and trim for final look. Our horse is ready (photos 49-50, final shots on last pages).

Assembly Instructions

  • Sew the head to the body by aligning the bottom edge of the head opening with the top of the body and whipstitching securely, then weave in ends (photos 46-50).
  • Position and sew the hind legs into the body at round 8: 6sc, 6sc with the hind leg, 15sc, 6sc with the second hind leg, 9sc; weave in ends on the wrong side (photos 43-45).
  • Attach forelegs on either side of the body at the points indicated in round 21 of the body: 5sc, 6sc with the foreleg, 5sc, 6sc with the second foreleg, 2sc; sew firmly for stability.
  • Sew the ears to the head where the white color ends and fold and slip-stitch the ear bases together before attaching (photos 12-15).
  • Attach mane bundles to the top line and bangs in front of the ears using a 5 mm hook; form the tail bundles into a rhombus and sew to the rear of the body as shown in photos 51-64.

Important Notes

  • ๐Ÿ’กCrochet with slightly tighter tension when using velvet yarn to prevent holes and visible stuffing.
  • ๐Ÿ’กInsert safety eyes before stuffing too much and secure them between rounds 9 and 10 of the head to match the photo placement.
  • ๐Ÿ’กWeave in yarn ends on the wrong side of the body immediately after joining legs to hide tails and secure the joins.
  • ๐Ÿ’กStuff gradually while crocheting to maintain the desired shape and avoid overstuffing which can distort shaping.
  • ๐Ÿ’กUse stitch markers when joining legs and aligning parts to keep symmetry and consistent placement.

This sweet velvet horse will bring smiles to children and adults alike and makes a perfect handmade gift. ๐Ÿงถ The pattern includes detailed round-by-round instructions, photo guidance and finishing techniques to help you create a polished amigurumi. โœ‚๏ธ Have fun personalizing colors, mane styles, and accessories to make your own unique companion. ๐Ÿ’–

You ask,

we answer.

FAQs

What size will the finished piece be?

The finished amigurumi measures approximately 11.40" (29 cm) tall when using the recommended velvet yarn and hook sizes.

Can I use different yarn weights for this pattern?

Yes, you can use different yarn weights, but this will change the final size and proportions; choose an appropriate hook for the yarn and expect to adjust stuffing and eye size.

Do I need prior crochet experience for this pattern?

This pattern is intermediate, so basic knowledge of single crochet, increases, decreases, working in the back loop only and color changes is recommended.

How long does this project typically take to complete?

Most crocheters complete this project in 5-7 hours, though time may vary depending on experience, customization and how much time is spent on the mane and tail.