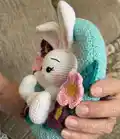
About This Hoppy Spring Wreath Crochet Pattern
This pattern creates a minty green covered foam wreath decorated with five crocheted flowers, five leaves, and a small scrappy bunny. It includes step-by-step instructions for the wreath cover, flower petals, leaf shapes, and finishing touches like sewing and painting. The pattern uses size 4 worsted yarn and a 4.0 mm hook and is designed to produce a charming seasonal decoration.

Clear row-by-row instructions make the wreath easy to follow, and photos show key steps for assembly. Ideal as a gift or a cheerful addition to your spring decor.
Why You'll Love This Hoppy Spring Wreath Crochet Pattern
I absolutely love this pattern because it blends simple stitches into a delightful seasonal display that feels both handcrafted and polished. I enjoy how the minty wreath cover uses a repetitive textured stitch so it grows quickly while staying interesting. The little flowers and leaves are great for practicing color changes and small shaping, and the scrappy bunny adds a charming focal point. I find it rewarding to sew everything together and see the composition come to life, and I hope you feel the same pride when you hang your finished wreath.
Switch Things Up
I love to experiment with color palettes, and I often swap the mint green for a soft sage or pastel blue to fit my decor.
I sometimes change the flower colors to all pastels for a vintage look or use bold brights for a playful modern wreath.
I make a mini version by using thinner yarn and a smaller foam ring to create a compact door hanger or gift tag-sized wreath.
For a fuller look, I crochet two strips and layer them offset around the wreath before sewing, creating extra texture and depth.
I also turn the flowers into tiny brooches by adding a felt backing and removable pin so they can be re-positioned or worn.
When I want a natural look, I replace acrylic paint with subtle embroidery on the bunny ears for color without paint.
I sometimes swap the scrappy bunny for a small chick or bird amigurumi for Easter or seasonal themes.
If I want a festive wreath, I add ribbon tails or tiny bells between flower clusters for movement and sound.
I try using variegated yarn for petals to get pretty tonal shifts without changing yarns mid-petal.
To make the wreath weather resistant for a covered porch, I use acrylic outdoor yarn and secure attachments with strong upholstery thread.
I recommend trying different leaf shapes by changing the stitch sequence to create pointy or rounded foliage for varied styles.
Finally, I often embellish with small wooden buttons or beads sewn into flower centers to add a crafty, tactile accent.
Common Mistakes & How to Fix Them
✗ Not checking gauge or wrap fit before making the full wreath cover; wrap the sample strip around the foam wreath early and adjust stitch count so it fits snugly.
✗ Skipping color finishing tips when changing yarns can leave long loose ends; always weave yarn ends in as you go and finish stitches with the new color for a neater finish.
✗ Joining the strip incorrectly so rows do not align; bring ends right sides together and slip stitch from row 99 to row 1 while matching rows exactly.
✗ Overstuffing or uneven sewing when attaching the bunny causes distortion at the bottom edge; position the bunny, pin in place, and sew with small even stitches, stuffing gradually before closing.
✗ Not leaving a long tail for sewing the wreath cover to itself makes assembly difficult; leave about 45ish inches of yarn for comfortable sewing and finishing.