🧢 Beautiful ✨ Detailed πŸ’ Adorable

Holly Baby Amigurumi Pattern

Holly Baby Amigurumi Pattern
4.7β˜… Rating
5-7 Hours Time Needed
1.7K Made This
βœ‚οΈ

Intermediate Level

Ideal for those with basic crochet experience, featuring slightly more advanced stitches and techniques to expand your skills.

⏱️

Weekend Treat

Takes 5-7 hours, making it an enjoyable project to finish over a couple of days.

🧸

Cute Companion

An adorable friend to cherish, handcrafted with love to bring comfort and joy for years to come.

About This Holly Baby Amigurumi Pattern

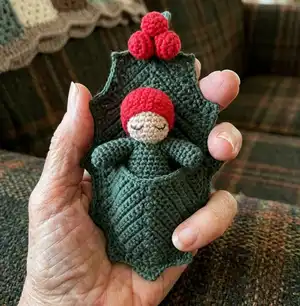
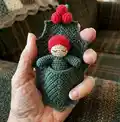
This pattern makes a tiny Holly Baby amigurumi tucked into a decorative holly leaf cradle with a cluster of berries. The design includes instructions for the head, cap, body, arms, berries, and two leaves (big and small) that form the cradle. You will crochet the baby and berries in continuous rounds and work the leaves back-and-forth in rows following a chart. Detailed assembly steps show how to stitch the parts together for a neat finished piece.

Holly Baby Amigurumi Pattern crochet pattern - detailed view of completed project

Perfect for a thoughtful handmade ornament or small gift that celebrates the season. The pattern includes clear photos and step-by-step directions for shaping and finishing details.

Why You'll Love This Holly Baby Amigurumi Pattern

I absolutely love this pattern because it combines a sweet, tiny amigurumi with an elegant leaf cradle that feels very special. I love how the leaves are worked flat and then turned into a little pocket β€” it makes the finished piece feel like a miniature scene. I also appreciate the small, thoughtful details like the embroidered sleepy face and the clustered berries that top the cradle. Making this pattern is relaxing and rewarding; the finished Holly Baby always brings a smile.

Holly Baby Amigurumi Pattern step 1 - construction progress Holly Baby Amigurumi Pattern step 2 - assembly progress Holly Baby Amigurumi Pattern step 3 - details and accessories Holly Baby Amigurumi Pattern step 4 - final assembly and finishing

Switch Things Up

I love changing colors to personalize this little doll β€” try pastel tones for a soft nursery-themed baby or metallic thread for a holiday shimmer.

I often make the doll larger by using a DK or worsted weight yarn with a larger hook to create a cuddly, chunky version.

I sometimes switch the cap style: add a picot edge or a tiny pompom to the top for extra charm and personality.

I like to embroider different facial expressions; move the eyes and adjust the curve of the mouth to give the baby a sleepy, smiling, or surprised look.

I recommend experimenting with different leaf shapes β€” use the chart as a base and add extra rows for a longer cradle or fewer rows for a compact one.

I sometimes replace the sewn berries with tiny felt balls or wooden beads for a mixed-material look that’s quicker to assemble.

I occasionally attach a small loop at the top of the leaf to make the cradle into a hanging ornament for a Christmas tree.

I like adding tiny accessories like a crocheted scarf, bow, or blanket to the baby to create themed sets for gifts or decorations.

I encourage trying different yarn fibers β€” mercerized cotton keeps crisp leaf shaping while acrylic gives softer drape and easier care.

I also experiment with embroidery thread thickness for the face; a thinner thread produces delicate features while slightly thicker makes bold, visible expressions.

Common Mistakes & How to Fix Them

βœ— Skipping the stitch count when working increases and decreases; recount each row or round after completion to confirm the correct number of stitches and avoid shape problems. βœ— Stuffing too firmly or too lightly causing misshapen pieces; stuff gradually and check shape often so limbs and head stay smooth and proportional. βœ— Joining the arms incorrectly and leaving connecting stitches visible; align the arm stitches carefully, use the described 2 sc join method and hide inner connecting sc as instructed. βœ— Rushing the leaf charts and not checking row starts/ends which can alter the leaf shape; follow the provided chart for each row and mark your place as you work, especially where rows begin or end differently.

Holly Baby Amigurumi Pattern

Create a tiny, hand-crocheted Holly Baby nestled in a holly leaf cradle β€” a perfect seasonal amigurumi gift. This pattern guides you through crocheting the baby, cap, arms, berries, and detailed leaves step by step. You will learn compact shaping, simple embroidery for the face, and how to assemble the cradle and berries neatly. Ideal for making a delicate holiday ornament or a tiny keepsake.

Intermediate 5-7 Hours

Materials Needed for Holly Baby Amigurumi Pattern

β€” Main Fabric

  • 01
    Cotton yarn Alpina Lily (50 g / 175 m) - Beige (for head and face)
  • 02
    Cotton yarn Alpina Lily (50 g / 175 m) - Red (for cap and berries)
  • 03
    Cotton yarn Alpina Lily (50 g / 175 m) - Dark green (for body, arms, leaves, cradle)
  • 04
    Embroidery thread for sewing and embroidery - Beige (for sewing head), Red (for sewing cap/berries), Dark green (for attaching berries to leaf), Black (for facial embroidery)
  • 05
    Any synthetic or organic filler for stuffing (small amount)

β€” Tools Required

  • 01
    Crochet hook size 2.0 mm
  • 02
    Sewing needles and pins
  • 03
    Tapestry needle
  • 04
    Scissors
  • 05
    Thin sewing/embroidery thread (black, beige, red, dark green)
  • 06
    Polyester stuffing or other filler

Progress Tracker

0% Complete

β€” Head :

Round 1 :

6 sc into magic ring (6 sts)

Round 2 :

(inc) X 6 (12 sts)

Round 3 :

(1 sc, inc) X 6 (18 sts)

Round 4 :

(2 sc, inc) X 6 (24 sts)

Round 5-9 :

sc around (24 sts)

Round 10 :

(2 sc, dec) X 6 (18 sts)

Round 11 :

(1 sc, dec) X 6 (12 sts)

Info :

After R11 stuff the head tightly.

Round 12 :

(dec) X 6 (6 sts)

Info :

Leave a tail.

Info :

In remaining 6 sc sew 6 stitches from inside to outside in sequence, pull the yarn, secure and hide it.

β€” Cap :

Round 1 :

6 sc into magic ring (6 sts)

Round 2 :

(inc) X 6 (12 sts)

Round 3 :

(1 sc, inc) X 6 (18 sts)

Round 4 :

(2 sc, inc) X 6 (24 sts)

Round 5-9 :

sc around (24 sts)

Round 10 :

(2 sc, dec) X 6 (18 sts)

Info :

Leave a tail and make clean fastening off.

Info :

How to do clean fastening off: insert the yarn into the first stitch after your last stitch. Insert the yarn back into this last stitch and repeat. Secure the yarn and hide inside.

β€” Body&Arms :

Info :

Dark green yarn. First make 2 arms:

Round 1 :

6 sc into magic ring (6 sts)

Round 2 :

(inc, 2 sc) X 2 (8sts)

Round 3 :

(inc, 3 sc) X 2 (10 sts)

Round 4-5 :

(2 rounds): sc around (10 sts)

Round 6 :

(dec, 3 sc) X 2 (8 sts)

Round 7-8 :

(2 rounds): sc around (8 sts)

Info :

Make 1 sl st more and leave short tail.

Info :

Body:

Round 1 :

6 sc into magic ring (6 sts)

Round 2 :

(inc) X 6 (12 sts)

Round 3 :

(1 sc, inc) X 6 (18 sts)

Round 4 :

(2 sc, inc) X 6 (24 sts)

Round 5 :

(inc, 11 sc) X 2 (26 sts)

Round 6 :

sc around (26 sts)

Round 7 :

(inc, 12 sc) X 2 (28 sts)

Round 8-11 :

(4 rounds): sc around (28 sts)

Round 12 :

(dec, 12 sc) X 2 (26 sts)

Round 13 :

(dec, 11 sc) X 2 (24 sts)

Round 14 :

(2 sc, dec) X 6 (18 sts)

Round 15-16 :

(2 rounds): sc around (18 sts)

Info :

Now place the one arm closely the body and join them together with 2 sc *. For the arm use its last stitch and the next following stitch. Work 7 sc and join the second arm with 2 sc, when 7 sc again. Now you have round 17.

Round 17 :

(6 sc of the arm, 7 sc of the body) X 2 (26 sts)

Info :

*These inner connecting sc will not be used in the next rounds.

Round 18 :

(2 sc, dec, 2 sc; (1 sc, dec) X 2, 1 sc) X 2 (20 sts)

Round 19 :

(dec) X 10 (10 sts)

β€” Doll Assembly :

Info :

Stuff the body and arms is not very tight, it should be a little flat. Fasten and hide the tail.

Info :

Place the head onto the body, pin it. Note - the initial, neater part of the head will be at the bottom, where the neck is (the less neat part of the head will be covered by the cap). Carefully sew on the head with fine stitches with thin beige thread.

Info :

Put the cap on the head of the doll (it is not so easy)and sew it with thin red thread.

β€” Face :

Info :

Embroider the eyes a few stitches with thin black thread, as shown further in the pictures.

Info :

It is difficult to embroider eyes, it is better to practice beforehand on a piece of cloth.

β€” Leaf-Cradle :

Info :

consist of 2 leaves - big and small worked back-and-forth in rows. Dark green yarn.

Info :

Big leaf: Be sure to check the chart as you work, as some rows start and end differently.

Row 1 :

2 ch, 1 sc, 1 dc, 2 sc into magic ring (6 sts), turn...

R2 :

2 ch, 1 sc, (1 sc,1 dc,1 sc in one loop – hereafter I refer to this set as "sds" for convenience, but it counts as three stitches!), 2 sc (8 sts)

R3 :

2 ch, 2 sc, sds, 3 sc (10 sts)

R4 :

2 ch, 3 sc, sds, 4 sc (12 sts)

R5 :

2 ch, 4 sc, sds, 5 sc (14 sts)

R6 :

2 ch, 5 sc, sds, 6 sc (16 sts)

R7 :

2 ch, 6 sc, sds, 7 sc (18 sts)

R8 :

2 ch, 7 sc, sds, 8 sc (20 sts)

R9 :

2 ch, 8 sc, sds, 9 sc (22 sts)

R10 :

2 ch, 9 sc, sds, 10 sc (24 sts)

R11 :

2 ch, 10 sc, sds, 10 sc (25 sts)

R12 :

2 ch, 10 sc, sds, 11 sc (26 sts)

R13 :

2 ch, 11 sc, sds, 11 sc (27 sts)

R14 :

2 ch, 11 sc, sds, 12 sc (28 sts)

R15 :

2 ch, 12 sc, sds, 12 sc (29 sts)

R16 :

2 ch, 12 sc, sds, 13 sc (30 sts)

R17 :

2 ch, 13 sc, sds, 13 sc (31 sts)

R18-25 :

(8 rows): 2 ch, 13 sc, sds, 12 sc, 1 dec (31 sts)

R26 :

2 ch, 13 sc, sds, 10 sc, 2 dec (30 sts)

R27 :

2 ch, 12 sc, sds, 10 sc, 2 dec (29 sts)

R28 :

2 ch, 12 sc, sds, 7 sc, 3 dec (27 sts)

R29 :

2 ch, 10 sc, sds, 7 sc, 3 dec (25 sts)

R30 :

2 ch, 10 sc, sds, 3 sc, 4 dec (22 sts)

R31 :

2 ch, 7 sc, sds, 3 sc, 4 dec (19 sts)

Info :

Make 1 ch more and leave short tail.

Info :

At the finish sharp end of the leaf (blue arrow in the photo), attach a new yarn and work the leaf in a round with a edging of sc with thorns.

Info :

The thorn is crocheted according to the chart: hdc; in one loop: 2-dc cluster, ch-3 picot, 2-dc cluster; hdc.

Info :

I got: 5 sc, thorn, 5 sc, thorn, 7 sc, thorn, 7 sc, thorn, 5 sc, thorn, 3 sc, thorn. And on the other side of the leaf - 3 sc, thorn, 5 sc, thorn, 7 sc, thorn, 7 sc, thorn, 5 sc, thorn, 5 sc. Then work chain of 15, connect the round with sl st and make 2 sl st more. Leave a tail and make clean fastening off, hide the tail inside.

β€” Small leaf :

Row 1: 2 ch, 2 sc, 1 dc, 3 sc into magic ring (8 sts), turn...

R2 :

2 ch, 2 sc, sds, 3 sc (10 sts)

R3 :

2 ch, 3 sc, sds, 4 sc (12 sts)

R4 :

2 ch, 4 sc, sds, 5 sc (14 sts)

R5 :

2 ch, 5 sc, sds, 6 sc (16 sts)

R6 :

2 ch, 6 sc, sds, 7 sc (18 sts)

R7 :

2 ch, 7 sc, sds, 8 sc (20 sts)

R8 :

2 ch, 8 sc, sds, 9 sc (22 sts)

R9 :

2 ch, 9 sc, sds, 10 sc (24 sts)

R10 :

2 ch, 10 sc, sds, 11 sc (26 sts)

R11-12 :

(2 rows): 2 ch, 11 sc (13 sts)

R13 :

2 ch, 10 sc (12 sts)

R14 :

2 ch, 9 sc (11 sts)

R15 :

2 ch, 8 sc (10 sts)

R16 :

2 ch, 7 sc (9 sts)

R17 :

2 ch, 6 sc (8 sts)

R18 :

2 ch, 5 sc (7 sts)

R19 :

2 ch, 4 sc (6 sts)

R20 :

2 ch, sc3tog (3 sts).

Info :

Make 1 ch more and leave short tail.

Info :

Now attach a new yarn according to the chart and work second side:

R11 :

2 ch, 11 sc (13 sts)

R12-13 :

(2 rows): 2 ch, 10 sc (12 sts)

R14 :

2 ch, 9 sc (11 sts)

R15 :

2 ch, 8 sc (10 sts)

R16 :

2 ch, 7 sc (9 sts)

R17 :

2 ch, 6 sc (8 sts)

R18 :

2 ch, 5 sc (7 sts)

R19 :

2 ch, 4 sc (6 sts)

R20 :

2 ch, sc3tog (3 sts).

Info :

Make 2 ch, don’t cut the yarn!

Info :

Turn the leaf left and work it in a round with a edging of sc. (I got 74 sc) Leave long tail for stitching.

β€” BERRIES (make 3) :

Round 1 :

6 sc into magic ring (6 sts)

Round 2 :

(inc) X 6 (12 sts)

Round 3-4 :

(2 rounds): sc around (12 sts)

Round 5 :

(dec) X 6 (6 sts)

Info :

Leave a tail. Stuff the berry tightly.

Info :

In remaining 6 sc sew 6 stitches from inside to outside in sequence, pull the yarn and secure it. Don’t cut the tail.

β€” Cradly Assembly :

Info :

Iron the leaves gently through a damp cloth.

Info :

Put a smaller leaf on top of a large, pin five pins. Carefully sew them together with small stitches over the sc. At the very beginning and finish, sew firmly, making several stitches on top of each other.

Info :

Tie the berries tightly together with a few knots. Stick the tails into a tapestry needle and hide them inside the berries, trim the ends. Use a thin red thread to sew the berries tightly together.

Info :

Stitch the finished berries neatly with a thin green thread on a cradle leaf at the base of a large loop.

Info :

Your cute Holly baby is ready! Congratulations!

Assembly Instructions

  • Stuff the body and arms moderately; they should be a little flat, then fasten and hide the tail.
  • Place the head onto the body, pin it so the neater part of the head is at the bottom (the neck area), then sew the head to the body with thin beige thread using fine stitches.
  • Put the cap on the head and sew it in place using thin red thread, securing neatly and hiding ends inside.
  • Lay the small leaf on top of the large leaf, pin with five pins, then sew them together with small stitches over the sc and secure firmly at the beginning and end.
  • Tie the three berries together with knots, hide the tails inside the berries, sew the berries tightly together with thin red thread, and then stitch the berry cluster to the large leaf with thin green thread at the base loop.

Important Notes

  • πŸ’‘Use the provided chart when working the leaves because some rows begin and end differently, and checking row starts prevents shape errors.
  • πŸ’‘When crocheting circles, pull the initial thread end out between rounds 2 and 3 to serve as a round marker and help you count rounds.
  • πŸ’‘When making decreases, follow the given decrease method: insert hook into next stitch, draw up loop, repeat into next stitch, then yarn over and pull through all loops on hook to form a neat decrease.

This Holly Baby is a tiny seasonal treasure that makes a heartwarming handmade gift. It combines sweet amigurumi shaping with a decorative leaf cradle and berry cluster for festive charm. Display it as a delicate ornament or tuck it into seasonal decor to bring cozy smiles. 🧢🌿✨

You ask,

we answer.

FAQs

What size will the finished piece be?

If you use the recommended yarn and 2.0 mm hook, the finished doll measures approximately 7.5 cm (3 in) tall and the leaf cradle about 13.5 cm (5.3 in) high.

Can I use different yarn weights for this pattern?

Yes, but using a different yarn weight will change the final size and texture; select an appropriate hook for your yarn and expect size variations.

Do I need prior crochet experience for this pattern?

This pattern is rated Intermediate; basic knowledge of single crochet, increases, decreases, back-and-forth rows and simple embroidery is recommended for best results.

How long does this project typically take to complete?

Most crocheters complete this project in about 5-7 hours, depending on experience level, leaf complexity, and time spent on assembly and embroidery.