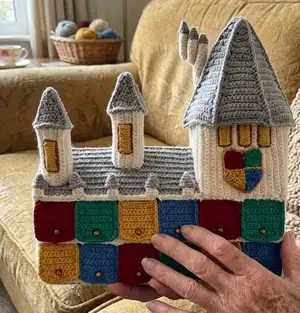
Create a charming crochet Hogwarts Castle advent with detailed step-by-step instructions, photo references, and embroidery guides. This pattern is packed with small pieces, structural cardboard framing and delightful finishing touches for a magical handmade calendar. Youll love the combination of amigurumi techniques and careful assembly that give the castle a professional, sturdy finish.
Progress Tracker
0% Complete
— Conventions :
Infos :
l - loop = chain. sc - single crochet. sl st - slip stitch. inc - increase. dec - decrease. (...) - total number of loops in a round. [...]xN - repeat what is indicated in round brackets N times.
— Castle - WALLS AND FLOOR (Yarn A) :
Round 1 :
25 loops, turning, 24sc (starting from the 2nd loop from the hook) (24l)
Round 2 :
1 loop, turning, 22sc, [inc]x2 (26l)
Round 3 :
1 loop, turning, inc, 25sc (27l)
Round 4 :
1 loop, turning, 25sc, [inc]x2 (29l)
Round 5 :
1 loop, turning, inc, 28sc (30l)
Round 6 :
1 loop, turning, 28sc, [inc]x2 (32l)
Round 7 :
1 loop, turning, inc, 31sc (33l)
Round 8 :
1 loop, turning, 31sc, [inc]x2 (35l)
Round 9 :
1 loop, turning, inc, 34sc (36l)
Round 10 :
1 loop, turning, 34sc, [inc]x2 (38l)
Round 11 :
1 loop, turning, inc, 37sc (39l)
Round 12 :
1 loop, turning, 37sc, dec (38l)
Round 13 :
1 loop, turning, [dec]x2, 34sc (36l)
Round 14 :
1 loop, turning, 34sc, dec (35l)
Round 15 :
1 loop, turning, [dec]x2, 31sc (33l)
Round 16 :
1 loop, turning, 31sc, dec (32l)
Round 17 :
1 loop, turning, [dec]x2, 28sc (30l)
Round 18 :
1 loop, turning, 28sc, dec (29l)
Round 19 :
1 loop, turning, [dec]x2, 25sc (27l)
Round 20 :
1 loop, turning, 25sc, dec (26l)
Round 21 :
1 loop, turning, [dec]x2, 22sc (24l)
Round 22 :
21 loops, turning, 44sc (44l) (see photos 1, 2)
Round 23 :
21 loops, turning, 64sc (64l) (see photos 3, 4)
Rounds 24-73 :
1 loop, turning, 64sc (64l) (see photos 5, 6)
Round 74 :
1 loop, turning, 44sc – don't crochet this row to the end (44l)
Round 75 :
23 loops, turning, 66sc (66l) (see photos 7-9)
Rounds 76-98 :
1 loop, turning, 66sc (66l)
Round 99 :
1 loop, turning, 46sc – don't crochet this row to the end (46l)
Rounds 100-122 :
1 loop, turning, 46sc (46l) (see photo 10)
Round 123 :
1 loop, turning, 22sc – don't crochet this row to the end (22l)
Rounds 124-169 :
1 loop, turning, 22sc (22l) (see photo 11)
Info :
Cut and fix the thread, leaving a very long end for sewing. Turn over the detail to the front side (see photo 12).
Info :
Make the embroidery with mouliné threads. Embroider big window with a satin stitch with yellow color on the side wall (see photos 13-17). Embroider the frame on the window with brown thread (see photo 18). Embroider 3 small windows on the tower (see photos 19-21). Embroider the door with a satin stitch with brown color on the side wall (see photos 22-24). Embroider 8 windows on the back wall (see photos 25-27).
— Clock :
Round 1 :
Yarn A 1: 2 loops, 6sc in 2nd loop from hook (amigurumi ring) (6l)
Round 3 :
[sc, inc]x6 (18l)
Info :
Change the thread to Yarn B. To get a beautiful line when changing color in the next round crochet the sc in this way - half of the sc with white thread, and the other half with grey (Yarn A + Yarn B), see photo 28.
Round 4 :
[2sc, inc]x6 (Yarn A + Yarn B) (24l)
Round 5 :
[3sc, inc]x6 (30l)
Info :
Cut and fix the thread leaving a long end for sewing. Embroider the hands and dial with black threads floss (see photo 29). Sew a clock above the door (see photo 30).
— House Crest :
Info :
Crochet the house crest with 1,75 mm hook along rows. Use video help to crochet 6, 12, 13 and 20 rows.
Yarn C - Round 1 :
3 loops, turning, 2sc (starting from the 2nd loop from the hook) (2l)
Yarn C - Round 2 :
4 loops, turning, 4sc, inc (6l) (see photos 31, 32)
Yarn C - Round 3 :
1 loop, turning, dec, 4sc (5l)
Yarn C - Round 4 :
1 loop, turning, 3sc, dec (4l)
Yarn C - Round 5 :
1 loop, turning, 4sc (4l)
Info :
Change the thread to Yarn D. To get a beautiful line when changing color in the next round crochet the sc in this way - half of the sc with burgundy thread, and the other half with green (Yarn C + Yarn D), see photos 33-35.
Yarn C + Yarn D - Round 6 :
1 loop, turning, 4sc (Yarn C + Yarn D) (4l)
Info :
Next crochet with Yarn D only, cut the Yarn A.
Yarn D - Round 7 :
1 loop, turning, 4sc (4l)
Yarn D - Round 8 :
1 loop, turning, 3sc, inc (5l)
Yarn D - Round 9 :
1 loop, turning, inc, 4sc (6l)
Yarn D - Round 10 :
1 loop, turning, 4sc, dec (5l)
Yarn D - Round 11 :
1 loop, turning, 2sc (2l) – don’t crochet this row to the end.
Info :
In the next rows combine yarns to create the colored quarters using the jacquard technique as shown in photos. Work the following sequence for the colored crest quarters and finishing rounds.
Round 12 :
5sc (Yarn C + Yarn E), 5sc (Yarn D + Yarn F) (10l) Don’t cut Yarn C and Yarn D.
Round 13 :
1 loop, turning, 5sc (Yarn F), 5sc (Yarn E) (10l) (see photos 43, 44)
Round 14 :
1 loop, turning, inc, 4sc (Yarn E), 4sc, inc (Yarn F) (12l) (see photo 45)
Round 15 :
1 loop, turning, 6sc (Yarn F), 6sc (Yarn E) (12l)
Round 16 :
1 loop, turning, 2 sl st, 4sc (Yarn E), 4sc (Yarn F) – don’t crochet this row to the end.
Round 17 :
1 loop, turning, 4sc (Yarn F), 4sc (Yarn E) (8l)
Round 18 :
1 loop, turning, [dec]x2 (Yarn E), [dec]x2 (Yarn F) (4l)
Round 19 :
1 loop, turning, dec (Yarn F), dec (Yarn E) (2l)
Round 20 :
1 loop, turning, dec. Change the thread to golden mouliné threads (see photo 46).
Round 21 :
Next crochet the detail around the perimeter in a counter-clockwise direction from the point 'Start' using jacquard technique for changing color (see photos 47, 48) - 10sc (Yarn F + golden mouliné threads), 11sc (Yarn D+gold mouliné), 11sc (Yarn C+gold mouliné), 10sc (Yarn E+gold mouliné), sl st in the 1st dec (Yarn E + golden mouliné threads) (43l)
Info :
Embroider and fix the lines with golden mouliné threads (see photos 49-51). Steam the house crest with an iron.
— SQUARE (Golden mouliné threads) :
Round 1 :
Crochet the square with 1,5 mm hook along rows. 4 loops, turning, 3sc (starting from the 2nd loop from the hook) (3l)
Rounds 2-3 :
1 loop, turning, 3sc (3l)
Round 4 :
Next crochet the detail around the perimeter in a counter-clockwise direction, 3sc down, 3sc straight, 3sc up, 3sc straight (12l)
Info :
Cut and fix the thread leaving a long end for sewing. Embroider letter 'H' with black floss threads in the middle. Sew the square to the center of the house crest. Sew the house crest to the castle (see photo 57).
— ASSEMBLAGE AND CARDBOARD FRAME :
Info :
Sew the walls and floor as shown on photos 58-66.
Tip :
To get a beautiful seam, you must constantly insert the needle from the inside to the outside direction.
Info :
Below is a drawing of the castle inner frame, which must be cut out of cardboard. Press the fold lines with the back of the needle using a ruler (see photos 67-69). Insert the partitions 1 and 2 and glue the frame with 'Moment' superglue (see photos 70-72).
— PARTITIONS, 2 pcs (Yarn A) :
Round 1 :
Crochet the partitions with 1,75 mm hook along rows. 5 loops, turning, 4sc (starting from the 2nd loop from the hook) (4l)
Rounds 2-72 :
1 loop, turning, 4sc (4l)
Info :
Cut and fix the thread leaving a long end for sewing (see photo 79). Place the frame inside the castle and sew the details, as shown on photos 80-82. Sew on the partitions (see photos 83-87).
— CROSSBAR (Yarn A) :
Info :
Crochet crossbar with a hook 1,5 mm. You need to divide the thread in half! At the beginning leave the long end of the thread, it will be needed for sewing.
Round 1 :
2 loops, 4sc in 2nd loop from hook (amigurumi ring) (4l)
Info :
Cut and fix the thread, leaving a long end for sewing. Cut off a piece of wire approximately 18 cm (7.1 inches) long (see photo 88). Pull wire through the crossbar (see photo 89). Use a needle to make 2 holes in the frame (see photos 90, 91). Pull the sewing threads and wire through the holes (see photo 92). Bend the ends of wire and wrap electrical tape around it to prevent end from protruding out (see photos 93-96). Sew the crossbar to the walls, trim and fasten the thread (see photos 97-99).
— DOORS, 12 pcs :
Info :
The doors are crocheted with 1.75 mm hook using Yarn C, D, E, F (3 doors of each color).
Round 1 :
11 loops, turning, 10sc (starting from the 2nd loop from the hook) (10l)
Round 2 :
1 loop, turning, 4sc, skip 2 stitches, crochet 2 loops, 4sc (10l)
Info :
After this row we got the hole for the bead (see photos 100-102).
Rounds 3-10 :
1 loop, turning, 10sc (10l)
Info :
Next crochet the door around the perimeter in a counter-clockwise direction from the point 'Start' (see photo 103) – [9sc, inc]x3 (Yarn C/D/E/F), 9sc, inc (Yarn C/D/E/F + Yarn A)*(44l)
Note :
To get a beautiful line when changing color in this round crochet part of the sc in this way - half of the sc with burgundy thread, and the other half with white (see photos 104, 105).
Info :
Below is a picture that I used to embroider the numbers on the doors. Attach a water soluble cross stitch canvas on it and circle the picture with a pencil (see photos 106,107). Fix the canvas to the door with the needle for cutting (see photo 108). Use 4 threads of golden metalized threads mouliné and embroider the outline of the number using the seam 'backstitch' (see photo 109). Then embroider the inside of the number with fill stitches (see photo 110). Rinse the embroidery under running water and gently peel off the canvas with your fingers (see photos 111).
Info :
Sew the beads to the partitions under the door's holes with golden thread floss (see photos 118-120). Glue the cardboard to the wrong side of the door (see photos 112, 113). Sew the doors to the castle (see photos 114-117).
— ROOF (Yarn B) :
Round 1 :
49 loops, turning, 48sc (starting from the 2nd loop from the hook) (48l)
Rounds 2-36 :
1 loop, turning, 48sc only through back loops (48l)
Info :
Cut and fix the thread, leaving a long end for sewing. Below is a drawing of the roof inner frame, which must be cut out of cardboard.
Info :
Glue the cardboard to the crocheted roof (see photos 121, 122). Sew two sides of the roof to the walls (see photos 123, 124). Glue neodymium magnets on the edge of the roof and on the ceiling (pre-try them so that they are well magnetized when closing, see photos 125, 126).
— PEAKS, 5 pcs :
Round 1 :
Crochet the peaks with a hook 1,5 mm. You need to divide the thread in half! 2 loops, 4sc in 2nd loop from hook (amigurumi ring) (4l)
Round 2 :
[sc, inc]x2 (6l)
Round 3 :
[2sc, inc]x2 (8l)
Round 4 :
[3sc, inc]x2 (10l)
Round 5 :
[4sc, inc]x2 (12l)
Round 6 :
[5sc, inc]x2 (14l) Change the thread to Yarn A.
Info :
To get a beautiful line when changing color in the next round crochet the sc in this way - half of the sc with grey thread, and the other half with white (Yarn B + Yarn A), see photo 127.
Round 7 :
5sc, skip 2 stitches, 5sc, skip 2 stitches (Yarn B + Yarn A) (10l)
Info :
Next crochet with Yarn A only.
Round 11 :
2sc – don’t crochet this round to the end. Cut and fix the thread, leaving a long end for sewing. Sew the peaks to the roof (see photos 128, 129).
This Hogwarts Castle advent is a labor of love that combines crochet, embroidery and careful assembly into a magical holiday centerpiece. The pattern walks you through small embroidered details, structural cardboard framing and magnetized roof construction for a professional finish. Whether you make it for a family countdown or as a special gift, it will bring delight and cozy handmade charm to your home. 🧶✨🎁