🧢 Beautiful ✨ Detailed πŸ’ Adorable

Hippo Lovey Amigurumi Pattern

Hippo Lovey Amigurumi Pattern
3.9β˜… Rating
5-7 Hours Time Needed
1.6K Made This
βœ‚οΈ

Intermediate Level

Ideal for those with basic crochet experience, featuring slightly more advanced stitches and techniques to expand your skills.

⏱️

Weekend Treat

Takes 5-7 hours, making it an enjoyable project to finish over a couple of days.

🧸

Cute Companion

An adorable friend to cherish, handcrafted with love to bring comfort and joy for years to come.

About This Hippo Lovey Amigurumi Pattern

This pattern creates a plush hippo lovey (comfort blanket) combining an amigurumi head with a soft lovey body. It uses chenille-style yarn for a luxurious, cuddly texture and clear round-by-round instructions. You'll learn shaping with hdc and sc, attaching parts, and simple facial embroidery to personalize your hippo.

Hippo Lovey Amigurumi Pattern crochet pattern - detailed view of completed project

The pattern includes head, ears, arms, legs and step-by-step assembly instructions with photo references. Recommended materials and substitute yarn suggestions are provided to help you adapt the design.

Why You'll Love This Hippo Lovey Amigurumi Pattern

I absolutely love this pattern because the plush chenille yarn makes the finished hippo so soft and comforting to hold. I enjoy the mix of simple rounds and shaping that create a charming 3D head without overwhelming complexity. Sewing the head to the lovey body always feels rewarding β€” the character comes to life quickly. I also love that it is easy to customize with color changes and small embroidered details to make each hippo unique.

Hippo Lovey Amigurumi Pattern step 1 - construction progress Hippo Lovey Amigurumi Pattern step 2 - assembly progress Hippo Lovey Amigurumi Pattern step 3 - details and accessories Hippo Lovey Amigurumi Pattern step 4 - final assembly and finishing

Switch Things Up

I love to change the color palette to create different personalities β€” try pastel pinks or mint for softer nursery styles or bold teals for a modern look.

I often switch yarn weight and hook size to make smaller or larger versions; use thinner yarn and a smaller hook for keychain minis or chunky yarn and a larger hook for an oversized plush.

I sometimes replace safety eyes with embroidered eyes for items meant for babies to ensure they are fully safe and soft.

I add small accessories like a crocheted bow, scarf, or tiny hat to personalize each lovey and make it gift-ready.

Try embroidering different expressions β€” a small smile, raised brows, or closed eyes β€” to change the mood of the hippo.

If you want more texture, use a contrasting yarn for the muzzle or feet and experiment with surface slip stitches for subtle decoration.

I like to add a loop to the top edge so the lovey can be hung on a stroller or crib, which is handy for busy parents.

For a travel-friendly version, make smaller legs and a compact head so it fits in a bag and still feels cuddly.

You can also create a matching set by crocheting a tiny hippo rattle or keychain using the same stitch patterns and colors.

When finishing, I often embroider the child's initials on the back edge β€” a simple personalization that turns a lovey into a keepsake.

Common Mistakes & How to Fix Them

βœ— Skipping stitch markers when joining or changing orientation can lead to misaligned parts; place markers at key rounds and count stitches frequently to keep placement accurate. βœ— Stuffing too firmly while forming the head can distort the shape of the snout; add small amounts of fiberfill gradually and shape with your hands for a smooth finish. βœ— Forgetting that the pattern is worked in continuous spirals will create visible seams if you join rounds; do not join or slip stitch unless explicitly stated in the instructions. βœ— Changing yarn colors without securing ends can create loose tails that show through the plush fabric; weave in ends neatly and leave long tails for sewing where parts are attached.

Hippo Lovey Amigurumi Pattern

Make a soft, cuddly hippo lovey using plush chenille yarn and easy shaping techniques. This pattern walks you through the head, ears, arms, legs and assembly step-by-step so you can create a lovable handmade friend. Perfect as a comforting gift or nursery companion, with options for color and finishing touches. Follow the clear rounds and photo references to achieve a neat, professional result.

Intermediate 5-7 Hours

Materials Needed for Hippo Lovey Amigurumi Pattern

β€” Main Fabric

  • 01
    Himalaya Dolphin Baby chenille 100g/120m (100% micropolyester) - Color #80325 (Gray) - main amount as needed
  • 02
    Himalaya Dolphin Baby chenille 100g/120m (100% micropolyester) - Color #80320 (Dark gray) - small amount for accents
  • 03
    Substitute yarn: Estako Velvet Chenille Blanket (as alternative chenille)
  • 04
    Substitute yarn: Premier Parfait Chunky (as alternative chunky option)
  • 05
    Substitute yarn: Hobbii Baby Snuggle (as alternative chenille)

β€” Tools Required

  • 01
    Crochet hook size 5 mm
  • 02
    Black safety eyes size 16 mm (2 pieces)
  • 03
    Fiberfill for stuffing
  • 04
    Black embroidery thread for brows and nostrils
  • 05
    Darning/yarn needle for sewing and finishing
  • 06
    Scissors
  • 07
    Sewing pins for placement
  • 08
    Stitch markers to mark rounds/placement

Progress Tracker

0% Complete

β€” Head :

Info :

Using 5 mm crochet hook and Himalaya Dolphin Baby #80325 (Gray). Start with foundation chain. Ch 6 [6] (pic. 1)

Round 1 :

Start in second chain from the hook: sc in next 4 st, 3 sc into the last chain, (turn the crocheting and on the other side of foundation chain work) sc in next 3 st, 2 sc into the last loop [12] (pic. 2)

Info :

Crochet in continuous spirals!

Round 2 :

inc in next st, sc in next 3 st, inc in next 3 st, sc in next 3 st, inc in next 2 st [18] (pic. 3)

Round 3 :

1 sc, inc, 3 sc, (1 sc, inc) repeat 3 times, 3 sc, (1 sc, inc) repeat 2 times [24] (pic. 4)

Round 4 :

2 sc, inc, 3 sc, (2 sc, inc) repeat 3 times, 3 sc, (2 sc, inc) repeat 2 times [30]

Round 5 :

3 sc, inc, 3 sc, (3 sc, inc) repeat 3 times, 3 sc, (3 sc, inc) repeat 2 times [36]

Round 6-7 :

36 sc [36] - 2 rounds

Round 8 :

3 sc, dec, 3 sc, (3 sc, dec) repeat 3 times, 3 sc, (3 sc, dec) repeat 2 times [30]

Round 9 :

30 sc [30] - 1 round

Round 10 :

5 sc, inc in next 5 st, 20 sc [35]

Round 11 :

inc, 3 sc, inc, 2 sc, inc, 4 sc, inc, 2 sc, inc, 3 sc, inc, 15 sc [41]

Round 12 :

7 sc, inc, 2 sc, inc, 4 sc, inc, 2 sc, inc, 22 sc [45]

Round 13-18 :

45 sc [45] - 6 rounds

Info :

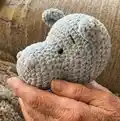
Install safety eyes between rounds 10 and 11, with the distance 12 stitches between them (pic. 5). Stuff the head not firmly with filler! Insert small amounts at a time until you get the right shape. Take your time with this step.

Round 19 :

(13 sc, dec) repeat 3 times [42]

Round 20 :

42 sc [42] - 1 round

Round 21 :

(5 sc, dec) repeat 6 times [36]

Round 22 :

(4 sc, dec) repeat 6 times [30]

Round 23 :

(3 sc, dec) repeat 6 times [24]

Round 24 :

(2 sc, dec) repeat 6 times [18]

Round 25 :

(1 sc, dec) repeat 6 times [12]

Round 26 :

(dec) repeat 6 times [6]

Info :

Cut yarn leaving a few inches, use darning needle to thread through outside loops of remaining 6 stitches, pull tight to close. Use needle to pull yarn end up into head to finish off. With the fingers of your hand, press your eyes into the hippo's head so that they are slightly sunken (pic. 6-8).

β€” Ears (make 2) :

Info :

Using 5 mm crochet hook and Himalaya Dolphin Baby #80325 (Gray)

Round 1 :

5 sc in magic ring [5]

Round 2 :

(inc) repeat 5 times [10]

Round 3 :

(1 sc, inc) repeat 5 times [15]

Round 4-5 :

15 sc [15] - 2 rounds

Info :

Fold the ear in half and crochet through two layers 7 sc. Fasten off and leave long thread for sewing (pic. 9-14).

β€” Arms (make 2) :

Info :

Using 5 mm crochet hook and Himalaya Dolphin Baby #80320 (Dark gray)

Round 1 :

6 hdc in magic ring [6]

Round 2 :

(inc) repeat 6 times [12]

Round 3 :

(1 hdc, inc) repeat 6 times [18]

Round 4-5 :

18 hdc in each stitch around [18] - 2 rounds

Info :

Change yarn into Himalaya Dolphin Baby #80325 (Gray)

Round 6 :

(1 hdc, dec) repeat 6 times [12]

Round 7-11 :

12 hdc in each stitch around [12] - 5 rounds

Info :

The arms don't get filled. Fold the arm in half and crochet through two layers 6 sc (pic. 15-20). Fasten off and leave long thread for sewing.

β€” Legs - Body :

Info :

Using 5 mm crochet hook and Himalaya Dolphin Baby #80320 (Dark gray)

Round 1 :

6 hdc in magic ring [6]

Round 2 :

(inc) repeat 6 times [12]

Round 3 :

(1 hdc, inc) repeat 6 times [18]

Round 4-5 :

18 hdc in each stitch around [18] - 2 rounds

Info :

Change yarn into Himalaya Dolphin Baby #80325 (Gray)

Round 6 :

(1 hdc, dec) repeat 6 times [12]

Round 7 :

(2 hdc, dec) repeat 3 times [9]

Round 8-19 :

9 hdc in each stitch around [9] - 12 rounds

Round 20 :

(2 hdc, inc) repeat 3 times [12]

Round 21 :

(1 hdc, inc) repeat 6 times [18]

Round 22 :

(2 hdc, inc) repeat 6 times [24]

Info :

We are now done with the first leg, fasten off and cut the yarn. The legs don't get filled. Crochet the second leg by repeating rounds 1-22 (pic. 21).

Round 23 :

Connecting the legs with a 1 hdc, go on with 23 hdc around the first leg and 24 hdc around the second leg [48] (pic. 22-24)

Round 24-25 :

48 hdc in each stitch around [48] - 2 rounds (pic. 25)

Info :

There may be a hole between the legs. This can simply be closed at the end by sewing (pic. 26). Make the gently knot each leg (pic. 27).

Round 26-29 :

48 hdc in each stitch around [48] - 4 rounds

Round 30 :

(6 hdc, dec) repeat 6 times [42]

Round 31 :

42 hdc in each stitch around [42] - 1 round

Round 32 :

(5 hdc, dec) repeat 6 times [36]

Round 33 :

36 hdc in each stitch around [36] - 1 round

Round 34 :

(4 hdc, dec) repeat 6 times [30]

Round 35 :

30 hdc in each stitch around [30] - 1 round

Round 36 :

(3 hdc, dec) repeat 6 times [24]

Round 37 :

(2 hdc, dec) repeat 6 times [18]

Info :

If you need work additional stitches to be at the side of work. Fold the detail in half and crochet 9 sc through two layers! Fasten off and leave long thread for sewing (pic. 28).

β€” Assembly :

Info :

Attach the ears between rounds 16 and 17, the distance between them is 8 stitches. Secure pins and sew. Weave in the yarn ends (pic. 29-31)

Info :

Make the nostrils on the nose of the hippo. Mark points with pins between rounds 4 and 5, the distance between them is 3 stitches, arrange them as in the photo. Make 3-4 stitches with thread from one pin to the other pin (pic. 32-36)

Info :

Using black embroidery thread embroider the brows. Mark points with pins between rounds 13 and 14, the distance between them is 8 stitches. Refer to pictures. Weave in the yarn ends (pic. 37-38)

Info :

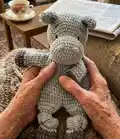
Attach the hippo head to the lovey detail between rounds 13 and 14 and sew it. Make sure the eyes are looking straight ahead and right side of lovey is facing you. Weave in the yarn ends (pic. 39-43)

Info :

Attach the arms between rounds 31 and 35. Secure them with pins and sew them. Weave in the yarn ends (pic. 44-46)

Assembly Instructions

  • Attach the ears between rounds 16 and 17, spacing them 8 stitches apart; pin in place and sew securely, then weave in yarn ends.
  • Mark nostril placement between rounds 4 and 5 on the nose, spacing the points 3 stitches apart; use pins and make 3-4 stitches between the pins to form nostrils.
  • Embroider the brows using black embroidery thread at points between rounds 13 and 14, spaced 8 stitches apart; weave in yarn ends after finishing.
  • Attach the hippo head to the lovey detail between rounds 13 and 14, making sure the eyes point straight ahead and the right side of the lovey faces you; sew securely and weave in ends.
  • Position the arms between rounds 31 and 35, pin them to the body, sew into place and weave in all yarn ends for a neat finish.

Important Notes

  • πŸ’‘Work the toy in continuous spirals without joining rounds unless the pattern explicitly states to do so.
  • πŸ’‘Install safety eyes between rounds 10 and 11 with 12 stitches between them before stuffing the head.
  • πŸ’‘The arms and legs do not get stuffed; fold and sew through two layers to close them neatly.
  • πŸ’‘Stuff the head gradually and not too firmly to maintain the correct hippo shape and snout profile.

This hippo lovey is a cozy, handmade companion perfect for cuddles and nap time. It combines plush chenille yarn with simple shaping to create an irresistibly soft toy you can treasure. Make one for a baby shower or a special gift β€” each hippo is unique and handmade with love. πŸ§ΆπŸ’™

You ask,

we answer.

FAQs

What size will the finished piece be?

The finished lovey measures approximately 45 cm long using the recommended yarn and hook size.

Can I use different yarn weights for this pattern?

Yes, you can substitute yarns, but the final size and texture will change; choose an appropriate hook for your yarn weight and adjust expectations.

Do I need prior crochet experience for this pattern?

This pattern is rated intermediate and assumes you are comfortable with hdc, sc, increases and decreases, and working in spirals.

How long does this project typically take to complete?

Most crocheters finish this lovey in about 5-7 hours, depending on experience and speed.