🧢 Beautiful ✨ Detailed πŸ’ Adorable

Harry Potter Ear Saver Pattern

Harry Potter Ear Saver Pattern
4.9β˜… Rating
2-3 Hours Time Needed
3.5K Made This
βœ‚οΈ

Beginner Friendly Level

Perfect for those just starting their crochet journey, with clear instructions and simple techniques

⏱️

Bite-Sized Project

Finishes in 2-4 hoursβ€”perfect for an afternoon of creative relaxation.

🧣

Snug Essential

Everyday comfort with practical charm, designed for both functionality and style through changing seasons.

About This Harry Potter Ear Saver Pattern

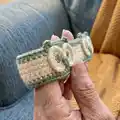
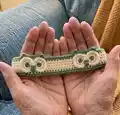
This pattern creates a compact ear saver with decorative owl buttons inspired by Harry Potter house colors. You can make two styles of owl buttons β€” a simple owl face and a full owl β€” and attach them to a small band that fits most masks. The instructions include material lists, abbreviations, round-by-round steps, and assembly guidance.

Harry Potter Ear Saver Pattern crochet pattern - detailed view of completed project

Small and quick to make, the ear saver is practical and machine-washable when made with cotton. Use the pattern to customize colors and button styles to match your favorite Hogwarts house.

Why You'll Love This Harry Potter Ear Saver Pattern

I absolutely love this pattern because it turns a useful item into a delightful, personalized accessory that brings a smile. I enjoy the mix of very simple band construction with tiny, charming button details β€” it feels rewarding to finish something quickly yet beautifully. The pattern is easy to adapt for different yarn weights and colors, so I often make sets to match seasonal masks or gift bundles. Stitching the little owl details always feels meditative, and the finished ear saver is surprisingly sturdy and practical.

Harry Potter Ear Saver Pattern step 1 - construction progress Harry Potter Ear Saver Pattern step 2 - assembly progress Harry Potter Ear Saver Pattern step 3 - details and accessories Harry Potter Ear Saver Pattern step 4 - final assembly and finishing

Switch Things Up

I love swapping the yarn colors to match different house palettes; try scarlet and gold for Gryffindor or green and silver for Slytherin.

I often change the button style: use the Owl Face for a simpler look or the Full Owl for more detail and texture.

I sometimes make mini versions using thinner yarn and a smaller hook to create keychain charm ear savers.

For a chunky, squishy version, use a bulkier yarn and a larger hook and reduce the chain count to keep the band proportional.

I like to add embroidered initials or tiny felt patches behind the button to create unique personalization.

You can use contrasting thread for pupils and beaks to make the owl details pop against pale yarns.

If you want a stiffer button, try lining the inside with a small piece of felt before finishing the whipstitch.

Try adding a thin elastic loop on the back to make the ear saver convertible into a mask strap extender for different mask types.

I sometimes attach small metal findings to make the ear saver into a decorative lanyard or badge holder for events.

Don't be afraid to experiment with texture: use a boucle or slubby yarn for a rustic owl look, or a smooth mercerized cotton for crisp stitch definition.

Common Mistakes & How to Fix Them

βœ— Skipping the stitch marker during continuous spiral rounds can make it hard to identify the start of the round; place a marker at the first stitch and move it each round to keep your count accurate. βœ— Not leaving long tails when fastening off the button pieces results in difficult sewing; leave the recommended long tail to make attaching and securing the button easy. βœ— Using a yarn weight that is too heavy for the small owl details can obscure the feather and eye details; use the recommended fine or medium weight yarn and the specified hook sizes for crisp shaping. βœ— Sewing buttons too close to the band edge can prevent mask elastic from fitting under them; attach buttons so the center indent is accessible and avoid sewing along the band edges.

Harry Potter Ear Saver Pattern

Make comfortable, handmade ear savers inspired by Harry Potter to relieve mask ear strain. This pattern guides you through two owl button styles and a simple band so you can customize the look for any fan. You will enjoy quick rounds, clear instructions, and small finishing techniques that make the pieces durable and machine-washable. Perfect for gifting or personal use, these ear savers add charm and function to everyday masks.

Beginner Friendly 2-3 Hours

Materials Needed for Harry Potter Ear Saver Pattern

β€” Main Fabric

  • 01
    Scarlet - Medium weight yarn (4), approx 3 yds / 2.7 m - 0.06 oz / 1.7 g (for band)
  • 02
    Gold - Medium weight yarn (4), approx 2.7 yds / 2.5 m - 0.05 oz / 1.4 g (for band accent)
  • 03
    White - Medium weight yarn (4), approx 4.6 yds / 4.2 m - 0.09 oz / 2.6 g (Owl Face buttons version 1)
  • 04
    Gold - Medium weight yarn (4), approx 1 yd / 0.9 m - 0.02 oz / 0.57 g (Owl Face button detail)
  • 05
    Black thread - approx 1 yd / 0.9 m (for pupils, beak and detailing)
  • 06
    White - Fine weight yarn (2), approx 6.5 yds / 5.9 m - 0.07 oz / 2 g (Full Owl buttons version 2)
  • 07
    Gold - Medium weight yarn (4), approx 0.5 yd / 0.46 m - 0.01 oz / 0.28 g (Full Owl button detail)

β€” Tools Required

  • 01
    Crochet hook size 5.0 mm (H/8) for band and medium yarn buttons
  • 02
    Crochet hook size 2.5 mm for fine weight (2) yarn for full owl buttons
  • 03
    Sewing needle
  • 04
    Scissors
  • 05
    Stitch marker (if desired)
  • 06
    Tapestry needle
  • 07
    Black sewing thread for pupils and beak

Progress Tracker

0% Complete

β€” Buttons - Version 1 - Owl Face (make 2) :

Info :

Working with white medium weight (4) yarn and 5 mm hook:

Round 1 :

4 sc into a magic ring. (4)

Round 2 :

inc in each st around. (8)

Round 3 :

using BLO - inc in each st around. (16)

Round 4 :

using FL left from previous rnd - inc in each st around. (16)

Info :

Fasten off, leaving a tail of approx 12 in/30 cm.

Info :

Using the tail of yarn, whip stitch through both sets of sts created in rnds 3 and 4.

β€” Buttons - Version 2 - Full Owl (make 2) :

Info :

Working with white fine weight (2) yarn and 2.5 mm hook

β€” Head :

Round 1 :

4 sc into a magic ring. (4)

Round 2 :

inc in each st around. (8)

Round 3 :

(sc, ch 2, sl) in next st, sl inc in next 3 sts, (sl, ch 2, sc) in next st, inc in each st around. (20)

Info :

Fasten off, leaving a long tail for sewing.

β€” Body :

Round 1 :

6 sc into a magic ring. (6)

Round 2 :

using BLO - inc in each st around. (12)

Round 3 :

using FL left from previous rnd - inc in each st around. (12)

Round 4 :

working though both sets of sts from rnds 3 and 4 - inc around. (24)

Info :

Fasten off, leaving a long tail for sewing.

β€” Band :

Info :

Working with scarlet yarn and 5 mm hook:

Round 1 :

ch 21. (21)

Round 2 :

beginning in 2nd ch from hook - sc 19, sc 3 in next st. Moving up the other side of chain - sc 18, inc in last ch. (42)

Info :

Switching to gold yarn:

Round 4 :

inc, sc 18, inc, sc, inc, sc 18, inc, sc. (46)

Info :

Fasten off.

β€” Assembly :

Owl Face Buttons and Band :

With a double strand of gold yarn, create two french knots for the owl's eyes. With black thread and a sewing needle, create the owl's pupils and beak.

Info :

Using long tails left after fastening off buttons, attach buttons securely at each end of band. Working around the outside of the center indent of the button (containing the eyes and nose) secures the button well while still allowing room for mask elastic to fit under buttons.

Info :

Weave in ends.

Full Owl Buttons and Band :

With head slightly in front of and overlapping the body, attach head to body using long tails left after fastening off head. With a single strand of gold yarn, create two french knots for the owl's eyes. With black thread and a sewing needle, create the owl's pupils, beak, and feather detail.

Info :

Using long tails left after fastening off owl bodies, and working between the feather details so they do not get covered up, attach buttons securely at each end of band. Make sure not to sew edges since mask elastic needs to fit underneath buttons.

Info :

Weave in ends.

Assembly Instructions

  • With a double strand of gold yarn, create two french knots for the owl's eyes, then use black thread and a sewing needle to stitch the pupils and beak on Owl Face Buttons.
  • Using long tails left after fastening off buttons, attach each button securely at the ends of the band, sewing around the outside of the center indent so mask elastic can slip under the button.
  • For Full Owl Buttons, attach the head slightly in front of and overlapping the body using the long tail left after fastening off; secure with neat whipstitches.
  • Attach Full Owl Buttons to each end of the band using long tails left after fastening off the bodies, working between feather details so they remain visible and not covered by the stitching.

Important Notes

  • πŸ’‘Gauge is flexible; adjust the number of stitches in the band so the ear saver measures about 5.5 inches long.
  • πŸ’‘Work the small owl buttons in a continuous spiral without joining and use a stitch marker to mark the start of each round if desired.
  • πŸ’‘Cotton yarn is recommended if you need machine-washable ear savers, though other yarns will work as well; weave in ends securely.

This Harry Potter inspired ear saver pattern is a cheerful and practical way to add comfort to mask-wearing routines. Customize the owls and colors to match your favorite house or make sets for friends and family. Quick to make and wonderfully giftable, these ear savers combine function with fandom flair. 🧢✨

You ask,

we answer.

FAQs

What size will the finished piece be?

The finished ear saver measures approximately 5.5 in / 14 cm long and 1.5 in / 4 cm wide when using the recommended yarn and hook sizes.

Can I use different yarn weights for this pattern?

Yes, you can use different yarn weights, but this will affect the final size and look; use a larger hook with bulky yarn or a smaller hook with finer yarn and adjust band stitch count if needed.

Do I need special techniques to make the owl buttons?

No special techniques are required beyond basic single crochet, increases, working in BLO/FLO, and slip stitches; a magic ring and continuous spiral help shape the buttons.

How long does this project typically take to complete?

Most crocheters finish an ear saver in about 2-3 hours, though time may vary depending on experience and the button style chosen.