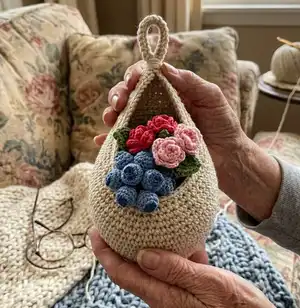
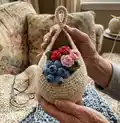
🧢 Beautiful ✨ Detailed πŸ’ Adorable

Hanging Basket Set Pattern

Hanging Basket Set Pattern
4.5β˜… Rating
5-7 Hours Time Needed
3.4K Made This
βœ‚οΈ

Intermediate Level

Ideal for those with basic crochet experience, featuring slightly more advanced stitches and techniques to expand your skills.

⏱️

Weekend Treat

Takes 5-7 hours, making it an enjoyable project to finish over a couple of days.

🏑

Cozy Accent

A warm touch for your space that transforms ordinary corners into inviting nooks filled with handmade charm.

About This Hanging Basket Set Pattern

This pattern teaches you how to crochet three hanging baskets (small, medium, large) using cord or bulky yarn. The instructions include working in a spiral, using back loops only (BLO) for texture, and finishing with a crab stitch edge and a neat hanging loop. Full photo references are included for each key step so you can follow along visually.

Hanging Basket Set Pattern crochet pattern - detailed view of completed project

Each basket starts from a magic ring and grows with clear round-by-round increases to shape the teardrop form. The pattern includes finishing techniques to hide ends and create a professional-looking wrapped hanging loop.

Why You'll Love This Hanging Basket Set Pattern

I absolutely love this pattern because it turns simple cord into elegant, functional decor that you can use around the house. I enjoy how the BLO rounds create a beautifully textured wall of stitches that hold shape well and look professional. The step-by-step photos and clear round counts give me confidence to tackle each size, and the crab stitch edge adds a tidy, finished look I always appreciate. It is satisfying to wrap the hanging loop and see the final basket ready to display.

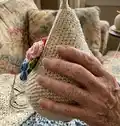
Hanging Basket Set Pattern step 1 - construction progress Hanging Basket Set Pattern step 2 - assembly progress Hanging Basket Set Pattern step 3 - details and accessories Hanging Basket Set Pattern step 4 - final assembly and finishing

Switch Things Up

I love customizing these baskets by changing cord color and thickness to suit my decor; soft neutrals look timeless while brights make a playful statement.

I often swap the cord for a chunky t-shirt yarn and a larger hook to make oversized baskets for storage or a smaller, thinner cord for key-sized mini baskets.

I sometimes add a decorative trim or tassels along the outer edge after completing the crab stitch to give each basket a unique finish.

I like to experiment with placement for the hanging loopβ€”moving it slightly forward creates a different drape and look when hung on hooks.

I occasionally crochet a lining in a contrasting color and sew it inside for extra structure or to protect delicate plant pots.

I recommend trying metallic thread wraps around the hanging loop for a subtle sparkle effect on seasonal decorations.

If you want a nested set, make each size in the same color family for a coordinated look that stacks nicely for gifting.

I sometimes attach small macrame accents or wooden beads to the hanging loop for a boho touch that pairs well with natural cord textures.

I will also change the stitch counts slightly to make a wider mouth or deeper pocket if I need the basket to hold bulkier items.

Finally, I always test a small swatch first to check tension and adjust hook size accordingly because that simple step ensures the final baskets match my expectations.

Common Mistakes & How to Fix Them

βœ— Skipping stitch markers when working in spiral can cause confusion and uneven increases; place and move a marker at the start of each round to track your position. βœ— Crocheting too loosely with cord will create floppy baskets that don’t hold shape; use a slightly smaller hook and maintain firm, consistent tension for a sturdy result. βœ— Forgetting to work in BLO when instructed will change the texture and fit of the basket; always check the instruction that says work BLO and use the back loop as shown. βœ— Not hiding and securing the cord ends properly results in messy finishing; follow the instructions to pull the cord through stitches, cut, then reattach a new cord and wrap the hanging loop tightly for a neat finish.

Hanging Basket Set Pattern

Create a set of three stylish hanging baskets for your home with this clear, photo-driven crochet pattern. Youll learn how to work in a spiral, use BLO (back loops only) for a tighter texture, and finish with a decorative hanging loop. Perfect for small plants, keys, or seasonal decor, this pattern is practical and beautiful. Follow step-by-step rounds and picture references to get consistently shaped baskets.

Intermediate 5-7 Hours

Materials Needed for Hanging Basket Set Pattern

β€” Main Fabric

  • 01
    4-5 mm cotton, acrylic or polyester cord, 250-300 meters total for three baskets
  • 02
    Use similar bulky cord for consistent results; thicker cord = larger baskets

β€” Tools Required

  • 01
    Crochet hook size 5.0 mm or 6.0 mm (for main crocheting)
  • 02
    Crochet hook size 2.5-3.0 mm (to hide the cord at the end of crocheting)
  • 03
    Scissors
  • 04
    Stitch marker
  • 05
    Tapestry/yarn needle for weaving ends
  • 06
    Small length of thin thread for wrapped loop finishing

Progress Tracker

0% Complete

β€” Small basket :

Info :

Make MR: ch1, 6 sc (pic. 8-11). Pull the ring (pic. 12). Crochet in a spiral. Place a stitch marker in the first stitch of the first round (move it each round). Work along diagram 1. When working BLO, also crochet in the 3rd back loop of each stitch to make your work tighter (pic. 13-16)

Round 1 :

1 round: work BLO, 6 inc (12) hide the end inside the stitches then cut it off (pic. 17-21)

Round 2 :

2 round: work BLO (inc, sc)*6 (18) (pic. 22)

Round 3 :

3 round: work BLO (2 sc, inc)* 6 (24) (pic. 23)

Round 4 :

4 round: work BLO (inc, 3 sc)* 6 (30) (pic. 24)

Round 5 :

5 round: work BLO, 2 sc, (inc, 4 sc)*5, inc, 2 sc (36) (pic. 25)

Round 6 :

6 round: work BLO, sc3inc, 35 sc (38) (pic. 26-27)

Round 7 :

7 round: work BLO, sc, sc3inc, 36 sc (40) (pic. 28-29)

Round 8 :

8 round: work BLO, 2 sc, sc3inc , 37 sc (42) (pic. 30-31)

Round 9 :

9 round: work BLO, 3 sc, sc3inc, 38 sc (44) (pic. 32)

Round 10 :

10 round: work BLO, 4 sc, sc3inc , 39 sc (46) (pic. 33)

Round 11 :

11 round: work BLO, 5 sc, sc3inc, 40sc (48) (pic. 34)

Round 12 :

12 round: work BLO, 6 sc, sc3inc, 41 sc (50) (pic. 35)

Round 13 :

13 round: work BLO, 7 sc, sc3inc, 42 sc (52) (pic. 36)

Round 14 :

14 round: work BLO, 8 sc, sc3inc, 7 sc, 18 dec (pic. 37-43)

Round 15 :

15 round: work BLO, 36 sc. (pic. 44-45)

Info :

Cut off the cord. Fasten off (pic. 46-52). Hide the end of the cord, cut off (pic. 53-55). Take a new cord (pic. 56). Find the middle of the top of the basket (pic. 57). Start crocheting a new round with new yarn (pic. 58-59). Make ch1 (pic. 60).

β€” Crab stitch :

Info :

- insert the hook from front to back in the first single crochet stitch on the right (pic. 61-62) - draw up a loop. You should have two loops on the hook. (pic. 63) - pull the thread through both stitches. There should be one stitch left on the hook. This completes the first crab stitch. (pic. 64-65) - repeat the crab stitch into the next stitch (pic. 66-69)

Info :

- Work one crab stitch in each single crochet stitch until you reach the end (pic. 70-72)

β€” Hanging loop :

Round 1 :

- make ch14 (pic. 73)

Round 2 :

- sl st in the stitch at the base (pic. 74)

Round 3 :

- sc in each stitch of the hanging loop (14) (pic. 75)

Round 4 :

- sl st in the stitch at the base (pic. 77)

Info :

- cut off the yarn, leaving a tail about 30 inches long.(pic. 78) - pull out the rest of the cord (pic. 79-80) - take a piece of thread about 10 inches, put as it is shown on the picture (pic. 81) - tightly wrap it with the cord first to the upper part, then to the bottom - insert the 2 ends of the cord into the loop of the thread (pic. 84) - pull the end of the thread up, pull the 2 cords out (pic. 84) - cut the ends (pic. 85)

β€” Medium basket :

Info :

Make MR: ch1, 6 sc (pic. 8-11). Pull the ring (pic. 12). Crochet in a spiral. Place a stitch marker in the first stitch of the first round (move it each round). Work along diagram 1. When working BLO, grab the jumper of the stitch to make your product tighter (pic. 13-16). For detailed pictures of rounds 1-5, see page 5, pic 17-25

Round 1 :

1 round: work BLO, 6 inc (12) hide the end inside the stitches then cut it off

Round 2 :

2 round: work BLO (inc, sc)*6 (18)

Round 3 :

3 round: work BLO (2 sc, inc)* 6 (24)

Round 4 :

4 round: work BLO (inc, 3 sc)* 6 (30)

Round 5 :

5 round: work BLO, 2 sc, (inc, 4 sc)*5, inc, 2 sc (36)

Round 6 :

6 round: work BLO, 4 sc, (inc, 5 sc)*5, inc, sc (42) (pic. 87)

Round 7 :

7 round: work BLO, sc3inc, 41sc (44) (pic. 88)

Round 8 :

8 round: work BLO, sc, sc3inc, 42 sc (46) (pic. 89)

Round 9 :

9 round: work BLO, 2 sc, sc3inc, 43 sc (48) (pic. 90)

Round 10 :

10 round: work BLO, 3 sc, sc3inc , 44 sc (50) (pic. 91)

Round 11 :

11 round: work BLO, 4 sc, sc3inc, 45 sc (52) (pic. 92)

Round 12 :

12 round: work BLO, 5 sc, sc3inc, 46 sc (54)

Round 13 :

13 round: work BLO, 6 sc, sc3inc, 47 sc (56)

Round 14 :

14 round: work BLO, 7 sc, sc3inc, 48 sc (58)

Round 15 :

15 round: work BLO, 8 sc, sc3inc, 49 sc (60)

Round 16 :

16 round: work BLO, 9 sc, sc3inc, 50 sc (62) (pic. 93)

Round 17 :

17 round: work BLO, 10 sc, sc3inc, 9 sc, 21 dec (pic. 94-97)

Round 18 :

18 round: work BLO, 41 sc. (pic. 98) Cut off the cord. Finish crocheting. (pic. 99-101 or pic. 46-52 page 8)

Info :

Take a new cord. Make a crab stitch in each stitches. For details on how to make a crab stitch, see pages 9-11, pic. 56-72. Make a loop for hanging. The hanging loop is made as in a small size basket. For details, see the pages 11-12, pic. 73-85

β€” Large basket :

Info :

Make MR: ch1, 6 sc (pic. 8-11). Pull the ring (pic. 12). Crochet in a spiral. Place a stitch marker in the first stitch of the first round (move it each round). Work along diagram 1. When working BLO, grab the jumper of the stitch to make your product tighter (pic. 13-16). For detailed pictures of rounds 1-5, see page 5, pic 17-25

Round 1 :

1 round: work BLO, 6 inc (12) hide the end inside the stitches then cut it off

Round 2 :

2 round: work BLO (inc, sc)*6 (18)

Round 3 :

3 round: work BLO (2 sc, inc)* 6 (24)

Round 4 :

4 round: work BLO (inc, 3 sc)* 6 (30)

Round 5 :

5 round: work BLO, 2 sc, (inc, 4 sc)*5, inc, 2 sc (36)

Round 6 :

6 round: work BLO, 4 sc, (inc, 5 sc)*5, inc, sc (42)

Round 7 :

7 round: work BLO, (6 sc, inc)*6 (48) (pic. 105)

Round 8 :

8 round: work BLO, sc3inc, 47sc (50) (pic. 106-107)

Round 9 :

9 round: work BLO, sc, sc3inc , 48 sc (52) (pic. 108)

Round 10 :

10 round: work BLO, 2 sc, sc3inc, 49 sc (54) (pic. 109)

Round 11 :

11 round: work BLO, 3 sc, sc3inc , 50 sc (56) (pic. 110)

Round 12 :

12 round: work BLO, 4 sc, sc3inc, 51 sc (58)

Round 13 :

13 round: work BLO, 5 sc, sc3inc, 52 sc (60)

Round 14 :

14 round: work BLO, 6 sc, sc3inc, 53 sc (62)

Round 15 :

15 round: work BLO, 7 sc, sc3inc, 54 sc (64)

Round 16 :

16 round: work BLO, 8 sc, sc3inc, 55 sc (66)

Round 17 :

17 round: work BLO, 9 sc, sc3inc, 56 sc (68)

Round 18 :

18 round: work BLO, 10 sc, sc3inc, 57 sc (70)

Round 19 :

19 round: work BLO, 11 sc, sc3inc, 58 sc (72)

Round 20 :

20 round: work BLO, 12 sc, sc3inc, 11 sc, 24 dec

Round 21 :

21 round: work BLO, 50 sc. Cut off the cord. Finish crocheting. How to finish crocheting beautifully see pic. 46-52 page 8

Info :

Take a new cord. Make a crab stitch in each stitches. For details on how to make a crab stitch, see pages 9-11, pic. 56-72. Make a loop for hanging. The hanging loop is made as in a small size basket. For details, see the pages 11-12, pic. 73-85

Assembly Instructions

  • Hide the end of the cord by pulling it inside the stitches and cut it off as shown in the pictures, then weave a new cord when instructed for the decorative edge.
  • Work one crab stitch in each single crochet around the top edge to create a clean, reversed edge before making the hanging loop.
  • Make the hanging loop by chaining 14, slip stitch to the base, single crochet 14 in the loop, then slip stitch to the base to secure; leave a long tail to wrap and finish.
  • Wrap a short piece of thin thread around the top of the hanging loop, insert the cord ends into the thread loop, pull the thread to lock the cords, then trim the ends for a neat finish.
  • Use stitch markers to find the middle of the top and position the hanging loop at the center point for symmetry before attaching and finishing.

Important Notes

  • πŸ’‘Place and move a stitch marker at the start of each round when working in a spiral to keep accurate stitch counts and increases.
  • πŸ’‘Work in BLO (back loops only) where specified to create the textured, tight rows that give the baskets their structured appearance.
  • πŸ’‘Use a smaller hook or firm tension with bulky cord to ensure the baskets hold their shape; thicker cord will produce larger baskets so choose cord and hook accordingly.

These hanging baskets add instant charm and function to any wall, entryway, or plant nook. Theyre quick to make and look beautifully finished with the crab stitch edge and wrapped hanging loop. Make a trio in coordinating colors to create a stylish display that you and your guests will admire. 🧢🏑

You ask,

we answer.

FAQs

What size will the finished baskets be?

Sizes vary depending on cord thickness; using the recommended 4-5mm cord and hooks, the small, medium and large baskets correspond to the three sets of rounds shown and will be small, medium and large wall baskets suitable for light items and small plants.

Can I use different yarn or cord weights for this pattern?

Yes, but changing yarn or cord thickness will affect final size and shape; choose an appropriate hook and expect larger baskets with thicker cord and smaller baskets with thinner cord.

Do I need to know any advanced stitches?

This pattern uses single crochet, increases, decreases, working in BLO and the crab stitch; it is rated intermediate because of these techniques, but step-by-step photos help guide you.

How long does this project typically take to complete?

Most crafters finish the set in about 5-7 hours total, depending on experience and number of baskets made; a single basket can be completed in less time.