🧢 Beautiful ✨ Detailed πŸ’ Adorable

Granny Square Pocket Bottle Holder Pattern

Granny Square Pocket Bottle Holder Pattern
4.2β˜… Rating
2-4 Hours Time Needed
1.5K Made This
βœ‚οΈ

Beginner Friendly Level

Perfect for those just starting their crochet journey, with clear instructions and simple techniques

⏱️

Bite-Sized Project

Finishes in 2-4 hoursβ€”perfect for an afternoon of creative relaxation.

✨

Stylish Touch

An elegant detail to elevate any look, combining traditional techniques with contemporary design sensibilities.

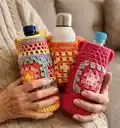
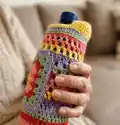
About This Granny Square Pocket Bottle Holder Pattern

This pattern teaches you how to crochet a snug bottle holder with a mesh body and optional granny square or solid pocket for your phone. You can make it in solid colours or stripe it for a festival-ready look. Two strap methods let you choose a stretchy vertical strap or a more stable horizontal strap.

Granny Square Pocket Bottle Holder Pattern crochet pattern - detailed view of completed project

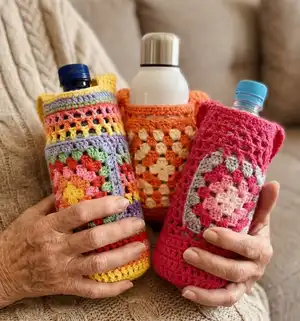
Worked in DK/8ply cotton with simple double crochet rounds and a mesh section for stretch. Includes measurements, strap options and finishing tips to prevent stretching.

Why You'll Love This Granny Square Pocket Bottle Holder Pattern

I absolutely love this pattern because it is practical and playful β€” perfect for taking your water bottle hands-free. I made mine for festivals and now I use it every day because it keeps my bottle and phone together. I enjoy that it is so adaptable: you can make a granny pocket, a solid pocket, change colours or stitch density to suit your bottle. I also love that the pattern is quick to make and a satisfying afternoon project.

Granny Square Pocket Bottle Holder Pattern step 1 - construction progress Granny Square Pocket Bottle Holder Pattern step 2 - assembly progress Granny Square Pocket Bottle Holder Pattern step 3 - details and accessories Granny Square Pocket Bottle Holder Pattern step 4 - final assembly and finishing

Switch Things Up

I love that this pattern is easy to customise β€” try changing colours every round to make bright stripes or keep it classic with a single shade.

I sometimes swap DK cotton for a sport-weight yarn and a smaller hook to make a tighter, less stretchy holder for very thin bottles.

For a sturdier strap I use the horizontal handle method and sew a fabric strip underneath to prevent stretching over time.

Make the granny square pocket larger or smaller by adding or removing rounds so it fits your phone or sunglasses perfectly.

Want a more secure pocket? Add a metal snap or a small crocheted flap with a button to keep items from falling out.

I also enjoy lining the pocket with lightweight fabric for extra durability and to prevent stretching from phone edges.

Try using recycled cotton or colourful T-shirt yarn for a chunky, eco-friendly version with a different texture.

Add a drawstring cord in a contrasting shade and bead the ends for a decorative finish that also cinches the top.

To make it child-friendly, shorten the strap and add a fun motif or small applique9 on the pocket to personalise it.

Combine granny squares down the length for a decorative front panel instead of a single square for a playful patchwork look.

I sometimes make matching accessories like a small coin pouch or key ring in the same yarn to create a coordinated set.

Experiment with stitch tension: tighter stitches give a more solid body while looser tension produces a more open mesh with extra stretch.

Common Mistakes & How to Fix Them

βœ— Not checking gauge early can result in a holder that is too loose or too tight; make a small test and compare to a water bottle, adjusting hook size as needed. βœ— Skipping the measurement on the cylinder rows causes a poor fit for your bottle; measure on the bottle after 4 rows and adjust number of rows before starting netting. βœ— Making the strap too short or too long without measuring will lead to discomfort; measure across your body or the person you are making for and crochet the strap to that length before fastening off. βœ— Forgetting to leave a long tail for sewing the pocket will make attachment difficult; always leave a long tail when finishing pocket pieces to allow secure sewing onto the body. βœ— Using a cotton blend without adjusting increases can make the holder too small because blends stretch less; add 2-3 stitches after the 3rd row if using cotton blend as recommended.

Granny Square Pocket Bottle Holder Pattern

Make a handy, wearable bottle holder with a granny square phone pocket β€” perfect for festivals, walks, or everyday hands-free use. This pattern gives you two pocket options (granny square or solid) and two strap methods so you can customise to suit your style. Clear step-by-step photos and concise instructions make it easy to follow whether you keep it simple or go colorful.

Beginner Friendly 2-4 Hours

Materials Needed for Granny Square Pocket Bottle Holder Pattern

β€” Main Fabric

  • 01
    8 ply (DK) cotton such as Paintbox (recommended) β€” 2 x 50 g balls for main colour
  • 02
    3-4 different colours, 1 ball each for stripes (optional)
  • 03
    Stash scraps of cotton/wool for the granny square pocket
  • 04
    Extra small amount of contrasting colour for pocket edging or details

β€” Tools Required

  • 01
    Crochet hook 3.00 mm (recommended)
  • 02
    Crochet hook 3.5 mm or 4.0 mm (optional depending on gauge)
  • 03
    Needle for sewing on pocket and strap (tapestry/sewing needle)
  • 04
    Scissors

Progress Tracker

0% Complete

β€” Bottom Solid Section :

Round 1 :

1. BOTTOM SOLID SECTION Make a magic loop (there are many instructions online if unsure how to do this)

Round 2 :

2. Ch 3, DC into magic loop 11 times, sl st into 3rd chain of initial 3ch to make a circle.

Round 3 :

3. You should now have a small circle of 11DC and 3ch counting as one DC, total 12 DC

Round 4 :

4. Ch 3, 2DC into each stitch till end, slst into 3rd chain to close circle (24DC)

Round 5 :

5. Ch 3, *1DC in next stitch, 2DC in next stitch , repeat from * till end, slst into 3rd chain to close circle (36 DC)

Round 6 :

6. Complete 4 more rows of 3ch ,then 1DC in each stitch and slst into 3rd chain.As there are no increases, the crochet will begin to form a cylinder shape. You can measure it on a water bottle to check fit. It should fit tightly as it will stretch if cotton. For cotton blend or acrylic refer to note above.

β€” Transition :

Round 7 :

7. When you have completed 4-6 rows depending on how large the water bottle is you are now ready to make the netting part of the pattern.

β€” Netting Section :

Round 8 :

8. NETTING SECTION: Ch 3 and 1DC into second stitch, ch1 sk 1 stitch and 1DC into next stitch . Continue 1DC, ch1, sk 1 to end. At the end of the round there should be 18 DC and 18 chains (unless you increased stitches earlier then add accordingly) Continue completing this same round until nearly to the top of the water bottle leaving some space for the final dc or sc rows. I usually do 14 rows.

β€” Body :

Round 9 :

9. BODY Finish body section by completing 1-2 rows of 1DC or 3 rows of sc, depending on the length of your bottle and your preference.

β€” Bag Strap :

Round 10 :

10. BAG STRAP To make the strap, there are two possible methods. METHOD 1 : Ch 3 from where you are and complete 5DC into the top of the last dc round. Measure how long the strap needs to be across your body. Continue in rows of 3ch, 5DC and turn, back and forth until you reach your desired length. METHOD 2 : Alternatively, I now crochet the handle horizontally, as it stretches less than the first method. Make a 200-240 ch depending on the person's height and 3 rows of HDC then sew on tightly to opposite sides

Round 11 :

Fasten off yarn leaving approximately 20 cm tail to sew other end of strap onto body. Fold bottle holder in half and sew end of strap on the opposite side.

β€” Granny Square Pocket :

Round 12 :

11. GRANNY SQUARE POCKET: measure the phone size and crochet enough rounds to leave approximately 2cm on either side of the phone. For a longer pocket, add an extra row or two at top, bottom or both to achieve the correct size, leaving a long tail for sewing onto bottle .

β€” Plain Solid Colour Pocket :

Round 13 :

PLAIN SOLID COLOUR POCKET : Ch 22, work into 3rd st in hdc ( 20 sts in each row) for approx 24 rows of hdc until the pocket measures from the bottom of the mesh to the top just below the final DC row.(or to your own desired length) leaving a long tail for sewing onto bottle. When making the pocket I now try to make it longer than a phone and put a metal snap to keep it close so the phone can't fall out, generally it is in the pocket quite tightly, however the cotton does stretch over time.

Round 14 :

12. Your finished body section should look like this picture

Round 15 :

13.Place the granny square pocket between the straps and make sure it is straight as you sew around the three sides to form a pocket. I found it easier to sew the pocket on while the cover was on the bottle.

Round 16 :

Sew in any ends inside the bottle holder, taking particular care to secure the magic loop end tightly.

Round 17 :

Also the cotton strap will stretch so if you want to prevent stretching sew a ribbon or fabric on the underside to prevent stretching.

β€” Drawstring :

Round 18 :

DRAWSTRING : To make the drawstring make a chain of 100 ch and thread it through every second stitch in the top final round above the netting starting from the middle back ( the pocket is on the front and the drafting ends meet at the back)

Assembly Instructions

  • Place the granny square pocket (or solid pocket) between the straps and sew around three sides to form a pocket, leaving the top open for the phone.
  • Fold the bottle holder in half and sew the end of the strap on the opposite side securely, leaving approximately a 20 cm tail when fastening off.
  • Sew in all loose ends inside the holder, paying particular attention to secure the magic loop end tightly so the base does not open.
  • If your cotton strap stretches, sew a ribbon or fabric to the underside of the strap to prevent stretching and keep the strap sturdy.

Important Notes

  • πŸ’‘Use a 3.00 mm hook for DK cotton but check gauge; you may need 3.5 or 4.0 mm if your tension is tight.
  • πŸ’‘For cotton blends that stretch less, add 2-3 stitches after the third row to ensure the holder will fit your bottle.
  • πŸ’‘Measure the cylinder on your water bottle after 4 rows to ensure a snug fit before proceeding to the netting section.
  • πŸ’‘Leave long tails when finishing pockets and straps to make sewing attachments easier and more secure.

This bottle holder pattern combines practicality and handmade charm to create a festival-ready accessory you will actually use every day. It includes two pocket options and two strap methods so you can personalise the fit and style with ease. Make it in bright stripes or a simple solid β€” either way it becomes a trusty companion for walks, shopping and outdoor fun. 🧢✨❀️

You ask,

we answer.

FAQs

What size will the finished piece be?

The finished holder fits a typical 500ml water bottle and measures to the bottle height you make it; size depends on how many cylinder rows you create and where you stop the netting.

Can I use different yarn weights for this pattern?

Yes, you can use different yarn weights but the size will change; DK/8ply cotton is recommended. If you change weight, adjust hook size and measure the fit on your bottle while working.

Do I need prior crochet experience for this pattern?

This pattern is beginner friendly, but you should be comfortable with basic stitches: chain, double crochet, slip stitch and half double crochet for the strap option.

How long does this project typically take to complete?

Most crafters complete this project in 2-4 hours, though time may vary based on experience and whether you add a granny pocket or stripes.