🧢 Beautiful ✨ Detailed πŸ’ Adorable

Gingerbread Amigurumi Pattern

Gingerbread Amigurumi Pattern
4.9β˜… Rating
5-7 Hours Time Needed
3.7K Made This
βœ‚οΈ

Intermediate Level

Ideal for those with basic crochet experience, featuring slightly more advanced stitches and techniques to expand your skills.

⏱️

Weekend Treat

Takes 5-7 hours, making it an enjoyable project to finish over a couple of days.

🧸

Cute Companion

An adorable friend to cherish, handcrafted with love to bring comfort and joy for years to come.

About This Gingerbread Amigurumi Pattern

This pattern teaches you how to crochet a gingerbread amigurumi complete with a frosted hat and decorative sprinkles. It includes step-by-step round instructions, materials, and helpful photos to guide you. The finished doll is compact and great for gifts or seasonal decor.
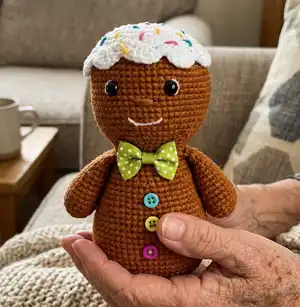
Gingerbread Amigurumi Pattern crochet pattern - detailed view of completed project

You'll work in continuous rounds, shape the body and limbs, and sew the pieces neatly together. Simple embroidery and button details finish the look.

Why You'll Love This Gingerbread Amigurumi Pattern

I absolutely love this pattern because it blends classic amigurumi shaping with playful, seasonal details that make each doll unique. I enjoy the small moments of decorating the frosted hat β€” the tiny embroidered sprinkles always bring a smile to my face. I designed it to be satisfying to crochet while still offering room for personalization. I hope you feel the same joy making and gifting these little gingerbread friends.

Gingerbread Amigurumi Pattern step 1 - construction progress Gingerbread Amigurumi Pattern step 2 - assembly progress Gingerbread Amigurumi Pattern step 3 - details and accessories Gingerbread Amigurumi Pattern step 4 - final assembly and finishing

Switch Things Up

I love changing up colors and trims to make each gingerbread doll unique; try pastel frosting for a soft look or bold white and bright sprinkles for a festive feel.

I sometimes use a slightly thicker yarn and larger hook to make a cuddly, larger version, or a thinner yarn for a tiny keychain-sized doll.

I enjoy adding embroidery details like eyelashes, freckles, or a heart on the chest to personalize each toy.

Buttons and bows can be swapped for felt shapes or tiny crocheted accessories to match the recipient's style.

For a more vintage look, use muted yarn colors and wooden buttons instead of bright plastic ones.

I often stitch the sprinkles in different lengths and colors to create a playful, random pattern on the hat.

Try adding a little wire armature inside the limbs for posability if you want the doll to sit or hold small items.

For a safer child-friendly version, embroider eyes and secure all small parts very tightly instead of using plastic safety eyes or buttons.

I recommend experimenting with different stuffing levels to alter firmness β€” firmer stuffing gives a sturdier toy while softer stuffing creates a plush feel.

Mixing yarn textures (cotton for the body, acrylic for the hat) can produce interesting tactile contrasts that make the finished piece even more charming.

Common Mistakes & How to Fix Them

βœ— Placing safety eyes too early can make shaping difficult later; attach eyes when instructed and check positioning on the stuffed head before fixing them permanently. βœ— Overstuffing limbs makes sewing and shaping awkward and can distort the body; stuff gradually and evenly, adding small amounts until you reach the desired firmness. βœ— Skipping stitch counts during increases and decreases leads to uneven shaping; count stitches after each round and use a marker to mark the beginning of rounds. βœ— Pulling yarn too tightly when sewing parts together can pucker the seams; use even tension and a yarn needle to whipstitch pieces with small, neat stitches. βœ— Not using the recommended hook size changes the finished size and stitch density; if you change yarn weight, adjust the hook and recheck gauge to maintain proportions.
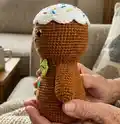
Gingerbread Amigurumi Pattern

Create a charming gingerbread amigurumi with this clear, photo-supported pattern. You will crochet a sweet gingerbread doll topped with a frosted hat and sprinkle details. The pattern is ideal for making a handmade gift or holiday decoration you can cherish.

Intermediate 5-7 Hours

Materials Needed for Gingerbread Amigurumi Pattern

β€” Main Fabric

  • 01
    Brown yarn (YarnArt Jeans recommended) suitable for 1.80-2.00 mm hook for the body - amount as needed
  • 02
    White yarn suitable for 1.80-2.00 mm hook for the hat and frosting - amount as needed
  • 03
    Colored yarn scraps for embroidered sprinkles (small amounts of yellow, pink, blue, etc.)
  • 04
    3 small buttons for decoration
  • 05
    8 mm safety eyes (2 pieces)
  • 06
    White and black sewing yarn for details
  • 07
    Polyester fiberfill for stuffing

β€” Tools Required

  • 01
    Crochet hook size 1.80-2.00 mm
  • 02
    Yarn needle for sewing and embroidery
  • 03
    Scissors
  • 04
    Stitch markers
  • 05
    8 mm safety eyes (2 pieces)
  • 06
    3 small buttons
  • 07
    Polyester stuffing / fiberfill
  • 08
    Pins for assembly (optional)

Progress Tracker

0% Complete

β€” Hat :

Info :

Start with white color.

Round 1 :

6 sc into a magic ring. (6)

Round 2 :

(inc) 6 times. (12)

Round 3 :

(sc,inc) 6 times. (18)

Round 4 :

(2sc, inc) 6 times. (24)

Round 5 :

(3sc, inc) 6 times. (30)

Round 8 :

(4 sc, inc) 6 times. (36)

Round 9 :

(5sc, inc) 6 times. (42)

Round 10 :

(6 sc,inc) 6 times. (48)

Round 11 :

(7sc, inc) 6 times. (54)

Round 12 :

(8sc, inc) 6 times. (60)

Round 13 :

(Skip 2 stitches, 5 dc in 1 stitch, skip 2 stitches, sc) Repeat along the whole row.

β€” Face seam :

Info :

Start with brown color.

Round 1 :

15 ch, starting from 2nd ch inc, 12 sc, 3 sc in 1 stitch (work on the other side of the chain) 13 sc. (30)

Round 2 :

2 inc, 12 sc, 3 inc, 12 sc, inc. (36)

Round 3 :

(sc, inc) 2 times, 13 sc, (inc,sc) 3 times, 12 sc, inc. (42)

Round 4 :

(2 sc, inc) 2 times, 14 sc, (inc, 2 sc) 3 times,13 sc, inc. (48)

Round 5 :

BLO sc around. (48)

Round 6 :

sc around. (48)

Round 7 :

(7 sc, inc) 6 times. (54)

Round 8-14 :

sc around. (54)

Round 15 :

(7 sc, dec) 6 times. (48)

Round 16-18 :

sc around. (48)

Round 19 :

(6 sc,dec) 6 times. (42)

Round 20-22 :

sc around. (42)

Round 23 :

(5 sc, dec) 6 times. (36)

Round 24-26 :

sc around. (36)

Round 27 :

(4 sc, dec) 6 times. (30)

Round 28-30 :

sc around. (30)

Round 31 :

(4 sc, inc) 6 times. (36)

β€” Arms :

Info :

Start with brown color.

Round 1 :

6 sc into a magic ring. (6)

Round 2 :

(inc) 6 times. (12)

Round 3 :

(sc,inc) 6 times. (18)

Round 4 :

BLO sc around. (18)

Round 5-7 :

sc around. (18)

Round 8 :

(4 sc,dec) 3 times. (15)

Round 9-11 :

sc around. (15)

Round 12 :

(3 sc,dec) (12)

Info :

Crochet the two edges together at the same time.

β€” Body :

Round 32 :

(5 sc, inc) 6 times.(42)

Round 33 :

(6 sc,inc) 6 times. (48)

Round 34 :

(7 sc,inc) 6 times. (54)

Round 35 :

(8 sc,inc) 6 times. (60)

Round 36-48 :

sc around. (60)

Round 49 :

(8 sc,dec) 6 times. (54)

Round 50 :

(7 sc,dec) 6 times. (48)

Round 51 :

(6 sc,dec) 6 times.(42)

Round 52 :

(5 sc,dec) 6 times.(36)

Round 53 :

(4 sc,dec) 6 times. (30)

Round 54 :

(3 sc,dec) 6 times. (24)

Round 55 :

(2 sc,dec) 6 times. (18)

Round 56 :

(sc,dec) 6 times. (12)

Round 57 :

dec .

Info :

Attach the eyes to the 43rd and 44th rows, 9 stitches apart.

Info :

Sew arms to the body between appropriate rounds to position them evenly on the sides.

Assembly Instructions

  • Attach the eyes to the 43rd and 44th rows, placing them 9 stitches apart and securing the safety eyes firmly from the inside.
  • Sew the arms to the body on either side, aligning the arm tops between the rounds where the body width matches; use a yarn needle and whipstitch securely.
  • Place the frosted hat on the head and sew it around the edge with small hidden stitches; embroider colored sprinkles onto the hat before fully attaching if preferred.
  • Sew the head to the body securely using the tail left from the final rounds, stitching around the neck evenly to avoid gaps and stuffing as you go.
  • Embroider the mouth with white sewing yarn and add the 3 small buttons to the front of the body as decorative details using a needle and thread.

Important Notes

  • πŸ’‘Remember to fill in the pieces as you go; stuffing gradually helps maintain shape and avoid lumps.
  • πŸ’‘The size of the doll will vary depending on the yarn and hook used; using the same yarn and hook as recommended will give an approximate finished size of 15 cm.
  • πŸ’‘Use stitch markers to keep track of the start of rounds and increases/decreases for consistent shaping.
  • πŸ’‘Pin parts in place and check symmetry before sewing to ensure correct positioning and a neat finish.

This gingerbread amigurumi pattern brings cozy holiday charm to your hook and yarn. It mixes simple amigurumi shaping with playful frosting and sprinkle details you can personalize. Make one for a friend, a child, or as seasonal decor β€” it makes a sweet handmade gift. 🧢πŸͺ✨

You ask,

we answer.

FAQs

What size will the finished piece be?

The finished amigurumi measures approximately 15 cm tall when using the recommended yarn and a 1.80-2.00 mm hook.

Can I use different yarn weights for this pattern?

Yes, you can use different yarn weights, but this will affect the final size and stitch density; choose an appropriate hook for your yarn and adjust expectations for size.

Do I need prior crochet experience for this pattern?

This pattern is rated intermediate, so basic knowledge of single crochet, increases, decreases, and working in continuous rounds is recommended.

How long does this project typically take to complete?

Most crocheters complete this project in 5-7 hours, though time may vary based on experience level and how much you customize decorations.

When should I attach the safety eyes?

Attach safety eyes when instructed β€” for this pattern, place them at the 43rd and 44th rows, 9 stitches apart β€” before closing the head and finishing stuffing for correct placement.