🧢 Beautiful ✨ Detailed πŸ’ Adorable

Giant Sloth Amigurumi Pattern

Giant Sloth Amigurumi Pattern
4.0β˜… Rating
5-7 Hours Time Needed
1.3K Made This
βœ‚οΈ

Intermediate Level

Ideal for those with basic crochet experience, featuring slightly more advanced stitches and techniques to expand your skills.

⏱️

Weekend Treat

Takes 5-7 hours, making it an enjoyable project to finish over a couple of days.

🧸

Cute Companion

An adorable friend to cherish, handcrafted with love to bring comfort and joy for years to come.

About This Giant Sloth Amigurumi Pattern

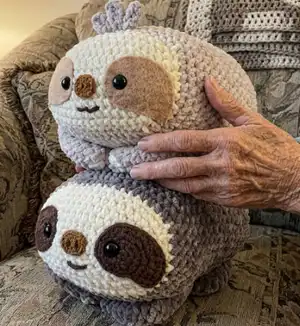
This pattern makes a large, cuddly three-toed sloth using jumbo chenille yarn and a large 10 mm hook. You will create the head/body in one oval spiral, add felt facial features and safety eyes, then crochet and attach the limbs. The finished sloth measures approximately 14 in. x 13 in. when using the recommended materials.

Giant Sloth Amigurumi Pattern crochet pattern - detailed view of completed project

The pattern includes clear round-by-round instructions, templates for felt pieces, and assembly notes to help you finish your sloth neatly. Helpful tips are included for working with chenille yarn and creating clean facial details.

Why You'll Love This Giant Sloth Amigurumi Pattern

I absolutely love this pattern because it turns jumbo chenille yarn into an irresistibly squishy character that feels like a big hug. I enjoy how quickly the jumbo yarn builds size and texture, giving a dramatic result in a relatively short time. The simple oval construction is satisfying to crochet and allows for easy customization of colors and facial expression. I also love adding little personal touches like a tuft of hair or embroidered mouth to give each sloth its own personality.

Giant Sloth Amigurumi Pattern step 1 - construction progress Giant Sloth Amigurumi Pattern step 2 - assembly progress Giant Sloth Amigurumi Pattern step 3 - details and accessories Giant Sloth Amigurumi Pattern step 4 - final assembly and finishing

Switch Things Up

I love customizing this pattern by changing colorsβ€”try soft pastels for a dreamy sloth or deep neutrals for a modern sofa buddy.

If you want a smaller version, use a thinner yarn and smaller hook; expect to adjust stitch counts to keep the oval shape.

Make a super chunky cuddle sloth by using multiple strands held together and a larger hook for an extra-plush result.

I sometimes replace the felt eyes with embroidered eyes for a softer, toy-safe finish for children.

Try adding accessories like a tiny crocheted leaf, scarf, or flower to give your sloth a unique personality.

If you want posable limbs, consider inserting thin craft wire into the arms before closing, but be cautious for safety.

Vary the facial expression by repositioning the nose and mouth slightly higher or lower; small changes transform the character.

Use safety eyes of different sizes to change the face's cuteness factorβ€”bigger eyes read more toy-like and expressive.

For a realistic touch, hand-embroider subtle fur lines with a darker yarn around the face patch edges.

I often make a whole family of sloths in different sizes and colors to create a charming display; mix textures like velvet felt and chenille for contrast.

Common Mistakes & How to Fix Them

βœ— Not using stitch markers can make it difficult to find the start of rounds with fuzzy chenille yarn; place a marker at the first stitch of every round and move it as you work. βœ— Overstuffing the body can distort the oval shape and make sewing edges awkward; stuff gradually, shaping as you go and add more stuffing right before closing for a firm but even result. βœ— Skipping the instruction to work in the back loops only when specified will change the shape of the fabric; follow 'blo' directions exactly to achieve the intended oval profile. βœ— Placing felt eyes or the nose without checking alignment can make the face look uneven; pin or temporarily place felt pieces and check symmetry before gluing or sewing. βœ— Applying hot glue in blobs can create messy edges and seep through chenille yarn; apply hot glue in a thin zigzag motion and avoid the extreme edges for a clean finish.

Giant Sloth Amigurumi Pattern

Make your very own giant, squishy sloth plush with this detailed crochet pattern. You will work in jumbo chenille yarn to create an oversized, huggable sloth with embroidered facial details and felt features. The pattern walks you through step-by-step rounds, assembly, and helpful tips so you can complete a lovable companion you will cherish. Perfect for gifting or cozying up at home.

Intermediate 5-7 Hours

Materials Needed for Giant Sloth Amigurumi Pattern

β€” Main Fabric

  • 01
    Jumbo size 7 chenille yarn, Cream - approximately 23 g for the face
  • 02
    Jumbo size 7 chenille yarn, Taupe or Marshmallow (body color) - approximately 386 g for body (a little over 1 skein may be needed for main body color when using Sweet Snuggles/Chenille Home)
  • 03
    Long strand of white blanket yarn - for the claws
  • 04
    Dark brown medium worsted yarn - small amount for facial embroidery details
  • 05
    Brown/tan/black felt - pieces for facial features (eyes, nose, patches)
  • 06
    Fiber fill stuffing - 680 g

β€” Tools Required

  • 01
    10 mm crochet hook
  • 02
    Jumbo yarn needle
  • 03
    Scissors
  • 04
    Stitch markers
  • 05
    Hot glue
  • 06
    Sewing pins
  • 07
    Polyester stuffing (fiber fill) 680 g
  • 08
    20 mm safety eyes (2 pieces)
  • 09
    Felt and small hand-sewing needle for attaching felt

Progress Tracker

0% Complete

β€” Head/Body :

Rnd 1 :

Ch 13. Sc into the second st from the hook. Sc into the next 10 sts. Make 3 sc into the next st. Continue onto the underside of the chain. Sc into the next 10 sts. Inc into the next st and slst into the first st of the rnd. [26]

Info :

The new rnd starts after the slst.

Rnd 2 :

(10 sc, inc into the next 3 sts) x2. [32]

Rnd 3 :

(10 sc, [sc into the next st, inc] x3) x2 [38]

Rnd 4 :

(10 sc, [2 sc, inc] x3) x2 [44]

Rnd 5 :

(10 sc, [3 sc, inc] x3) x2 [50]

Info :

Change to your main color yarn.

Rnd 6 :

blo - (10 sc, [4 sc, inc] x3) x2 [56]

Rnd 7-23 :

(17 rnds total): sc all around [56]

Info :

Insert a stitch marker and remove your hook. We will now create the facial features before closing up the body.

β€” Facial Features :

Eyes :

Cut out two pieces of brown or tan felt for the dark part of the eyes using the template on pg 5. Then, cut a small slit in both to insert the safety eyes into. Glue (sewing is optional) the felt part onto the face and secure the eyes in place.

Nose :

Cut an oval out of brown felt ~2 in. x 1 in. and create the nostrils out of a darker felt. Glue (or sew) the nose in the middle of the starting ch, keeping it aligned with the eyes for a cuter look.

Mouth :

Use your yarn needle and create a mouth right below the nose. Secure the yarn tails in a knot on the wrong side of the body.

Hair tuft (for Sylvia) :

(ch 6, slst into the first st) x3. Fasten off and sew onto the head where the body color starts. Secure the yarn tails in a knot on the inside of the body.

β€” Head/Body :

Info :

Here, we will begin decreasing. Lay the body flat against a table to see where the start of the rnd should align with where rnd 6 started. Undo or add a few sts to achieve this.

Rnd 24 :

(10 sc, [4 sc, dec) x3]) x2 [50]

Rnd 25 :

(10 sc, [3 sc, dec) x3]) x2 [44]

Rnd 26 :

(10 sc, [2 sc, dec) x3]) x2 [38]

Rnd 27 :

(10 sc, [sc into the next st, dec] x3) x2 [32]

Rnd 28 :

(10 sc, dec into the next 3 sts) x2. [26]

Info :

Fasten off and leave a long tail for sewing. Stuff well.

Info :

Pinching the two longer edges together, whip stitch the hole closed. Bury the excess yarn tail.

β€” Assembly :

Limbs :

Cut a long strand of white blanket yarn. Using your yarn needle, weave through each limb to create three long claws. Secure the yarn tails in a knot. Lightly stuff.

Info :

Flatten each arm and then use pins to mark where to sew so that the tips meet in the middle.

Info :

Sew the arms 2 rnds below the cream part of the face. Sew the legs 4 rnds below the arms.

Info :

Weave one of the arm's remaining tail through to the hand and sew the two hands together. [img 3]

β€” Arms/Legs :

Rnd 1 :

Ch 5. Sc into the second ch from the hook. Sc into the next 2 sts. Make 3 sc into the next st. Continue onto the underside of the chain. Sc into the next 2 sts. Inc into the next st and slst into the first st of the rnd. [10]

Rnd 2 :

sc all around [10]

Rnd 3 :

(2 sc, inc into the next 3 sts) x2 [16]

Rnd 4-5 :

(2 rnds total): sc all around [16]

Rnd 6 :

(6 sc, dec) x2 [14]

Rnd 7-9 :

(3 rnds total): sc all around [14]

Info :

Fasten off and leave a long tail for sewing.

β€” Templates :

Info :

Print this page and cut these shapes out to use as a template. X marks where to insert the eyes. If using a thinner yarn weight, you can shrink down this page in your printer settings accordingly.

Assembly Instructions

  • Cut a long strand of white blanket yarn and weave through each limb with a yarn needle to create three long claws, knotting the yarn tails and lightly stuffing the limb.
  • Flatten each arm and pin where to sew so the tips meet in the middle, then sew the two tips together to form the hand.
  • Sew the arms in place two rounds below the cream part of the face and sew the legs four rounds below the arms, checking symmetry before securing.
  • Weave the remaining tail from one arm through to the hand and sew the two hands together for extra stability and a finished look.

Important Notes

  • πŸ’‘Use stitch markers to keep track of the beginning of each round, especially since fuzzy chenille yarn can make stitches difficult to see.
  • πŸ’‘Use sewing pins to position parts evenly before sewing to check placement and symmetry.
  • πŸ’‘Fluff up your stuffing by pulling it apart and inserting small amounts gradually for a smooth, even shape.
  • πŸ’‘Note that jumbo chenille patterns do not transfer well to thinner yarn weights; dimensions will be different if using other yarn.
  • πŸ’‘When using hot glue, apply in a zigzag motion and not in globs; avoid the edges for a cleaner finish.

Thank you for making my Giant Sloths β€” I hope they bring you lots of cuddles and smiles! 🧢 This pattern is designed to be approachable and playful while teaching you how to work with jumbo chenille yarn. ✨ Share photos of your finished sloth and enjoy customizing each one with personality and color! 🐾

You ask,

we answer.

FAQs

What size will the finished piece be?

The finished sloth measures approximately 14 in. x 13 in. [35.56 cm x 33.02 cm] when using the recommended jumbo chenille yarn and 10 mm hook.

Can I use different yarn weights for this pattern?

You can, but the dimensions and texture will change significantly. This pattern is written for jumbo size 7 chenille yarn and a 10 mm hook; using thinner yarn will require adjusting stitch counts and may alter the shape.

Do I need prior crochet experience for this pattern?

This pattern is rated intermediate; basic knowledge of single crochet, increases, decreases, and working in a spiral is recommended for best results.

How long does this project typically take to complete?

Most crocheters finish this project in 5-7 hours, though time will vary depending on experience level and how much time you spend on facial details and assembly.