🧢 Beautiful ✨ Detailed πŸ’ Adorable

Ghost in Pumpkin Amigurumi Pattern

Ghost in Pumpkin Amigurumi Pattern
4.8β˜… Rating
2-3 Hours Time Needed
1.7K Made This
βœ‚οΈ

Intermediate Level

Ideal for those with basic crochet experience, featuring slightly more advanced stitches and techniques to expand your skills.

⏱️

Bite-Sized Project

Finishes in 2-4 hoursβ€”perfect for an afternoon of creative relaxation.

🧸

Cute Companion

An adorable friend to cherish, handcrafted with love to bring comfort and joy for years to come.

About This Ghost in Pumpkin Amigurumi Pattern

This pattern creates a tiny ghost sitting snugly inside a plush pumpkin β€” a perfect seasonal amigurumi for Halloween. It uses bobble stitches for a textured ghost head and simple shaping to form pumpkin ribs. You will learn a color-change technique, sewing ribs for definition, and an optional tendril for the stem.
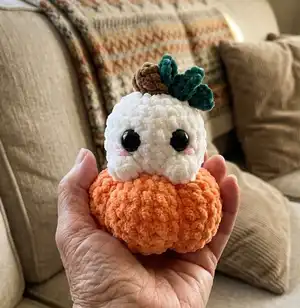
Ghost in Pumpkin Amigurumi Pattern crochet pattern - detailed view of completed project

Designed to be small and giftable, it uses chunky yarn for a squishy finish and works quickly. The pattern includes full round-by-round instructions, finishing tips, and assembly notes for a polished result.

Why You'll Love This Ghost in Pumpkin Amigurumi Pattern

I absolutely love this pattern because it combines simple shaping with playful details to create a charming miniature scene. I adore how the bobble stitch gives the ghost its fluffy personality and how sewing the ribs transforms a simple sphere into a recognizable pumpkin. Making this pattern feels fast and satisfying β€” it finishes quickly but looks like you spent so much time. I also enjoy customizing the tendril and blush to make each little ghost unique.

Ghost in Pumpkin Amigurumi Pattern step 1 - construction progress Ghost in Pumpkin Amigurumi Pattern step 2 - assembly progress Ghost in Pumpkin Amigurumi Pattern step 3 - details and accessories Ghost in Pumpkin Amigurumi Pattern step 4 - final assembly and finishing

Switch Things Up

I often change the yarn color palette to make seasonal or themed versions β€” try cream or pastel orange for a vintage look.

I like to use thinner yarn and a smaller hook to make a tiny keychain version; adjust the eye size down to 6-8mm for proportion.

I sometimes embroider different expressions on the ghost instead of safety eyes to make it baby-safe and soft for little ones.

I add metallic embroidery thread to a few ribs for a subtle sparkle effect that catches light on display pieces.

I change the number of ribs to alter the pumpkin look; fewer, deeper ribs make a squat pumpkin and more ribs make it look rounder.

I swap the tendril for a tiny crocheted leaf to create a harvest-themed ornament variation.

I also experiment with stuffing levels β€” firmer stuffing makes the pumpkin hold shape, while softer stuffing gives a plush, squishy toy.

I sometimes add a tiny loop at the top so the finished amigurumi can hang as an ornament or keyring accessory.

I use blush placement to change the ghost personality β€” higher blush for a surprised look, lower for a sleepy expression.

I often create a matching set with different colored ghosts sitting inside pumpkins for a cute seasonal collection.

Common Mistakes & How to Fix Them

βœ— Skipping the color-change step can leave loose ends and messy joins; when changing colors leave two loops on the hook, cut the old color, pull through the new color and tie the small tails together to secure the join. βœ— Not stuffing before closing can make it hard to shape the head and pumpkin; stuff gradually and generously where the pattern instructs so you can shape the head and close the hole neatly. βœ— Forgetting to place the safety eyes at the right rounds will shift the face; place 12mm eyes between rounds 8-9 with 2-3 visible stitches between to keep the face centered. βœ— Not sewing ribs tightly enough results in shallow pumpkin ridges; pull the long tail firmly after each stitch while sewing the ribs to create deep indentations. βœ— Using a hook that is too large for the recommended yarn can make stitches loose and affect shaping; use a 4.5mm hook as suggested for the Parfait Chunky yarn for best results.
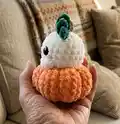
Ghost in Pumpkin Amigurumi Pattern

Make a tiny, adorable Ghost-in-Pumpkin amigurumi perfect for Halloween decorations, gifts, or keychains. This pattern uses bobble stitches and simple shaping to create a squishy pumpkin base with a cute ghost topper. Clear step-by-step rounds and finishing instructions help you achieve defined pumpkin ribs and sweet facial details.

Intermediate 2-3 Hours

Materials Needed for Ghost in Pumpkin Amigurumi Pattern

β€” Main Fabric

  • 01
    Brown yarn - Parfait Chunky (small amount for the stem)
  • 02
    White yarn - Parfait Chunky (small amount for ghost head)
  • 03
    Orange yarn - Parfait Chunky (approximate amount for pumpkin body)
  • 04
    Optional: Pink yarn - small amount for blush
  • 05
    Optional: Green yarn - small amount for tendril
  • 06
    Safety eyes 12mm (2 pieces)
  • 07
    Polyester stuffing (small amount)

β€” Tools Required

  • 01
    Crochet hook size 4.5mm
  • 02
    Safety eyes 12mm (2 pieces)
  • 03
    Scissors
  • 04
    Yarn needle for sewing
  • 05
    Stitch marker
  • 06
    Polyester stuffing
  • 07
    Pins for assembly (optional)

Progress Tracker

0% Complete

β€” Stem :

Info :

WE ARE GOING TO BEGIN WITH THE STEM OF THE PUMPKIN.

Round 1 :

4SC IN A MR (4)

Round 2-3 :

4SC AROUND (4)

Info :

COLOR CHANGE TO WHITE: To color change: leave 2 loops on the hook & do not complete the SC. Cut the first color (brown) & pull thru the next color (white) and tie the two small tails together to secure.

Round 4 :

IN THE FLO: [3SC IN EACH ST AROUND] (12)

Round 5 :

(SC, INC) X6 (18)

Round 6 :

(2SC, INC) X6 (24)

Round 7-9 :

SC AROUND (24) (3 ROUNDS)

Round 10 :

9SC, BO, 4SC, BO, 9SC (24)

Info :

BOBBLE STITCH = 6 LOOPS. PLACE 12MM EYES IN R.8 - R.9, 2-3 VISIBLE STS BETWEEN. Eyes should be placed right above the BO stitches & centered between the arms.

Round 11 :

DEC X12 (12)

β€” Pumpkin :

Info :

NOW WE WILL MAKE THE PUMPKIN. COLOR CHANGE TO ORANGE:

Round 12 :

IN FLO: [3SC IN EACH ST AROUND] (36)

Round 13-15 :

SC AROUND (36) (3 ROUNDS)

Round 16 :

(4SC, DEC) X6 (30)

Round 17-18 :

SC AROUND (30) (2 ROUNDS)

Info :

START TO STUFF THE HEAD.

Round 19 :

(3SC, DEC) X6 (24)

Round 20 :

(2SC, DEC) X6 (18)

Info :

STUFF GENEROUSLY.

Round 21 :

(SC, DEC) X6 (12)

Info :

FINISH STUFFING IF NEEDED. MAKE SURE ALL OTHER COLORS ARE CUT OFF.

Round 22 :

DEC X6 (6)

Info :

FO, LEAVING A SUPER LONG TAIL FOR SEWING THE BUMPS OF THE PUMPKIN. INSERT NEEDLE INTO THE FLO OF EACH ST & PULL TO CLOSE THE HOLE.

β€” Sewing the Ribbing :

Info :

NOW, WE WILL USE THE LONG TAIL TO SEW THE RIBBING OF THE PUMPKIN.

Step 1 :

INSERT THE NEEDLE INTO THE TOP OF THE PUMPKIN WHERE IT MEETS THE BOTTOM OF THE GHOST.

Step 2 :

PULL THE NEEDLE BACK THROUGH THE SAME SPOT YOU STARTED (IN THE MIDDLE WHERE YOU SEWED THE HOLE CLOSED). PULL THE NEEDLE BACK THROUGH THIS SAME SPOT ON THE BOTTOM EACH TIME YOU MAKE A RIB.

Step 3 :

GENTLY PULL ON THE YARN TAIL TO TIGHTEN AS MUCH AS POSSIBLE TO CREATE THE INDENTATION.

Info :

MOVE TO A DIFFERENT SPOT ABOUT 5-6 STS AWAY FROM THE FIRST RIB & REPEAT STEPS 1-3 TO COMPLETE ANOTHER ONE. REPEAT THIS PROCESS A TOTAL OF 5-6 TIMES (DEPENDING ON HOW MANY RIDGES/RIBS YOU WANT). I SEW MY RIBS ABOUT 6 STS APART FOR A TOTAL OF 5 RIBS.

β€” Final Touches :

Info :

WEAVE IN THE ENDING TAIL TO FINISH OFF THE PUMPKIN.

Info :

YOU SHOULD HAVE NOTICEABLE RIDGES/RIBS OF YOUR PUMPKIN. IF NOT, COMPLETE THE STEPS ON THE PREVIOUS PAGE AGAIN.

β€” Optional Tendril :

Info :

MAKE A TENDRIL! USING GREEN YARN, MAKE A SLIP KNOT & INSERT YOUR HOOK INTO ANY ST ON THE SIDE OF THE STEM.

Round 1 :

CH 8, STARTING IN THE 2ND CH FROM THE HOOK, DO 3SC IN EACH CH (21 TOTAL SC)

Info :

FEEL FREE TO CHANGE THE LENGTH BY ADDING OR SUBTRACTING CHAINS!

β€” Blush & Face Details :

Info :

SEW BLUSH RIGHT UNDER/BY THE EYES! I SEW TWO STRAIGHT LINES RIGHT UNDER & TO THE SIDE OF THE EYE ABOUT A STITCH WIDE.

Assembly Instructions

  • Insert safety eyes between rounds 8-9 with 2-3 visible stitches between, centered above the BO stitches and between the arms.
  • Sew ribs by inserting the needle into the top where the pumpkin meets the ghost, pull back through the center where you closed the hole, then pull tight to create each rib; repeat 5-6 times around.
  • Use the long tail left when fastening off to stitch the pumpkin bumps and define the ribs, moving about 5-6 stitches between each rib for even spacing.
  • Attach the green tendril by inserting a slip knot into a side stitch of the stem and secure the tendril in place; feel free to adjust length with extra or fewer chains.
  • Sew blush under the eyes by stitching two small straight lines just under and to the side of each eye for a subtle rosy effect.

Important Notes

  • πŸ’‘Do not copy, resell, or redistribute this pattern as your own; please credit the creator when selling finished items.
  • πŸ’‘This pattern is crocheted in continuous rounds using US terminology; use a stitch marker to mark your rounds.
  • πŸ’‘When changing colors leave two loops on the hook and complete the stitch with the new color to create a neat color change and secure the small tails.
  • πŸ’‘Stuff the head and pumpkin as you go and stuff generously where indicated to achieve the best shape before closing.

This tiny Ghost-in-Pumpkin is perfect for spooky season and makes a delightful little gift for Halloween lovers. It works up quickly, uses chunky yarn for a plush feel, and can be customized with blush and a tendril. πŸŽƒπŸ§Ά

You ask,

we answer.

FAQs

What size will the finished piece be?

The finished amigurumi measures approximately 6-8 cm tall depending on yarn tension and exact yarn used (Parfait Chunky with 4.5mm hook).

Can I use different yarn weights for this pattern?

Yes, you can use different yarn weights but this will affect final size and texture; use an appropriate hook for your chosen yarn and adjust stuffing accordingly.

Do I need prior crochet experience for this pattern?

This pattern is rated Intermediate due to bobble stitches, color changes, and sewing ribbing; basic knowledge of single crochet, increases, decreases, and working in the FLO is recommended.

How long does this project typically take to complete?

Most crocheters complete this project in 2-3 hours, though time may vary based on experience level and how many optional details (tendril, blush) you add.