About This Gatitos Amigurumi Pattern
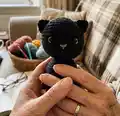
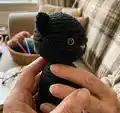
This pattern teaches you how to crochet a tiny amigurumi cat (gatito) using simple rounds and basic shaping. It includes head, body, ears, front and back legs, tail, and facial embroidery instructions. The design is compact, perfect for using leftover cotton yarn and making multiple color variations.
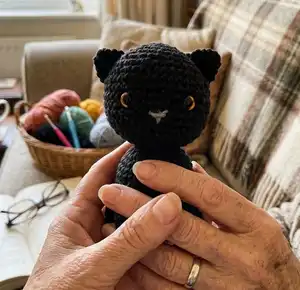
Follow step-by-step rounds for each piece and simple assembly notes to sew everything together. Ideal for making small gifts, keychain buddies, or a charming shelf display.
Why You'll Love This Gatitos Amigurumi Pattern
I absolutely love this pattern because it transforms a few simple stitches into a character full of personality. I enjoy how quick it is to make — you can finish a little cat in an afternoon and customize it with different colors. I also appreciate the focus on clean finishing and embroidered details that give each kitty a unique expression. Sharing this pattern makes it easy for others to create sweet handmade gifts that feel personal and special.
Switch Things Up
I love how easy this pattern is to customize — you can swap yarn colors to create calico, tabby, or solid kitties with no changes to the rounds.
Want a larger cat? Use a bulkier yarn and a bigger hook; this will make a cuddly, bigger version perfect for plush gifts.
To make a miniature keychain buddy, use very fine yarn and a small hook, and replace safety eyes with embroidered eyes for safety.
I often change the eye embroidery color to give each kitty a different expression — try bright thread for playful faces or soft tones for baby gifts.
Make little accessories like tiny scarves or bows by crocheting a few chains and sewing them on for personality and seasonal variations.
I sometimes add a small bell or a keyring loop before closing the head to turn the kitty into a charm or ornament.
Try embroidering freckles or a different nose shape to vary expressions and character — a simple satin stitch for the nose changes the whole look.
For a textured finish, use a slightly fuzzy yarn like boucle or a brushed cotton for a different tactile feel and a cozy appearance.
I recommend playing with eye placement to create different personalities — higher eyes give a surprised look, lower eyes make a calm expression.
When I gift these, I like to make a little trio in matching or complementary palettes — it makes a lovely set that showcases how color changes can transform the same pattern.
Common Mistakes & How to Fix Them
✗ Skipping stitch counts during increases can produce an uneven head shape; count each round carefully and mark the start of the round with a stitch marker.
✗ Forgetting to insert safety eyes before stuffing will make placement difficult later on; place eyes between the recommended rounds, secure them, then lightly stuff and continue.
✗ Overstuffing the head or body can distort the shaping and make sewing parts together awkward; stuff gradually and evenly, checking the shape as you go.
✗ Not leaving enough tail after finishing with a slip stitch prevents easy sewing of parts; leave a long tail for sewing and knot securely when attaching pieces.