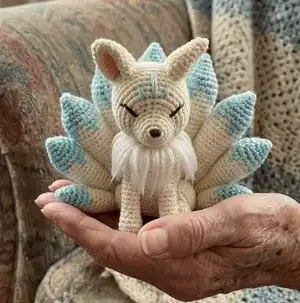
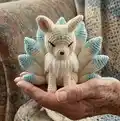
Create a sweet handmade kitsune named Fuyuko with this detailed crochet amigurumi pattern. You will enjoy step-by-step rounds, clear assembly photos, and stitch counts for accurate shaping. Perfect for gifting or keeping as a lovely soft sculpture on your shelf. Follow the instructions and bring your own little fox spirit to life.
Progress Tracker
0% Complete
— Head :
Round 1 :
Round 1: 6 sc in magic ring. (6 sts)
Round 2 :
R2: Sc 3, inc 3. (9 sts)
Round 3 :
R3: Inc 3, sc 6. (12 sts)
Round 4 :
R4: Sc 6, *sc 1, inc,* 3 times. (15 sts)
Round 5 :
R5: *Sc 1, inc,* 3 times, sc 9. (18 sts)
Round 7 :
R7: *Sc 1, inc,* 6 times, sc 6. (24 sts)
Round 8 :
R8: *Sc 1, inc,* 9 times, sc 6. (33 sts)
Round 9 :
R9: Sc 4, inc, *sc 10, inc,* 2 times, sc 6. (36 sts)
Round 10 :
R10: *Sc 11, inc,* 3 times. (39 sts)
Round 11 :
R11: Sc 5, inc, *sc 12, inc,* 2 times, sc 7. (42 sts)
Round 12 :
R12: *Sc 13, inc,* 2 times, sc 14. (44 sts)
Round 13 :
R13: Sc 4, dec, sc 30, dec, sc 6. (42 sts)
Round 14-19 :
R14-19: Sc 42.
Round 20 :
R20: *Sc 5, dec,* 6 times. (36 sts)
Round 21 :
R21: *Sc 4, dec,* 6 times. (30 sts)
Round 22 :
R22: *Sc 3, dec,* 6 times. (24 sts)
Round 23 :
R23: *Sc 2, dec,* 6 times. (18 sts)
Round 24 :
R24: *Sc 1, dec,* 6 times. (12 sts)
Round 25 :
R25: Dec around. (6 sts)
Info :
Fasten off and leave a tail for sewing.
— Ears (make 2) :
Round 1 :
Round 1: 6 sc in magic ring. (6 sts)
Round 2 :
R2: *Sc 1, inc,* 3 times. (9 sts)
Round 3 :
R3: *Sc 2, inc,* 3 times. (12 sts)
Round 4 :
R4: *Sc 3, inc,* 3 times. (15 sts)
Round 5 :
R5: *Sc 4, inc,* 3 times. (18 sts)
Round 6 :
R6: *Sc 5, inc,* 3 times. (21 sts)
Info :
Press the ear flat and do not stuff. Fasten off and leave a tail for sewing.
— Front Legs (make 2) :
Round 1 :
Round 1: 6 sc in magic ring. (6 sts)
Round 2 :
R2: *Sc 3 in one st, inc, sc 1,* 2 times. (12 sts)
Round 6 :
R6: Dec 3, sc 6. (9 sts)
Info :
Fasten off and leave a tail for sewing.
— Body :
Round 1 :
Round 1: 6 sc in magic ring. (6 sts)
Round 2 :
R2: 2 sc in each st around. (12 sts)
Round 3 :
R3: *Sc 1, inc,* 6 times. (18 sts)
Round 4 :
R4: *Sc 2, inc,* 6 times. (24 sts)
Round 5 :
R5: *Sc 3, inc,* 6 times. (30 sts)
Round 9 :
R9: Sc 15, *sc 4, inc,* 3 times. (33 sts)
Round 11 :
R11: Sc 15, *sc 5, inc,* 3 times. (36 sts)
Info :
Stuff the front legs with fiberfill. In the next round, we will join the front legs with the body.
Round 13 :
R13: *Sc 4, dec,* 3 times, sc 4, starting at the next unstitched st of one front leg (photo 4), sc 7 on the leg, skip 2 sts on the body and sc 4. Continue by joining the other leg, starting at the next unstitched st of the other front leg, sc 7 on the leg, skip 2 sts on the body and sc 7 on the remaining sts of the round on the body. (43 sts) (photo 5)
Info :
There will be a gap of two unstitched sts on each leg and the body (photo 6). Using a yarn needle, sew the gaps close using the yarn ends of the front legs (photo 7, 8).
Round 14 :
R14: Sc 26, dec, sc 15. (42 sts)
Round 15 :
R15: Sc 5, dec, sc 12, dec, sc 4, dec, sc 5, dec, sc 8. (38 sts)
Round 17 :
R17: Sc 17, dec, sc 10, dec, sc 7. (36 sts)
Round 18-20 :
R18-20: Sc 36.
Round 21 :
R21: Sc 4, dec, *sc 10, dec,* 2 times, sc 6. (33 sts)
Round 23 :
R23: *Sc 9, dec,* 3 times. (30 sts)
Round 24 :
R24: *Sc 3, dec,* 6 times. (24 sts)
Round 25 :
R25: Sc 1, hdc, dc 3, tc 2, dc 3, hdc, sc 1. (12 sts) (left as an incomplete round)
Info :
Stuff body. Fasten off and leave a tail for sewing.
— Hind Leg - Feet (make 2) :
Round 1 :
Round 1: 6 sc in magic ring. (6 sts)
Round 2 :
R2: *Sc 1, inc,* 3 times. (9 sts)
Info :
Stuff feet. Fasten off and leave a tail for sewing.
— Hind Leg - Thigh (make 2) :
Round 1 :
Round 1: 6 sc in magic ring. (6 sts)
Round 2 :
R2: 2 sc in each st around. (12 sts)
Round 3 :
R3: *Sc 1, inc,* 6 times. (18 sts)
Info :
Stuff thigh lightly and continue stuffing as you go.
Round 10 :
R10: *Sc 1, dec,* 6 times. (12 sts)
Round 11 :
R11: Dec around. (6 sts)
Info :
Fasten off and leave a tail for sewing.
— Tails :
Item Name (Tail 1) :
Using sky blue yarn,
Round 1 :
Round 1: 4 sc in magic ring. (4 sts)
Round 2 :
R2: Sc 1, inc 3. (7 sts)
Round 3 :
R3: Sc 1, *sc 1, inc,* 3 times. (10 sts)
Round 4 :
R4: Sc 1, *sc 1, inc,* 4 times, sc 1. (14 sts)
Round 5 :
R5: *Sc 2, inc,* 4 times, sc 2. (18 sts)
Round 6 :
R6: Sc 3, *sc 3, inc,* 3 times, sc 3. (21 sts)
Info :
From R7 onwards, we will start working with both sky blue [blue] and white [white] yarn.
Round 7 :
R7: Sc 7, inc, sc 2, change to white yarn [white], sc 1, change to sky blue yarn [blue], sc 1, inc, sc 1, [white] sc 1, [blue] sc 2, inc, [white] sc 1, [blue] sc 2. (24 sts)
Round 8 :
R8: Sc 1, [white] sc 1, [blue] sc 3, [white] sc 1, [blue] sc 2, sc 1 in the next st, [white] sc in the same st (this is an inc with one sky blue and one white st), [blue] sc 2, [white] sc 2, [blue] sc 1, inc, [white] sc 3, [blue] sc 2, sc 1 in the next st, [white] sc in the same st (this is an inc with one sky blue and one white st), sc 2, [blue] sc 1. (27 sts)
Round 9 :
R9: [White] sc 3, [blue] sc 2, [white] sc 2, [blue] sc 1, [white] sc 3, [blue] sc 1, [white] sc 3, [blue] sc 1, [white] sc 5, [blue] sc1, [white] sc 5. (27 sts)
Round 10 :
R10: *Sc 1, dec,* 3 times, *sc 5, inc,* 3 times. (27 sts)
Round 12 :
R12: *Sc 1, dec,* 2 times, *sc 5, inc,* 3 times, sc 1, dec. (27 sts)
Round 14 :
R14: *Sc 7, dec,* 3 times. (24 sts)
Round 15 :
R15: Sc 4, dec, *sc 5, inc,* 2 times, sc 4, dec. (24 sts)
Round 17 :
R17: Sc 2, dec, *sc 6, dec,* 2 times, sc 4. (21 sts)
Round 19 :
R19: *Sc 5, dec,* 3 times. (18 sts)
Round 21 :
R21: *Sc 7, dec,* 2 times. (16 sts)
Round 22-23 :
R22-23: Sc 16.
Round 24 :
R24: Sc 2, dec, sc 6, dec, sc 4. (14 sts)
Round 25-26 :
R25-26: Sc 14.
Round 27 :
R27: *Sc 5, dec,* 2 times. (12 sts)
Round 28-30 :
R28-30: Sc 12.
Round 31 :
R31: Sc 1, dec, sc 4, dec, sc 3. (10 sts)
Round 33 :
R33: *Sc 3, dec,* 2 times. (8 sts)
Round 35 :
R35: *Sc 2, dec,* 2 times. (6 sts)
Round 37 :
R37: *Sc 1, dec,* 2 times. (4 sts)
Info :
Fasten off and leave a tail for sewing.
Item Name (Tails 2 & 3 make 2) :
Using sky blue yarn,
Round 1 :
Round 1: 4 sc in magic ring. (4 sts)
Round 2 :
R2: Sc 1, inc 3. (7 sts)
Round 3 :
R3: Sc 1, *sc 1, inc,* 3 times. (10 sts)
Round 4 :
R4: Sc 1, *sc 1, inc,* 4 times, sc 1. (14 sts)
Round 5 :
R5: *Sc 2, inc,* 4 times, sc 2. (18 sts)
Round 6 :
R6: Sc 3, *sc 3, inc,* 3 times, sc 3. (21 sts)
Info :
From R7 onwards, we will start working with both sky blue [blue] and white [white] yarn.
Round 7 :
R7: Sc 7, inc, sc 2, change to white yarn [white], sc 1, change to sky blue yarn [blue], sc 1, inc, sc 1, [white] sc 1, [blue] sc 2, inc, [white] sc 1, [blue] sc 2. (24 sts)
Round 8 :
R8: Sc 1, [white] sc 1, [blue] sc 4, [white] sc 1, [blue] sc 3, [white] sc 3, [blue] sc 2, [white] sc 3, [blue] sc 2, [white] sc 3, [blue] sc 1. (24 sts)
Round 9 :
R9: [White] sc 3, [blue] sc 1, dec, [white] sc 2, [blue] sc 1, [white] sc 3, sc 1 in the next st, [blue] sc in the same st (this is an inc with one white and one sky blue st), [white] sc 4, sc 1 in the next st, [blue] sc in the same st (this is an inc with one white and one sky blue st), [white] sc 4, inc. (24 sts)
Round 11 :
R11: *Sc 1, dec,* 2 times, *sc 4, inc,* 3 times, sc 1, dec. (24 sts)
Round 13 :
R13: Sc 2, dec, *sc 6, dec,* 2 times, sc 4. (21 sts)
Round 15 :
R15: Sc 2, dec, *sc 5, inc,* 2 times, sc 3, dec. (21 sts)
Round 17 :
R17: *Sc 5, dec,* 3 times. (18 sts)
Round 19 :
R19: *Sc 7, dec,* 2 times. (16 sts)
Round 20-21 :
R20-21: Sc 16.
Round 22 :
R22: Sc 2, dec, sc 6, dec, sc 4. (14 sts)
Round 23-24 :
R23-24: Sc 14.
Round 25 :
R25: *Sc 5, dec,* 2 times. (12 sts)
Round 26-28 :
R26-28: Sc 12.
Round 29 :
R29: Sc 1, dec, sc 4, dec, sc 3. (10 sts)
Round 31 :
R31: *Sc 3, dec,* 2 times. (8 sts)
Round 33 :
R33: *Sc 2, dec,* 2 times. (6 sts)
Round 35 :
R35: *Sc 1, dec,* 2 times. (4 sts)
Info :
Fasten off and leave a tail for sewing.
Item Name (Tails 4 & 5 make 2) :
Using sky blue yarn,
Round 1 :
Round 1: 4 sc in magic ring. (4 sts)
Round 2 :
R2: Sc 1, inc 3. (7 sts)
Round 3 :
R3: Sc 1, *sc 1, inc,* 3 times. (10 sts)
Round 4 :
R4: Sc 1, *sc 1, inc,* 4 times, sc 1. (14 sts)
Round 5 :
R5: *Sc 2, inc,* 4 times, sc 2. (18 sts)
Round 6 :
R6: Sc 3, *sc 3, inc,* 3 times, sc 3. (21 sts)
Info :
From R7 onwards, we will start working with both sky blue [blue] and white [white] yarn.
Round 7 :
R7: Sc 7, inc, sc 2, change to white yarn [white], sc 1, change to sky blue yarn [blue], sc 1, inc, sc 1, [white] sc 1, [blue] sc 2, inc, [white] sc 1, [blue] sc 2. (24 sts)
Round 8 :
R8: Sc 1, [white] sc 1, [blue] sc 4, [white] sc 1, [blue] sc 3, [white] sc 3, [blue] sc 2, [white] sc 3, [blue] sc 2, [white] sc 3, [blue] sc 1. (24 sts)
Round 9 :
R9: [White] sc 1, dec, [blue] sc 1, dec, [white] sc 1, dec, [blue] sc 1, [white] sc 3, sc 1 in the next st, [blue] sc in the same st (this is an inc with one white and one sky blue st), [white] sc 4, inc. (24 sts)
Round 11 :
R11: Sc 2, dec, *sc 6, dec,* 2 times, sc 4. (21 sts)
Round 14 :
R14: *Sc 5, dec,* 3 times. (18 sts)
Round 16 :
R16: *Sc 7, dec,* 2 times. (16 sts)
Round 18 :
R18: Sc 2, dec, sc 6, dec, sc 4. (14 sts)
Info :
Fasten off and leave a tail for sewing.
Item Name (Tails 6 & 7 make 2) :
Using sky blue yarn,
Round 1 :
Round 1: 4 sc in magic ring. (4 sts)
Round 2 :
R2: Sc 1, inc 3. (7 sts)
Round 3 :
R3: Sc 1, *sc 1, inc,* 3 times. (10 sts)
Round 4 :
R4: Sc 1, *sc 1, inc,* 4 times, sc 1. (14 sts)
Round 5 :
R5: *Sc 2, inc,* 4 times, sc 2. (18 sts)
Round 6 :
R6: Sc 3, *sc 3, inc,* 3 times, sc 3. (21 sts)
Info :
From R6 onwards, we will start working with both sky blue [blue] and white [white] yarn.
Round 6 :
R6: Sc 6, inc, sc 2, [white] sc 1, [blue] inc, sc 2, [white] sc 1, [blue] inc, sc 1, [white] sc 1, [blue] sc 1. (21 sts)
Round 7 :
R7: [Blue] sc 1, [white] sc 3, [blue] sc 1, [white] sc 3, [blue] sc 1, [white] sc 3, [blue] sc 1, [white] sc 1. (14 sts)
Round 8-10 :
R8-10: Sc 14.
Info :
Stuff the tail, and continue stuffing as you go.
Round 11 :
R11: *Sc 5, dec,* 2 times. (12 sts)
Round 12 :
R12: Sc 1, dec, sc 4, dec, sc 3. (10 sts)
Round 14 :
R14: *Sc 3, dec,* 2 times. (8 sts)
Round 16 :
R16: *Sc 2, dec,* 2 times. (6 sts)
Round 18 :
R18: *Sc 1, dec,* 2 times. (4 sts)
Info :
Fasten off and leave a tail for sewing.
Item Name (Tails 8 & 9 make 2) :
Using sky blue yarn,
Round 1 :
Round 1: 4 sc in magic ring. (4 sts)
Round 2 :
R2: Sc 1, inc 3. (7 sts)
Round 3 :
R3: Sc 1, *sc 1, inc,* 3 times. (10 sts)
Round 4 :
R4: Sc 1, *sc 1, inc,* 4 times, sc 1. (14 sts)
Round 5 :
R5: Sc 1, dec, *sc 3, inc,* 2 times, sc 1, dec. (14 sts)
Round 6 :
R6: *Sc 5, dec,* 2 times. (12 sts)
Round 8 :
R8: Sc 1, dec, sc 4, dec, sc 3. (10 sts)
Round 10 :
R10: *Sc 3, dec,* 2 times. (8 sts)
Round 12 :
R12: *Sc 1, dec,* 2 times. (4 sts)
Info :
Fasten off and leave a tail for sewing.
— Assembly :
Info :
1. Fill the base of the body with approximately 8 grams of poly pellets to add some weight to the body. You could also use a white stocking as a pouch for the poly pellets before inserting it into the body. Fill the rest of the body with fiberfill.
Info :
2. To make the fur around the neck, cut 24 8cm strands of white yarn. Hook the middle of a strand through a stitch on Round 25 to form a loop (photo 1). Hook the ends of the strand into the loop to form a knot (photo 2). Repeat around Round 25 with the remaining strands (photo 3).
Info :
3. Brush the fur around the neck with a slicker brush to make it fluffy (photo 4).
Info :
4. Fold the ears slightly and position them on head, with the front part of the ear on Round 13 and the other end on Round 17 (photo 5). Photo 6 shows the position of the ends of the ears. Sew the ears to the head.
Info :
5. Position the head on top of the body. Attach and sew the head to the body, adding more fibrefill to the neck before closing the seam (photo 7).
Info :
6. Sew the foot and thigh of the hind leg together (photo 8). Position and sew the hind legs onto the sides of the body (photo 9).
Info :
7. Trim the fur around the neck to your liking (photo 10).
Info :
8. Optional: Brush all nine tails with a slicker brush to make them fluffy (photo 11).
Info :
9. Sew the tails tightly together, according to the sequence: tail numbers 9 - 7 - 5 - 3 - 1 - 2 - 4 - 6 - 8 (photo 11). Make sure to sew across all the tails at the middle and the bottom of the tails.
Info :
10. Attach and sew the tails to the back of the body (photo 12). Do make sure to test the balance of your kitsune before securing the tails to the body.
— Facial Features :
Info :
Now on to her face! I have written the method for embroidering her eyes and nose, but feel free to use any other methods you'd like.
Item Name (Nose) :
To embroider the nose, using brown embroidery thread, sew the outline of a small triangle measuring approximately 0.5 x 0.5 x 0.5 cm on the tip of the muzzle (photo 1). Fill the triangle by sewing vertical lines within (photo 2).
Item Name (Eyes) :
To embroider the eye, using brown embroidery thread, sew a straight line around twice, starting at Round 6 and ending at Round 10 (photo 3). Gently tug the straight line upwards at Round 9, to create an arch near the end of the eyes (photo 4). Separate one strand of the brown embroidery thread used for the eyes and bring the strand to sew over the arch to hold the arch in place (photo 4, 5). Repeat with the other eye. The inside corners of the eyes should be about 5 stitches apart.
Info :
Head markings: Use the sky blue yarn to embroider the head markings. Sew a straight line in the middle of the head starting at Round 8 and ending at Round 12. Skip one stitch to the left of the line you just sew. Sew a shorter straight line starting at Round 8 and ending at Round 10. Repeat sewing another short line to the right of the middle line. Sew each line around one more time (photo 6).
Info :
Inside of the ears: Using red or pink makeup blush, colour the ear flaps (photo 7). Fasten, trim off and hide any excess yarn or thread.
This lovely kitsune amigurumi pattern walks you through every round and assembly step to create Fuyuko, nine-tailed and full of charm. Whether for a magical gift or a cozy shelf friend, you will enjoy the careful shaping and embroidered details. Happy crocheting and may Fuyuko bring a little bit of magic to your handmade collection! 🧶✨