🧢 Beautiful ✨ Detailed πŸ’ Adorable

ELENDAN mushroom with mouse Amigurumi Pattern

ELENDAN mushroom with mouse Amigurumi Pattern
4.1β˜… Rating
2-4 Hours Time Needed
3.3K Made This
βœ‚οΈ

Intermediate Level

Ideal for those with basic crochet experience, featuring slightly more advanced stitches and techniques to expand your skills.

⏱️

Bite-Sized Project

Finishes in 2-4 hoursβ€”perfect for an afternoon of creative relaxation.

🎁

Tiny Treasure

Small, sweet, and gift-worthy creations that fit perfectly in the palm of your hand with detailed charm.

About This ELENDAN mushroom with mouse Amigurumi Pattern

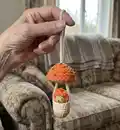
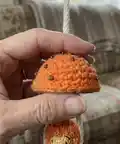
This pattern creates a delicate mushroom pendant with a tiny gnome (wooden bead head or crochet bead) that fits inside the stem pocket. It includes full instructions for the stem chain, cap (top and inner parts) and the little gnome, plus decoration ideas for a finished charm. You will work mainly in spiral rounds with a very fine hook to keep the pieces neat and compact.

ELENDAN mushroom with mouse Amigurumi Pattern crochet pattern - detailed view of completed project

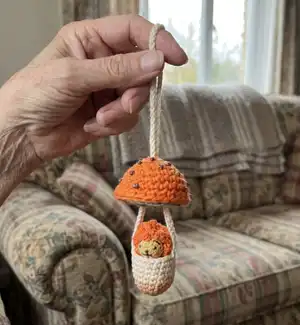
The finished pendant is approximately 2" tall and the gnome about 1.75" using the recommended materials. The pattern uses tight tension and small details like beads or painted dots for decoration.

Why You'll Love This ELENDAN mushroom with mouse Amigurumi Pattern

I absolutely love this pattern because it transforms simple stitches into a tiny world you can wear. I enjoy working with fine cotton yarn and a small hook to create neat, charming details that feel magical when finished. The gnome with a wooden bead face is one of my favorite small touches because it gives the piece personality with minimal effort. I also love how versatile the design is β€” you can decorate the cap with beads, paint, or embroidered dots to make each piece unique.

ELENDAN mushroom with mouse Amigurumi Pattern step 1 - construction progress ELENDAN mushroom with mouse Amigurumi Pattern step 2 - assembly progress ELENDAN mushroom with mouse Amigurumi Pattern step 3 - details and accessories ELENDAN mushroom with mouse Amigurumi Pattern step 4 - final assembly and finishing

Switch Things Up

I love how easy it is to customize this mushroom pendant by changing yarn colors; try soft pastels for a vintage look or bright primaries for a playful charm.

If you want a chunkier pendant, use a thicker cotton yarn and a larger hookβ€”your finished mushroom will be bigger and more tactile.

To make a mini keychain version, shorten the stem chain and attach a split ring instead of making a long necklace strand.

Use a painted wooden bead for a rustic face or crochet a tiny ball instead for a yarn-only finish.

Add tiny beads or sequins to the cap before sewing the inner cap for a sparkly effect that is easier to attach before assembly.

Experiment with embroidered faces using sewing thread to change expressions β€” a simple smile or sleepy eyes gives a completely different personality.

Try adding a small loop at the top of the cap to hang the mushroom as an ornament instead of wearing it as a pendant.

I sometimes stitch a tiny felt heart or applique to the cap to make a themed version for holidays or special gifts.

For a wearable set, crochet several gnome friends in different colors and string them on the same necklace for a whimsical look.

If you want posable hanging, incorporate a thin wire in the stem chain before pulling it through the cap, taking care to secure ends so they are not exposed.

Common Mistakes & How to Fix Them

βœ— Crocheting with loose tension can make the stem and cap floppy and misshapen; maintain rather tight tension throughout the project as suggested. βœ— Forgetting to use a marker for spiral rounds causes lost row beginnings and miscounted stitches; place a marker after finishing each row to track the start of the next round. βœ— Hiding the tail incorrectly can cause a bulky knot inside small pieces; try to hide the tail inside the magic loop or use a tapestry needle to weave it neatly into the inner stitches. βœ— Sewing beads onto the cap after assembling the inner part can be awkward and bulky; sew beads to the cap top before finishing the top part if you plan to add them for comfort and ease.

ELENDAN mushroom with mouse Amigurumi Pattern

Create a tiny mushroom pendant with a sweet gnome inside using fine cotton yarn and a small hook. This pattern guides you through crocheting the stem, cap and a tiny gnome head with clear step-by-step rounds and helpful photos. Perfect as a gift or a delicate necklace charm, it combines simple shaping with charming finishing touches. Make one to wear or give as a handmade keepsake.

Intermediate 2-4 Hours

Materials Needed for ELENDAN mushroom with mouse Amigurumi Pattern

β€” Main Fabric

  • 01
    100% cotton yarn 100g/200m (3.5 oz/218 yds) β€” this thickness corresponds to yarn weight No2 (fine/DK); use small amounts of main and accent colors as needed
  • 02
    Small amounts of contrasting cotton yarn for stem, cap and gnome details (approx. 5-20g per color depending on color choices)
  • 03
    Piece of thread in contrast color as a marker (small length, used to mark rows)

β€” Tools Required

  • 01
    Crochet hook 1.75 mm (US steel/thread hook 4 or UK steel/thread hook 2)
  • 02
    Thick hook (for pulling stem chain through cap center)
  • 03
    Scissors
  • 04
    Wooden bead for gnome's head (10-14 mm) - wooden bead may be replaced with a crochet ball
  • 05
    Needle for yarn (usually tapestry needle with wide enough eye)
  • 06
    Piece of toy filler
  • 07
    Textile markers or acrylic paints with brush to paint the gnome's face or dots on the mushroom cap
  • 08
    Sewing thread in matching colors
  • 09
    Piece of thread in contrast color as a row marker

Progress Tracker

0% Complete

β€” STEM :

Info :

Work in spiral rows (rounds). Use marker after finishing each row to see the beginning of next row if needed.

Info :

Make a magic loop (adjustable ring) or ch 2, insert hook into 1-st ch.

Row 1 :

sc 6 (6) (try to hide the tail of yarn inside while crocheting)

Row 2 :

inc 6 (12)

Row 3 :

[inc, sc 2] x 4 (16)

Rows 4-8 :

sc in each stitch (16), ch 250 (this would be approx. 65 cm strand to hang on neck as a necklace; you may ch as many as you wish), sl st into sc 7 of last row (into the middle of last row), fasten off, weave in the tail.

β€” CAP :

Info :

Top part:

Info :

Make a magic loop (adjustable ring) or ch 2, insert hook into 1-st ch.

Row 1 :

sc 6 (6) (try to hide the tail of yarn inside while crocheting)

Row 2 :

inc 6 (12)

Row 3 :

[inc, sc 2] x 4 (16)

Row 4 :

into front loop only [inc, sc 3] x 4 (20)

Row 5 :

[inc, sc 4] x 4 (24)

Rows 6-7 :

sc in each stitch (24), fasten off, weave in the tail. If you wish to sew the beads to the cap top, it would be more comfortable to make it before next step.

Info :

Inner part:

Info :

Turn the top part of cap inner side out.

Row 1 :

sc into each back loop of top part row 3 (16)

Row 2 :

sc in each stitch (16)

Row 3 :

[dc inc, dc 3] x 4 (20), fasten off, weave in the tail.

Info :

Pull the stem chain through the center of cap (I use thick hook for this purpose).

β€” GNOME :

Info :

Make a magic loop (adjustable ring) or ch 2, insert hook into 1-st ch.

Row 1 :

sc 6 (6)

Row 2 :

[inc, sc] x 3 (9)

Rows 3-5 :

sc into each stitch (9)

Rows 6-8 :

ch 1, turn, sc 6 (6); stuff it. Fold the borders.

Row 9 :

sl st 3 through both borders. Fasten off, leaving long tail to sew the bead *

Info :

Pull the tail with a needle through the bead as showed and fix it. To make a quiff I let small tail of yarn left after sewing the bead remain on the outside ☺ Otherwise just hide the tail inside. Make face features with textile marker/acrylic paint (I sometimes prefer to paint the face before sewing not to spoil the yarn around with paint).

Info :

*wooden bead may be replaced with crochet ball in suitable color of same yarn and hook:

Info :

Crochet inner side out.

Row 1 :

sc 6 in a magic ring (6)

Row 2 :

sc into each stitch (6)

Row 3 :

dec 3 (3). Fasten off, hide the tail inside. You may embroider face with sewing thread (for me it’s easier to make a face after joining with body).

β€” DECORATION :

Info :

You may decorate mushroom with pastels / acrylic paints / textile markers. For example, tint the stem in the bottom. Sew beads or make paint dots on the cap. You may also crochet small white circles and sew them to it (honestly, I prefer quicker decor techniques :-P). Maybe you’d also like to embroider it.

β€” FINISH :

Info :

CONGRATULATIONS! Your mushroom pendant with gnome is ready! I hope you loved the process of growing it ☺

Assembly Instructions

  • Pull the stem chain (long chain created at the end of the stem rounds) through the center of the cap using a thick hook so the cap sits neatly on top of the stem.
  • If you will sew beads onto the cap top, do so before finishing the inner part of the cap as noted; this makes attaching beads more comfortable and avoids bulk later.
  • Sew the wooden bead to the top of the gnome body by pulling the long tail through the bead with a needle and fixing it securely; leave a small tail outside if you want a quiff or hide it inside if you prefer.
  • Stuff the gnome lightly before folding the borders, then fold and sl st through both borders as instructed to form the wrapped body pocket.
  • Place the wooden-bead head gnome into the stem pocket or attach the gnome to the inside of the cap as desired, using sewing thread to secure the gnome in position so it won’t move when worn.
  • Weave in all tails neatly and trim excess threads; if painting the face, consider painting before sewing to avoid paint on surrounding yarn.

Important Notes

  • πŸ’‘Work in spiral rounds and use a marker after each row to clearly see the beginning of the next round.
  • πŸ’‘Crocheting must be rather tight with the suggested materials to ensure the mushroom holds its shape and does not sag.
  • πŸ’‘Try to hide tails inside the magic loop or inner stitches to avoid bulky seams inside small pieces.
  • πŸ’‘If adding beads to the cap, attach them before assembling the inner cap for a cleaner finish and easier sewing.

This charming little mushroom pendant with a tiny gnome is a delightful handmade gift and a sweet accessory you can wear or give. It uses fine cotton yarn and small hooks to create a compact, durable charm full of personality. Try different color combinations and tiny decorations to make each pendant unique. πŸ§Άβœ¨πŸ„

You ask,

we answer.

FAQs

What size will the finished piece be?

With the suggested materials the finished mushroom pendant size is approx. 2" height (4.5 x 4 cm), and the gnome is approx. 1.75" height (3.5 cm).

Can I use different yarn weights for this pattern?

Yes, you can choose thicker or thinner yarn, but keep in mind that the pattern uses a very small hook and tight tension; changing yarn weight will affect final size and structure, so adjust hook size accordingly.

Do I need special experience to make this?

This pattern is rated intermediate because it uses small hooks, magic loop/magic ring technique and small shaping; basic amigurumi experience and familiarity with increases, decreases and working in the round is recommended.

How should I decorate the mushroom cap?

You can decorate the cap with beads sewn on, paint dots with acrylics or textile markers, or crochet and sew small white circles; the pattern suggests sewing beads before finishing the inner cap for comfort.

Can I replace the wooden bead for the gnome head?

Yes, the wooden bead may be replaced with a small crochet ball made in matching yarn and hook; instructions for crocheting the small inner bead are included in the pattern.