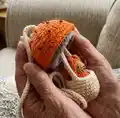
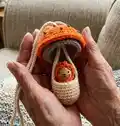
About This Elendan Mushroom with Mouse Amigurumi Pattern
This pattern creates a tiny mushroom pendant with a little gnome (wooden bead head or crochet bead) tucked inside. It includes instructions for the mushroom stem, cap (top and inner lining), the miniature gnome body, and decorative finishing. The finished pendant measures about 2" tall while the gnome is approximately 1.75" tall using the recommended yarn and hook. Techniques include working in spiral rounds, front/back loop work, simple increases/decreases and an optional tiny double crochet round for the cap inner part.

Perfect for making a sweet wearable amigurumi or a small gift, this design is worked tightly for stability. The pattern also suggests simple painting and bead-sewing options for easy decoration.
Why You'll Love This Elendan Mushroom with Mouse Amigurumi Pattern
I absolutely love this pattern because it turns tiny bits of yarn into a whimsical, wearable scene that feels magical. I enjoy the small scale and the way simple shaping gives character to both the mushroom and the little gnome. The pattern is satisfying to crochet quickly but also allows for tiny creative finishes like painted faces or sewn beads. Making several in different colors is irresistible — each one becomes a tiny collectible with its own personality.
Switch Things Up
I love changing colors to create different moods — try pale pastels for a soft woodland look or bright oranges and reds for a classic toadstool vibe.
You can make the pendant larger or smaller by switching yarn weight and adjusting hook size; bulky yarn will give you a chunky pendant, while finer thread creates a delicate mini.
I often swap the wooden bead head for a crocheted bead made with the same yarn for a fully textile look and easier painting.
For a keychain version, shorten the stem chain and attach a metal keyring instead of a necklace cord.
Try embroidering tiny freckles or a tiny smile on the bead head instead of painting to give each gnome its own expression.
Add tiny felt or crocheted leaves to the cap edge for extra decoration and a nature-inspired finish.
If you like sparkle, sew small seed beads onto the cap top for dotted highlights that catch the light.
Experiment with the cap shape by adding or removing increase rounds — a flatter cap is achieved with fewer increases, a puffier cap with more.
I sometimes insert a small magnet inside the gnome and another in the cap to make a snap-together pendant that can be detached as a tiny toy.
Don't be afraid to layer textures — a boucle or slightly fuzzy yarn for the quiff makes for a delightful, tactile accent on the gnome's head.
Common Mistakes & How to Fix Them
✗ Working too loosely on this tiny project makes the stem and cap sag; maintain a tight, even tension so the pendant keeps its shape.
✗ Forgetting to hide the starting tail while crocheting the stem can leave a visible tail at the mouth of the pendant; tuck the tail into the first rounds as you work to hide it.
✗ Skipping stitch counts after increases and decreases leads to mismatched rounds and ill-fitting parts; always count stitches at the end of each round.
✗ Overstuffing the gnome or stem causes distortion and lumps; stuff gradually and lightly to preserve the miniature shape.
✗ Sewing beads onto the cap after joining can be awkward and uneven; if you plan beads on the cap top, sew them on before assembling the inner cap for the cleanest finish.