🧢 Beautiful ✨ Detailed πŸ’ Adorable

Duck and Goose Trinket Tray Amigurumi Pattern

Duck and Goose Trinket Tray Amigurumi Pattern
4.2β˜… Rating
5-7 Hours Time Needed
2.5K Made This
βœ‚οΈ

Intermediate Level

Ideal for those with basic crochet experience, featuring slightly more advanced stitches and techniques to expand your skills.

⏱️

Weekend Treat

Takes 5-7 hours, making it an enjoyable project to finish over a couple of days.

🧸

Cute Companion

An adorable friend to cherish, handcrafted with love to bring comfort and joy for years to come.

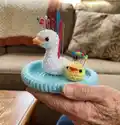
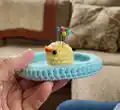
About This Duck and Goose Trinket Tray Amigurumi Pattern

This pattern creates a shallow crochet trinket tray with a tiny goose and mini ducky pin cushion, ideal for holding small craft tools or jewelry. Youll work in continuous rounds to form the tray base and shape two small amigurumi figures with detailed beaks and placements for safety eyes. The pattern uses type 4 yarn and a 3.0mm hook, and includes clear round-by-round directions for shaping and assembly. Finished pieces make sweet gifts or a colorful desktop companion for makers.

Duck and Goose Trinket Tray Amigurumi Pattern crochet pattern - detailed view of completed project

Perfect for intermediate crocheters, this project teaches shaping, BLO rounds, and neat finishing for display-ready results. Includes assembly guidance to securely sew the characters onto the tray for a cute, functional finish.

Why You'll Love This Duck and Goose Trinket Tray Amigurumi Pattern

I absolutely love this pattern because it brings together a practical accessory and playful amigurumi friends in one project. I enjoy how the shallow tray is formed with simple increases and a BLO round to create a clean rim that naturally curves inwards. The goose and mini ducky are small, satisfying makes that allow for quick shaping and personality through eye placement and beaks. Sewing them onto the tray turns three separate pieces into a cohesive, displayable scene I always enjoy gifting to fellow crafters.

Duck and Goose Trinket Tray Amigurumi Pattern step 1 - construction progress Duck and Goose Trinket Tray Amigurumi Pattern step 2 - assembly progress Duck and Goose Trinket Tray Amigurumi Pattern step 3 - details and accessories Duck and Goose Trinket Tray Amigurumi Pattern step 4 - final assembly and finishing

Switch Things Up

I love personalizing this pattern by changing the tray color to match my craft room; try pastel shades for a softer look or bright colors for a playful vibe.

I sometimes make the tray larger by adding extra increase rounds and more rounds at the rim to create a deeper dish for larger items.

If you want an extra-sturdy tray, use tighter tension or a slightly smaller hook than recommended to make firmer fabric.

Swap the safety eyes for embroidered eyes or felt circles if you prefer a non-safety-eye finish, especially if giving to young children.

For a vintage look, use a variegated yarn for the base or choose neutrals and add tiny embroidered flowers inside the tray.

Make a set by crocheting multiple matching mini duckies in different colors and arranging them around the tray as a decorative display.

I sometimes add a small piece of felt to the underside of the tray to protect surfaces and give a neater bottom finish.

Try using cotton yarn for a more rigid tray that holds shape well, or softer acrylic for a plush finish on the characters.

For gift versions, stitch a little loop to the edge of the tray and include a tiny keyring for a portable keepsake option.

Experiment with changing the duck or goose beak color or shape to create different expressions and personalities for each figure.

Common Mistakes & How to Fix Them

βœ— Skipping the BLO round on the tray will prevent the rim from curving inward; be sure to work Round 9 in the back loops only to form the tray edge. βœ— Forgetting to insert safety eyes at the suggested rounds can make placement awkward later; add the eyes between the recommended rounds before you stuff too much. βœ— Overstuffing small amigurumi heads can distort shape and make sewing difficult; stuff gradually and stop when the head is firmly shaped but still pliable. βœ— Not weaving in tails or leaving short sewing tails causes finishing issues; leave long tails for sewing the pieces to the tray and weave in ends as you go.

Duck and Goose Trinket Tray Amigurumi Pattern

Make a charming trinket tray with a tiny goose and mini ducky to hold pins, rings, and small treasures. This pattern combines a shallow crochet tray with two adorable amigurumi characters β€” perfect for gifting or decorating your craft space. You will work in continuous rounds and shape small stuffed figures for a delightful finished piece. Clear rounds and assembly instructions make this a fun intermediate project you'll love to display.

Intermediate 5-7 Hours

Materials Needed for Duck and Goose Trinket Tray Amigurumi Pattern

β€” Main Fabric

  • 01
    Type 4 yarn (worsted weight) - Color A: base trinket color (blue)
  • 02
    Type 4 yarn (worsted weight) - Color B: goose color (white)
  • 03
    Type 4 yarn (worsted weight) - Color C: ducky color (yellow)
  • 04
    Type 4 yarn (worsted weight) - Color D: beak color (orange)

β€” Tools Required

  • 01
    Crochet hook size 3.0mm
  • 02
    Polyfill for stuffing
  • 03
    Darning needle
  • 04
    Scissors
  • 05
    4.0mm safety eyes OR black felt and fabric glue

Progress Tracker

0% Complete

β€” Base Trinket Tray :

Info :

Using color A

Round 1 :

8 sc into mr (8)

Round 2 :

incr into every st (16)

Round 3 :

(1 sc, 1 incr) x8 (24)

Round 4 :

(2 sc, 1 incr) x8 (32)

Round 5 :

(3 sc, 1 incr) x8 (40)

Round 6 :

(4 sc, 1 incr) x8 (48)

Round 7 :

(5 sc, 1 incr) x8 (56)

Round 8 :

(6 sc, 1 incr) x8 (64)

Round 9 :

BLO sc into every st (64)

Round 10-12 :

sc into every st (64)

Info :

Slip stitch and fasten off, weave in the tail. The 'neater' side of the trinket should be facing the inside, so that the rims of the tray would naturally curve inwards. The base of your trinket dish is now complete.

β€” Goose Body :

Round 1 :

6 sc into mr (6)

Round 2 :

incr into every st (12)

Round 3 :

(1 sc, 1 incr) x6 (18)

Round 4-5 :

sc into every st (18)

Info :

You may now insert the safety eyes between rounds 4-5. The safety eyes should be placed along the side of the goose's head. Begin to stuff the goose's body. Continue stuffing as you decrease.

Round 6 :

3 sc, 6 decr, 3 sc (12)

Round 7 :

2 sc, 4 decr, 2 sc (8)

Round 8-10 :

sc into every st (8)

Round 11 :

2 incr, 4 sc, 2 incr (12)

Round 12 :

3 incr, 6 sc, 3 incr (18)

Round 13 :

4 incr, 11 sc, 3 incr (25)

Round 14 :

6 incr, 14 sc, 5 incr (36)

Round 15 :

sc into every st (36)

Round 16 :

12 sc, 6 decr, 12 sc (30)

Round 17 :

9 sc, 6 decr, 9 sc (24)

Round 18 :

6 sc, 6 decr, 6 sc (18)

Round 19 :

3 sc, 6 decr, 3 sc (12)

Info :

Fasten off, leaving a long tail for sewing. You may need to bend the neck of the goose to create a "2" shape.

β€” Goose Beak :

Info :

Using color D

Row 1 :

ch 4 (4)

Row 2 :

sc in the second st from hook. Sc in the last two st (3)

Info :

Fasten off, leaving a tail for sewing.

β€” Mini Ducky :

Info :

Using color C

Round 1 :

6 sc into mr (6)

Round 2 :

incr into every st (12)

Round 3 :

(3 sc, 1 incr) x3 (15)

Round 4-6 :

sc into every st (15)

Info :

You may now insert the safety eyes between rounds 3-4. Begin to stuff the duck's body. Continue stuffing as you decrease.

Round 7 :

1 sc, 7 dec (8)

Info :

Fasten off, leaving a long tail for sewing

β€” Assembly :

Info :

Sew the goose's beak between rounds 4-5 of the goose's head.

Info :

Using the long tail of the goose body, sew the goose onto the base trinket dish at the position you'd like.

Info :

Using yarn color D, sew on a beak between rounds 3-4 of the ducky.

Info :

Using the long tail of the duck's body, sew it onto the base trinket dish at the position you'd like.

Info :

Congrats !! Your duck and goose trinket tray is now complete :")

Assembly Instructions

  • Sew the goose's beak between rounds 4-5 of the goose's head, aligning it centrally along the head's front before securing tightly.
  • Using the long tail of the goose body, sew the goose onto the base trinket dish at the position you'd like, securing with small whipstitches around the base.
  • Using yarn color D, sew on a beak between rounds 3-4 of the mini ducky, centering it across the duckys face before fastening off.
  • Using the long tail of the duck's body, sew the mini ducky onto the base trinket dish at the position you prefer, anchoring firmly so it stands upright.
  • Weave in all loose ends and tuck tails neatly under stitches on the underside of the tray for a clean finish.

Important Notes

  • πŸ’‘This pattern is written in US terminology.
  • πŸ’‘This pattern is worked in continuous rounds; there is no need to sl st and ch 1 at the end of every round.
  • πŸ’‘The number written in parenthesis at the end of each round indicates the total number of stitches for that round.
  • πŸ’‘Place safety eyes before excessive stuffing to ensure correct and symmetrical placement.

This sweet Duck and Goose Trinket Tray brings handmade charm to your desk or sewing corner. It's a playful combination of function and cuteness that also makes a thoughtful gift for crafters. Happy crocheting and enjoy your little feathered friends! 🧢🧡

You ask,

we answer.

FAQs

What size will the finished piece be?

The finished trinket tray with figures will be small and compact β€” roughly the size of a small dish (approximately 10-15 cm across) when using type 4 yarn and a 3.0mm hook; final size depends on yarn and tension.

Can I use different yarn weights for this pattern?

Yes, you can use different yarn weights, but this will affect the final size; use a suitable hook for your chosen yarn and expect a proportionally larger or smaller tray and figures.

Do I need prior crochet experience for this pattern?

This pattern is rated intermediate, so basic knowledge of single crochet, increases, decreases, working in the round, and back-loop-only rounds is recommended.

How long does this project typically take to complete?

Most crocheters finish this project in about 5-7 hours, though time may vary depending on experience level and how many interruptions you have.