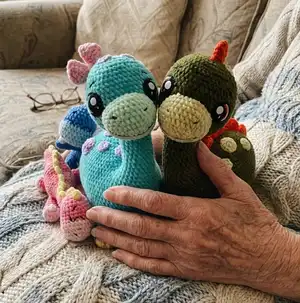
Create a charming handmade dinosaur from plush and semi-cotton yarn with this complete crochet pattern. You will build the body, legs, tail, neck and head step-by-step, attaching parts as you go for a seamless finish. The pattern includes clear round-by-round instructions, material lists and helpful assembly tips so you can make a sturdy, huggable dino.
Progress Tracker
0% Complete
— Tail :
Round 2-3 :
2 rounds 6 SC (6)
Round 4 :
2 SC, 2 INC, 2 SC (8)
Round 5 :
DEC, SC, 2 INC, SC, DEC (8)
Round 6 :
3 SC, 2 INC, 3 SC (10)
Round 7 :
DEC, 2 SC, 2 INC, 2 SC, DEC (10)
Round 8 :
4 SC, 2 INC, 4 SC (12)
Round 9 :
DEC, 3 SC, 2 INC, 3 SC, DEC (12)
Round 10 :
3 SC, (SC, INC)*3, 3 SC (15)
Round 12 :
3 SC, (2 SC, INC)*3, 3 SC (18)
Info :
If the beginning of the round shifts strongly to the right, then work a shifting stitch (align the beginning of the round (stitch marker) in the middle)
Round 14 :
3 SC, (3 SC, INC)*3, 3 SC (21)
Round 16 :
3 SC, (4 SC, INC)*3, 3 SC (24)
Info :
Fix and cut the thread.
— Legs :
Info :
*crochet 4 details. *start with light green yarn
Round 3 :
(SC, INC)*7 (21)
Info :
- change color to dark green;
Round 4 :
BLO: 7 SC, (change color to white, PS, change color to dark green, 2 SC)*3, 5 SC (21)
Round 5 :
5 SC, (DEC, 2 SC)*2, DEC, 6 SC (18)
Round 6-8 :
3 rounds 18 SC (18)
Info :
Fix and cut the thread.
— Body-Head :
Info :
*start with light green yarn. *legs and tail are going to be attached in the process. *stuff in process
Round 0 :
Chain 23; work in spiral (without a turning CH and SS) as in all amigurumi toys (oval-shape detail)
Round 1 :
start in the 2nd chain from the hook: 21 SC, 3 SC into the last chain from the hook, on the other side: 20 SC, INC (46)
Round 2 :
INC, 20 SC, 3 INC, 20 SC, 2 INC (52)
Round 3 :
SC, INC, 20 SC, (SC, INC)*3, 20 SC, (SC, INC)*2 (58)
Infos :
- in Round 4 we attach the legs. - place stitch marker right in the middle on the top of the oval. - mark the place of attaching on the oval: 4 areas of 6 SC at a distance of 11 SC on the sides and of 6 SC on the tops of the oval;
Round 4 :
3 SC, 6 SC with the leg, 11 SC, 6 SC with the leg, 6 SC, 6 SC with the leg, 11 SC, 6 SC with the leg, 3 SC (58)
Info :
- change color to dark green;
Round 5 :
3 SC, 12 SC on the outer leg contour, 11 SC, 12 SC on the outer leg contour, 6 SC, 12 SC on the outer leg contour, 11 SC, 12 SC on the outer leg contour, 3 SC (82)
Round 6-8 :
3 rounds 82 SC (82)
Infos :
*in order to avoid gaps when shifting from the body to the outer leg contour, I work the already worked SC in Round 4 on the inner attaching leg side with the first SC on the outer leg contour in Round 5 as a DEC; *You can simply sew these gaps on the wrong side of the body;
Round 9 :
76 SC, 6 SC with the tail (82)
Round 10 :
76 SC, 18 SC on the outer tail contour (94)
Round 11-12 :
2 rounds 94 SC (94)
Round 13 :
76 SC, (DEC, 6 SC)*2, DEC (91)
Round 15 :
76 SC, DEC, 5 SC, DEC, 4 SC, DEC (88)
Round 17 :
76 SC, (DEC, 3 SC)*2, DEC (85)
Round 19 :
76 SC, DEC, 2 SC, DEC, SC, DEC (82)
Infos :
- mark 18 SC in the front in the middle (neck area); - count 32 SC from the right marker and put the stitch marker in the 32nd SC;
Round 20 :
6 SC, DEC, 24 SC, 6 CH, skip 18 SC (neck area with markers), 22 SC, DEC, 6 SC, DEC (61+6 CH)
Round 21 :
5 SC, DEC, 24 SC, 6 SC on the chain, 21 SC, DEC, 5 SC, DEC (64)
Round 22 :
5 SC, DEC, 11 SC, (5 SC, DEC)*3, 11 SC, (5 SC, DEC)*2 (58)
Round 23 :
4 SC, DEC, 11 SC, (4 SC, DEC)*3, 11 SC, (4 SC, DEC)*2 (52)
Round 24 :
3 SC, DEC, 11 SC, (3 SC, DEC)*3, 11 SC, (3 SC, DEC)*2 (46)
Round 25 :
2 SC, DEC, 11 SC, (2 SC, DEC)*3, 11 SC, (2 SC, DEC)*2 (40)
Round 26 :
SC, DEC, 11 SC, (SC, DEC)*3, 11 SC, (SC, DEC)*2 (34)
Round 28 :
8 DEC, don't work the last SC (9)
Info :
- tighten the hole, fix the thread and hide the end inside.
Info :
- return to Round 19, to the neck hole; - attach the thread to the left stitch marker as shown in the photo, leave a long thread end at the beginning to sew the gap on the side later; - don't stuff the neck yet;
Round 20 (neck transition) :
18 SC on the body, SC in the loop-transition from body to chain, 6 SC on the chain, SC in the loop-transition from body to chain (26)
Round 21 (neck transition) :
16 SC, 5 DEC (21)
Info :
- sew the hole on the side, if required, fix and hide the thread inside;
Round 22-33 :
12 rounds 21 SC (for a girl I work 11 rounds)
Infos :
- cut a square of sintepon/synthetic insulation of one and a half neck length; - wrap a tube and fix it with a fabric patch; - stuff well the area of neck base and insert the sintepon tube into the neck so that it goes slightly below the neck and goes beyond the last round of the neck about half the length of the future head; - stuff additionally the area around the tube so that the neck and its base are tightly stuffed and keep the future head well; - sintepon can be replaced by fleece or felt; - if you made a toy of semi-cotton yarn, then a wire frame insulated with a fabric patch can be inserted into the neck;
Round 34 :
4 SC, 12 INC, 5 SC (33)
Round 35 :
4 SC, (SC, INC)*12, 5 SC (45)
Round 36 :
17 SC, (2 SC, INC)*3, 19 SC (48)
Round 37-48 :
12 rounds 48 SC (48)
Info :
- stuff well the area of transition from the neck to the head, continue stuffing in the process;
Round 49 :
(6 SC, DEC)*6 (42)
Round 50 :
(5 SC, DEC)*6 (36)
Round 51 :
(4 SC, DEC)*6 (30)
Round 52 :
(3 SC, DEC)*6 (24)
Round 53 :
(2 SC, DEC)*6 (18)
Round 54 :
(SC, DEC)*6 (12)
Info :
- tighten the hole, fix the thread and hide the end inside the head.
— Muzzle :
Round 0 :
Chain 6; work in spiral (without a turning CH and SS)
Round 1 :
start in the 2nd chain from the hook: 4 SC, 3 SC into the last chain from the hook, on the other side: 3 SC, INC (12)
Round 2 :
INC, 3 SC, 3 INC, 3 SC, 2 INC (18)
Round 3 :
SC, INC, 3 SC, (SC, INC)*3, 3 SC, (SC, INC)*2 (24)
Round 4 :
2 SC, INC, 3 SC, (2 SC, INC)*3, 3 SC, (2 SC, INC)*2 (30)
Round 5 :
3 SC, INC, 3 SC, (3 SC, INC)*3, 3 SC, (3 SC, INC)*2 (36)
Round 6-7 :
2 rounds 36 SC (36)
Info :
- fix the thread and leave a long end to sew; - stuff the detail; - sew it in the area of Rounds 34-42.
— Eyes :
Info :
*start with black semi-cotton yarn, 2 mm hook
Round 3 :
(SC, INC)*6 (18)
Round 4 :
(2 SC, INC)*4, change color to orange, DON'T cut the black thread, (2 SC, INC)*2 (24)
Info :
- work SS, or finish with straight line as shown in the advice box on page 9; - cut the orange thread, withdraw it to the wrong side and fix it; - attach the white thread to the first orange SC and work:
Left eye :
3 CH, DC in the same St, DC, 2 HDC, 4 SC, SS (or finish with straight line instead of working the last SS)
Right eye :
SS, 4 SC, 2 HDC, 2 DC, 3 CH, SS in the same St
Info :
- cut the white thread, withdraw to the wrong side and fix it; - attach the black thread to the last black SC and crochet the detail around with SC; work 3 SC in one St in the two lower corners of the eye; - fix the thread and leave a long end to sew;
Eye glares :
crochet 2 eye glares of white semi-cotton yarn: 6 SC in MR; join the round and leave a long thread end to sew; sew glare on the eye and embroider additional small glare.
Info :
- sew the eyes on the head in the area of Rounds 41-45 at a distance of 10 SC between them;
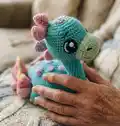
— Finishing & Assembly :
Info :
- insert the sintepon tube into the neck and fix with fabric patch; - stuff legs, tail and body in process; - sew muzzle in area Rounds 34-42; - sew eyes and add glaires; - weave in and hide all ends and secure seams.
This Dino Family Amigurumi brings playful charm to your handmade toy collection and stands proudly with a reinforced neck and soft plush body. Make one for a special child or create a colorful family set to gift and cherish. The pattern includes detailed steps, photos and helpful tips to guide you through every stitch. 🧶🦕