🧢 Beautiful ✨ Detailed πŸ’ Adorable

Diamond Beanie Pattern

Diamond Beanie Pattern
4.2β˜… Rating
2-4 Hours Time Needed
1.9K Made This
βœ‚οΈ

Beginner Friendly Level

Perfect for those just starting their crochet journey, with clear instructions and simple techniques

⏱️

Bite-Sized Project

Finishes in 2-4 hoursβ€”perfect for an afternoon of creative relaxation.

πŸ‘•

Casual Chic

Relaxed style with a modern twist, perfect for everyday wear while maintaining that handcrafted uniqueness.

About This Diamond Beanie Pattern

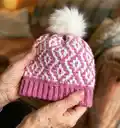
This Diamond Beanie pattern teaches you mosaic crochet to create a striking two-color diamond motif. You will work the hat in one piece from the top down, finishing the foundation round to close the top neatly. The design is sized for children and adults with a helpful overview table for yarn amounts. It is perfect if you want a modern, textured hat with clear, approachable instructions.

Diamond Beanie Pattern crochet pattern - detailed view of completed project

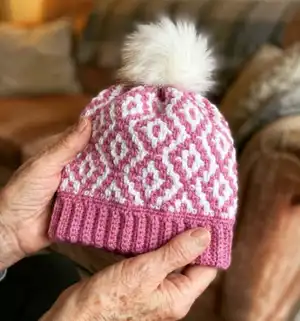
The pattern uses two contrasting colors (A and B) and a DK/8-ply weight yarn, with a 4 mm hook recommended. Detailed finishing instructions and tips on reading the mosaic diagram are included for best results.

Why You'll Love This Diamond Beanie Pattern

I absolutely love this pattern because it combines simple stitches with mosaic crochet to create a surprisingly sophisticated look. I enjoy how a two-color scheme transforms basic single crochets into a striking diamond design. It is approachable for beginners yet satisfying for more experienced crocheters who want a quick, polished project. I also appreciate that it is worked top-down, making it easy to try on and adjust length as you go.

Diamond Beanie Pattern step 1 - construction progress Diamond Beanie Pattern step 2 - assembly progress Diamond Beanie Pattern step 3 - details and accessories Diamond Beanie Pattern step 4 - final assembly and finishing

Switch Things Up

I love experimenting with colours on this pattern; try swapping color A for a neutral and color B for a bright pop to change the overall mood.

You can change the size easily by altering the foundation chain and using the table for stitch counts; try adding or removing repeats of the 12-st pattern to adjust width.

If you want a softer, chunkier hat, use a bulkier weight yarn and a larger hook β€” it will create a cozy, squishy version that works well for winter.

Conversely, use a finer yarn with a smaller hook to make a delicate, slouchy beanie perfect for lighter seasons or a more subtle look.

For a seasonal twist, substitute one of the colours with a speckled or gradient yarn so the diamond motif has textured interest without changing stitchwork.

I sometimes add a folded rib brim by working several rounds of sc in the back loop only or by picking up stitches and working a short ribbed cuff to modify fit.

To customize the top, consider embroidering a small initial or emblem over a diamond after finishing for a personal touch.

Make earflaps and ties by picking up stitches at the brim and crocheting down into triangular shapes for a functional cold-weather variant.

I also like to line the beanie with a thin fleece band for extra warmth and wind protection; hand-sew it to the inside of the brim for a neat finish.

Try different pom poms β€” faux fur, yarn, or leather tassels β€” and secure them firmly for durability; each choice gives a distinct style to the finished hat.

Common Mistakes & How to Fix Them

βœ— Not checking gauge before starting; measure a 10x10 cm swatch and adjust hook size to match 18 stitches and 18 rounds so your hat fits as expected. βœ— Skipping stitch markers when working in spiral rounds; place a marker in the first stitch of each round and move it as you go to keep your stitch count accurate. βœ— Changing colors incorrectly at the end of rounds; always change color on the last yarn over and pull through to ensure clean color transitions in mosaic crochet. βœ— Pulling yarn too tight when fastening off or finishing the edge; leave enough slack to sew below both loops for a neat edge and weave ends gently without distorting the brim. βœ— Using colors with too little contrast; pick two colors with good contrast so the diamond mosaic motif reads clearly rather than blending into an indistinct pattern.

Diamond Beanie Pattern

Create a stylish two-color Diamond Beanie using mosaic crochet techniques. This beginner-friendly pattern guides you step-by-step from the top down so you can make a snug, fitted hat in multiple sizes. The pattern uses two contrasting colors for a crisp diamond motif and includes finishing and assembly tips. Perfect for gifting or keeping cozy on cold days.

Beginner Friendly 2-4 Hours

Materials Needed for Diamond Beanie Pattern

β€” Main Fabric

  • 01
    WooleVo Soft Merino by Merinor (Garnius), 105 m / 50 g (115 yds / 1.8 oz) recommended
  • 02
    Or other 8 ply / DK / worsted weight yarn - two colours (A and B)
  • 03
    Color A and Color B: contrast colours - amounts depend on size (see table): 50 g each for children sizes, 100 g each for teen/women sizes
  • 04
    You need two colours (A and B) for the mosaic diamond pattern

β€” Tools Required

  • 01
    Crochet hook size 4 mm (or the one giving the correct gauge)
  • 02
    Scissors
  • 03
    Tape measure
  • 04
    Yarn needle for sewing and weaving ends
  • 05
    Stitch marker
  • 06
    Pom pom (or button if preferred)

Progress Tracker

0% Complete

β€” How to work Mosaic Crochet and how to read the Mosaic Diagram :

Infos :

The numbers on the vertical axis indicate which round/row you are on. The first row consist of sc worked using color A, the second of sc blo worked with color B. You start working the actual pattern on the third row of the diagram. You use only one color per row. Odd numbered rows are worked in color A, even numbered rows in color B. Read each row in the diagram from right to left. Empty boxes indicate sc blo. Black boxes indicate dc fastening to the flo 2 rows earlier. This front loop will always have the same color as the color you are currently using. Usually, you will fasten the dc to the front loop of a sc, sometimes you fasten the dc to the front loop of a dc.

Infos :

Insert the hook from below, as you would when crocheting through both loops ("normal" crochet). Image 1 and 2 shows how you will work the dc. After image 2, pull the yarn with you through the front loop and finish the dc like you normally would.

Infos :

On each round, repeat column 1-12 all the way around. Column 13-16 are in the diagram to give you a better idea of the complete pattern. When you have finished row 14 in the diagram, start on row 3 again. Image 3 shows what the diamond pattern will look like.

β€” Pattern :

Info :

You work the hat in one piece, as a cylinder. You start at the top and work down. You do this because the foundation chain often comes out less stretchy than the rest of your work. You finish by sewing through the foundation round, tightening, securing the top with a few extra stitches, and attaching the pom pom.

Info :

Chain 76 (79) 82 (84) 86 (88) in color A. Sl st to the first st, making a circle.

Round 1 :

sc all the way around 76 (79) 82 (84) 86 (88), in color A. The last time you "yo and pull through" on the last sc on the round, change to color B.

Info :

Place a marker in the first st. As you move from one round into the next, move the marker to the new first stitch, but do not use sl st or other transitional stitches (You work in a spiral).

Round 2 :

sc blo all the way around 76 (79) 82 (84) 86 (88), in color B. The last time you "yo and pull through" on the last sc on the round, change to color A.

Info :

You now start working the pattern. The pattern repeats over 12 st. Because of this, you will not be able to complete the last repeat of the pattern on all sizes. In order to get the spot where the rounds meet as symmetrical as possible, you start on different columns in the diagram, depending on size. From R3, start every round with column 11 (9) 2 (1) 12 (11) in the diagram.

Round 3 and onwards :

Repeat the pattern of the round you are currently on, starting in the column reported for your size, all the way around. Always change color on the last "yarn over and pull through". After completing row 14 in the diagram, start on row 3 again. Repeat row 3 to 14 until your hat has the height listed in the table for your size or the height you prefer. As you work top down, it is easy for you to add a few rounds or remove a few after trying the hat on.

Info :

The last round should be worked in color A. Finish the last round by sl st to the first st on the round or finish the edge as described below.

β€” Finishing the edge perfectly :

Infos :

Cut the yarn and pull it up, so it comes out of the last stitch of the round. Thread a yarn needle onto the yarn end. Sew below front and back loop of the first stitch on the round. Then, insert needle back down, into the stitch where the yarn comes from. See image 6. Weave in all ends.

β€” Sewing the hat and adding the pom pom :

Info :

Using a yarn needle and color A, through the foundation round, all the way around, leaving about 2 cm between each time you sew through.

Info :

Tighten, so that the hat closes completely. Sew a few extra stitches at the top, making sure everything is secure.

Info :

Depending on the type of pom pom you are using, either sew the pom pom or a button (for the pom pom) to the top of the hat. Attach hat/button well, especially if you are making a hat for small children. I do not recommend using buttons for children below the age of 3.

Info :

Fasten all ends well. And pat yourself on the back – your hat is ready to be used!

Assembly Instructions

  • Sew through the foundation round with a yarn needle and color A all the way around, leaving about 2 cm between each insertion to gather the top evenly.
  • Tighten the foundation thread so that the top closes completely, then secure the closure with a few extra stitches to prevent gaping.
  • Attach the pom pom or button at the top, sewing through several times so it is firmly anchored, especially for children's hats.
  • Weave in all yarn ends neatly into the inside of the hat, and trim excess to prevent lumps.
  • Try the hat on while working the crown rounds to check height; add or remove rows before finishing if needed.

Important Notes

  • πŸ’‘Check your gauge before starting: 10x10 cm corresponds to 18 stitches and 18 rounds when working in rounds.
  • πŸ’‘Use stitch markers to mark the first stitch of each round and move the marker as you progress since the pattern is worked in a spiral.
  • πŸ’‘Choose two colours with good contrast so the diamond mosaic pattern is clear and defined.
  • πŸ’‘Do not use buttons as pom alternative for children under three years old; sew pom poms or buttons securely.
  • πŸ’‘Finish the foundation edge by sewing below both loops of stitches to create a clean, stable brim.

This Diamond Beanie pattern brings a modern mosaic diamond motif to a cozy, everyday hat that you will love to wear and gift. The top-down construction makes fitting easy and the two-color design gives a sharp, graphic finish. Follow the included diagram, finishing tips, and assembly notes to create a polished, professional-looking beanie. 🧢✨

You ask,

we answer.

FAQs

What size will the finished piece be?

The finished hat sizes vary by the foundation chain you choose: 1-2 years (48-49 cm), 3-4 years (50-51 cm), 5-8 years (52-53 cm), 9-12 years (54 cm), teen (55 cm), and women (56-57 cm) approximately as listed in the overview table.

Can I use different yarn weights for this pattern?

Yes, you can substitute yarn weights but this will affect the final size and gauge. If you change yarn weight, make a gauge swatch and adjust hook size to achieve 18 stitches and 18 rounds per 10x10 cm for best fit.

Do I need prior crochet experience for this pattern?

This pattern is rated beginner friendly, but you should be comfortable with single crochet, double crochet, working in the back loop only, color changes, and following a mosaic diagram.

How long does this project typically take to complete?

Most crocheters complete this beanie in about 2-4 hours, depending on size, experience, and whether you are familiar with mosaic crochet techniques.