🧢 Beautiful ✨ Detailed πŸ’ Adorable

Delilah Boho Bag Pattern

Delilah Boho Bag Pattern
4.9β˜… Rating
8-10 Hours Time Needed
2.1K Made This
βœ‚οΈ

Intermediate Level

Ideal for those with basic crochet experience, featuring slightly more advanced stitches and techniques to expand your skills.

⏱️

All-Day Adventure

Requires 8-10 hours, ideal for a full day of immersive crocheting.

✨

Stylish Touch

An elegant detail to elevate any look, combining traditional techniques with contemporary design sensibilities.

About This Delilah Boho Bag Pattern

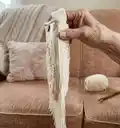
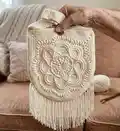
This pattern creates a boho-style shoulder bag featuring a layered mandala front panel and rounded bottom with fringe. The design combines textured bobbles, shells, and openwork to create a rich decorative surface. Photographic references are provided for each round to help you match shaping and placement.

Delilah Boho Bag Pattern crochet pattern - detailed view of completed project

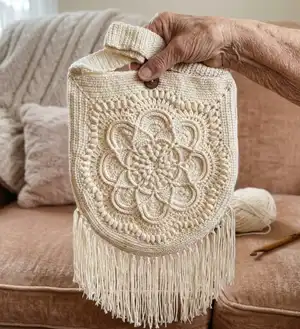
Includes instructions for the mandala front, joining row, top edging, and a long crocheted strap. Finish with fringe and a button loop for a functional and stylish bag.

Why You'll Love This Delilah Boho Bag Pattern

I absolutely love this pattern because it blends decorative crochet motifs with practical bag construction. The layered mandala creates a stunning focal point that always draws compliments. I enjoy the meditative pace of working repeat rounds and watching the texture build up. This pattern is satisfying to make and yields a beautiful, usable accessory that I am proud to carry and gift.

Delilah Boho Bag Pattern step 1 - construction progress Delilah Boho Bag Pattern step 2 - assembly progress Delilah Boho Bag Pattern step 3 - details and accessories Delilah Boho Bag Pattern step 4 - final assembly and finishing

Switch Things Up

I love how this pattern adapts to different yarns β€” swap to a soft cotton blend for a beachy look or a rustic wool blend for a cozy winter bag.

To make a mini version for a phone or keys, use a finer yarn and smaller hook; adjust the number of rounds so the mandala sits proportionally.

I often change the color palette by working alternating color rounds to create striped mandalas or contrasting edges for impact.

For a more structured bag, add a fabric lining and light interfacing; this helps the bag hold shape and protects delicate contents.

If you want a crossbody style, lengthen the strap rows or join two straps for an adjustable shoulder option with a buckle.

Try embroidered initials or a crocheted flower applique9 sewn to the front for a personalized touch that makes a great gift.

Consider adding a zipper to the top edge instead of the button loop for extra security if you carry valuables.

I sometimes replace the fringe with a tassel cluster at the center bottom to reduce bulk while keeping boho style.

Experiment with metallic or novelty yarn for just one round to add shimmer without changing the overall texture of the mandala.

To create a reversible bag, crochet two identical mandala panels and join them with a narrow seam, finishing the top edge and strap for a clean reversible finish.

Common Mistakes & How to Fix Them

βœ— Skipping photo reference checks for each round can cause irregular shaping; refer to the round photo while you work to match placement and texture. βœ— Not counting stitches after complex rounds leads to mismatched motif repeats; count and mark segment boundaries after each round to maintain even shaping. βœ— Working with inconsistent tension makes the mandala edges uneven; try to maintain the same yarn tension and check your gauge frequently. βœ— Joining the side rows without pinning can twist the panel; pin or clip the piece before sewing the joining row and check alignment before stitching. βœ— Adding fringe too early can tangle and get in the way of assembly; attach fringe after the bag is fully joined and the top edge is completed.

Delilah Boho Bag Pattern

Make a beautiful Delilah Boho Bag with an intricate mandala front and textured border. This pattern guides you through each decorative round and assembly step so you can create a stylish, bohemian shoulder bag. Perfect for adding handmade flair to your wardrobe or gifting to someone special. Clear photos accompany each round to help you follow the design.

Intermediate 8-10 Hours

Materials Needed for Delilah Boho Bag Pattern

β€” Main Fabric

  • 01
    Aran/Chunky weight cotton or cotton blend yarn, approximately 300-450g (natural/cream shown)
  • 02
    Extra yarn 50g for fringe and strap finishing

β€” Tools Required

  • 01
    Crochet hook size 5.0mm (or recommended for yarn)
  • 02
    Crochet hook size 4.0mm (for tighter edge stitches, optional)
  • 03
    Scissors
  • 04
    Yarn needle for sewing and weaving ends
  • 05
    Stitch markers
  • 06
    Measuring tape
  • 07
    Pins or clips for assembly
  • 08
    Large wooden or decorative button for closure (1)
  • 09
    Polyester stuffing for optional strap padding (optional)

Progress Tracker

0% Complete

β€” Mandala Front :

Round 1 :

Photo reference: see Round 1 image (start motif centre).

Round 2 :

Photo reference: see Round 2 image (early expansion of motif).

Round 3 :

Photo reference: see Round 3 image (petal/bobble shaping begins).

Round 4 :

Photo reference: see Round 4 image (petal shaping continues).

Round 5 :

Photo reference: see Round 5 image (petals more defined).

Round 6 :

Photo reference: see Round 6 image (motif widening).

Round 7 :

Photo reference: see Round 7 image (raised edges forming).

Round 8 :

Photo reference: see Round 8 image (scallop and arch details added).

Round 9 :

Photo reference: see Round 9 image (continuation of scallops and shaping).

Round 10 :

Photo reference: see Round 10 image (arch detail solidified).

Round 11 :

Photo reference: see Round 11 image (top of arch smoothed with dc/higher stitches).

Round 12 :

Photo reference: see Round 12 image (arch edges joined to motif base).

Round 13 :

Photo reference: see Round 13 image (arches reinforced with dc rows).

Round 14 :

Photo reference: see Round 14 image (openwork row begins above arches).

Round 15 :

Photo reference: see Round 15 image (openwork and picot-like spacing).

Round 16 :

Photo reference: see Round 16 image (rows of openwork forming semicircle edge).

Round 17 :

Photo reference: see Round 17 image (bobble clusters and ch3 spaces noted; watch for locations marked 'No ch3 space' in photo).

Round 18a :

Photo reference: see Round 18a image (first shaping row of the set shown).

Round 18b :

Photo reference: see Round 18b image (repeat section X5 indicated in photo).

Round 18c :

Photo reference: see Round 18c image (continuation of 18b repeat in photo).

Round 18d :

Photo reference: see Round 18d image (repeat shaping shown across section).

Round 18e :

Photo reference: see Round 18e image (finishing row of the 18 sequence).

Round 19 :

Photo reference: see Round 19 image (panel approaches square/joining shape).

Round 20 :

Photo reference: see Round 20 image (outer border rows smoothing the edge).

Round 21 :

Photo reference: see Round 21 image (final round for mandala front panel before joining).

β€” Joining row :

Joining row :

Photo reference: see Joining row image (row of sc/dc used to join panels and create top edge foundation).

β€” Top edge :

Top edge - Round 1 :

Photo reference: see Top edge - Round 1 image (foundation row forming loop for button if desired).

Top edge - Round 2 :

Photo reference: see Top edge - Round 2 image (evening of edge rows with dc/sc).

Top edge - Round 3 :

Photo reference: see Top edge - Round 3 image (final smoothing row, button loop placement shown).

β€” Strap :

Strap - Row 1 :

Photo reference: see Strap - Row 1 image (strap foundation rows of dc/hdc).

Strap - Row 2-61 :

Photo reference: see Strap - Row 2-61 image (work repeating rows to desired strap length; photo shows texture and width).

Strap - Joining :

Photo reference: see Strap - Joining image (details of how strap edge is joined to bag top edge).

Assembly Instructions

  • Join the mandala front panel to the back or lining using the Joining row as a foundation, aligning the outer edges and sewing with mattress stitch or whipstitch through the joining row.
  • Work the Top Edge rounds around the bag opening to create a neat finishing edge; add the button loop at the position shown in the Top edge - Round 1 photo and sew the button to the opposite side securely.
  • Make the strap to the length shown (Row 2-61 photo indicates the long strap); block and flatten the strap, then join to the bag top using the Strap - Joining technique and reinforce with additional stitches.
  • Add the fringe after assembly along the rounded bottom edge: cut equal lengths, fold in half, pull loop through edge spaces, and secure by pulling ends through loop; trim evenly.
  • Weave in all ends neatly on the wrong side and block the finished bag to even out stitches and shape the scalloped edges.

Important Notes

  • πŸ’‘Use the photo reference for each round to match stitch placement and shaping exactly as you work.
  • πŸ’‘Maintain consistent tension throughout the project to keep the mandala motifs and outer edges even and flat.
  • πŸ’‘Pin or clip each piece into position before sewing to ensure accurate alignment and symmetry during assembly.
  • πŸ’‘Work the strap to your preferred length and test the fit before permanently joining to avoid rework.

This Delilah Boho Bag pattern guides you through a decorative mandala front and neat assembly for a practical, beautiful accessory. The pattern includes step-by-step photo references for every round so you can match the texture and shaping exactly. Make one for yourself or gift to someone special β€” it is a lovely handmade treasure. 🧢✨

You ask,

we answer.

FAQs

What size will the finished bag be?

The finished bag measures approximately 32-36 cm wide and 36-40 cm tall (excluding fringe), depending on your yarn tension and hook size.

What skill level is required for this pattern?

This pattern is rated Intermediate β€” it requires experience with textured stitches, reading round photos, and basic assembly techniques.

Can I change the yarn weight to make a bigger or smaller bag?

Yes, using a heavier yarn and larger hook will produce a larger, chunkier bag while a lighter yarn and smaller hook makes a smaller, more delicate version. Adjust strap length accordingly.

How long does this project take to complete?

Most crocheters complete this project in 8-10 hours, though time will vary depending on experience and working speed.