🧢 Beautiful ✨ Detailed πŸ’ Adorable

Cute Sponge Amigurumi Pattern

Cute Sponge Amigurumi Pattern
4.1β˜… Rating
5-7 Hours Time Needed
2.1K Made This
βœ‚οΈ

Intermediate Level

Ideal for those with basic crochet experience, featuring slightly more advanced stitches and techniques to expand your skills.

⏱️

Weekend Treat

Takes 5-7 hours, making it an enjoyable project to finish over a couple of days.

🧸

Cute Companion

An adorable friend to cherish, handcrafted with love to bring comfort and joy for years to come.

About This Cute Sponge Amigurumi Pattern

This pattern creates a small, rectangular sponge-inspired amigurumi with embroidered details and felt accessories. It uses basic crochet stitches and small shaping techniques to form the body, limbs, and hat. You will add felt eyes, teeth, a tie and collar for personality and finish with simple embroidery.

Cute Sponge Amigurumi Pattern crochet pattern - detailed view of completed project

The design is assembled with glue and stitching for clean edges and a neat finish. Ideal for craft lovers wanting a playful, handmade toy with bright colors.

Why You'll Love This Cute Sponge Amigurumi Pattern

I absolutely love this pattern because it combines simple crochet construction with fun felt and embroidered details that really bring the character to life. I enjoy how quickly the rectangular body works up while still allowing for expressive facial features. The hat, belt and tiny accessories make each finished piece feel special and gift-ready. Working small like this is very satisfying β€” you see results fast and can make variations easily.

Cute Sponge Amigurumi Pattern step 1 - construction progress Cute Sponge Amigurumi Pattern step 2 - assembly progress Cute Sponge Amigurumi Pattern step 3 - details and accessories Cute Sponge Amigurumi Pattern step 4 - final assembly and finishing

Switch Things Up

I love how easy it is to customize this pattern by swapping colors; try pastel shades for a softer look or bright primary colors for maximum impact.

You can change the size by adjusting yarn weight and hook size β€” bulky yarn and a larger hook gives you a cuddly large version while thinner yarn makes a tiny keychain-friendly version.

I often replace felt with embroidery for a sewn finish that is more durable; small embroidered highlights can be stitched instead of glued for a handmade look.

Try different accessories: a small crocheted scarf, a bow, or a little pocket add personality and make great gift variations.

For posability, consider adding a short piece of wire inside the arms before stuffing, which lets you bend them slightly to hold tiny props.

Embellish the hat with a pompom or small embroidered logo to create themed characters or seasonal variations.

Mix yarn textures β€” use a boucle or textured yarn for the body to create a fuzzy, playful surface that catches the eye.

I sometimes use a contrasting color for the first round of the arms to make cuffs that look like sleeves; try metallic or neon yarn for a fun accent.

Swap felt teeth for tiny crocheted squares sewn into place if you prefer all-crochet finishes without glue.

If you want a sturdier base, glue a small felt or cardboard insert into the bottom of the pants before attaching the legs to help the toy stand upright.

Common Mistakes & How to Fix Them

βœ— Skipping stuffing little by little can cause the rectangular shape to warp; stuff gradually while checking shape and firmness. βœ— Not gluing or reinforcing the acetate on the body can make the piece collapse; glue a small strip of acetate to the left side to keep the rectangle stable. βœ— Changing color without securing ends can cause loose strands; fasten off and weave in ends neatly at every color change. βœ— Misaligning white rounds on the arms and blouse will look uneven; align the first white round on the arm with the last white round on the blouse before gluing. βœ— Rushing the felt placement for eyes and teeth can produce crooked features; cut and position felt pieces first, then glue or stitch them in place carefully.

Cute Sponge Amigurumi Pattern

Create an adorable sponge-inspired amigurumi with clear, step-by-step instructions and charming felt details. This pattern guides you through crocheting the body, limbs, hat and facial features, plus simple assembly tips. Perfect for gifting or keeping as a playful handmade decoration.

Intermediate 5-7 Hours

Materials Needed for Cute Sponge Amigurumi Pattern

β€” Main Fabric

  • 01
    Yellow yarn - main body color (amount not specified)
  • 02
    Brown yarn - pants and trim (amount not specified)
  • 03
    Black yarn - legs and belt details (amount not specified)
  • 04
    White yarn - shirt and small details (amount not specified)
  • 05
    Turquoise / blue yarn - eye detail (amount not specified)
  • 06
    Red felt - tie (small piece)
  • 07
    White felt - eye bases and teeth (small pieces)
  • 08
    Thin black yarn or thin black yarn for belt embroidery (small amount)

β€” Tools Required

  • 01
    Crochet hook size 2 mm
  • 02
    Scissors
  • 03
    Yarn needle for sewing and weaving ends
  • 04
    White felt (small circles for eyes, teeth)
  • 05
    Red felt for tie and white felt for collar
  • 06
    Glue (fabric glue) to attach felt and acetate
  • 07
    Small piece of acetate to maintain rectangular shape
  • 08
    Polyester stuffing
  • 09
    Embroidery thread or paint for eyelashes, anchor and small details
  • 10
    Pins for positioning pieces

Progress Tracker

0% Complete

β€” Hat :

Info :

Using white.

Round 1 :

6 sc in MR (6)

Round 2 :

6 inc (12)

Round 3 :

(3sc,inc)*3 (15)

Round 4-6 :

(3 rounds). 15 sc (15)

Info :

Change to black.

Round 7 :

15 slst BLO (15)

Round 8 :

15 slst BLO (15)

Info :

Change to blue.

Round 9 :

5 sc FLO (5)

Round 10 :

Make 1 ch and turn. 5 sc (5)

Round 11 :

Make 1 ch and turn. 5 sc (5)

Info :

Make 1 ch and turn. Cut the yarn and fasten off. Embroider or paint the red lines. Embroider or paint the anchor.

β€” Body :

Info :

Stuff it little by little. Be careful not to lose the rectangular shape

Info :

Using YELLOW. Make 8ch and start the 1st round in the 2nd ch from the hook

Round 1 :

1 inc, 5sc, triple inc, 6sc (16)

Round 2 :

sc, triple inc, 5sc, triple inc, sc, triple inc, 5sc, triple inc (24)

Round 3 :

2sc, triple inc, 7sc, triple inc, 3sc, triple inc, 7sc, triple inc, sc (32)

Round 4 :

3sc, triple inc, 9sc, triple inc, 5sc, triplo inc, 9sc, triple inc, 2sc (40)

Info :

To help maintain the rectangular shape, glue a piece of acetate to the left side

Round 5-14 :

(10 rounds). 40sc (40)

Info :

Cut the yarn and fasten off

β€” PANTS + SHIRT :

Info :

Using BROWN. Make 9ch and start the 1st round in the 2nd ch from the hook

Round 1 :

1 inc, 6sc, triple inc, 7sc (18)

Round 2 :

sc, triple inc, 6sc, triple inc, sc, triple inc, 6sc, triple inc, (26)

Round 3 :

2sc, triple inc, 8sc, triple inc, 3sc, triple inc, 8sc, triple inc, sc (34)

Round 4 :

3sc, triple inc, 10sc, triple inc, 5sc, triple inc,10sc, triple inc, 2sc (42)

Round 5-7 :

42sc (42)

Info :

Change to WHITE

Round 8 :

42slst BLO (42)

Round 9 :

42sc BLO (42)

Info :

Cut the yarn and fasten off

Info :

Glue the body inside this Pants + Blouse piece

β€” LEGS :

Info :

Using BLACK

Round 1 :

8s in MR (8)

Round 2 :

8inc (16)

Info :

Glue acetate, or something similar, to the back of this piece

Round 3 :

16sc BLO (16)

Round 4 :

16sc (16)

Round 5 :

2sc, (dec, sc)*3, dec, 3sc (12)

Info :

Change to WHITE

Round 6 :

12slst BLO (12)

Round 7 :

12sc BLO (12)

Info :

Change to YELLOW

Round 8 :

12slst BLO (12)

Round 9 :

12slst BLO (12)

Info :

Cut the yarn and fasten off

Info :

Embroider the red detail on the sock.

Info :

Make two identical pieces

Info :

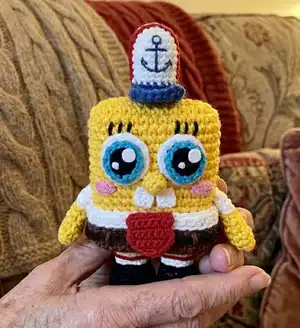
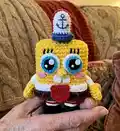
Glue below the body (Picture 1)

β€” ARMS :

Info :

Using YELLOW

Round 1 :

7sc in MR (7)

Round 2-5 :

7sc (7)

Info :

Change to WHITE

Round 6 :

7slst BLO (7)

Round 7 :

7sc BLO (7)

Info :

Cut the yarn and fasten off

Info :

Make two identical pieces

Info :

Glue to the sides of the body, aligning the first white round on the arm with the last white round on the Blouse

β€” BELT :

Info :

Using BLACK, but choose a thinner yarn.

Item Name (P1) :

Make 49ch

Info :

Cut the yarn and fasten off

Info :

Glue it on the pants

Info :

With the color BROWN, embrioder the details of the belt (Picture 2)

β€” EYE :

Info :

Cut 2 circles of white felt, approximately 2cm in diameter each.

Info :

Glue it to the head, according to Picture 2

Info :

Using the same black yarn that you used for the belt

Round 1 :

Make 8sc in MR

Info :

Using the same yarn as above, but in TURQUOISE color

Round 2 :

Make 8slst BLO

Info :

Cut the yarn and fasten off

Info :

Cut small circular pieces of white felt and glue it to the eye (Picture 2). If you prefer, embroider instead of using felt.

Info :

Embroider the eyelashes and cheeks, according to Picture 2

β€” TEETH :

Info :

Use White Felt to make two little teeth, approximately 0.4cm wide each. Glue them on the face according to Picture 2

β€” NOSE :

Info :

Using YELLOW

Info :

Make 4ch and start the 2st round in the 2nd ch from the hook

Round 1 :

3sls t (3). Make 1ch and turn

Round 2 :

3slst BLO (3)

Info :

Cut the yarn and fasten off

Info :

Glue between the eyes, according to Picture 2

β€” TIE and COLLAR :

Info :

Use red felt for the tie, and white for the collar (Picture 2)

Assembly Instructions

  • Glue the body inside the Pants + Blouse piece after finishing the brown piece and white rounds to form the rectangular torso.
  • Glue or sew the two legs below the body (Picture 1), spacing them evenly and aligning the sock embroidery details before attaching.
  • Glue the two arms to the sides of the body, aligning the first white round on the arm with the last white round on the blouse for a neat seam.
  • Attach the hat on top of the head and glue or stitch firmly; embroider or paint the red lines and anchor on the hat for the final detail.
  • Glue the white felt eye circles to the head, then attach the crocheted eye rounds and small white felt highlights according to Picture 2.
  • Glue the small felt teeth on the face and the small yellow nose between the eyes; add the red felt tie and white collar in front as shown in Picture 2.

Important Notes

  • πŸ’‘Stuff little by little to preserve the rectangular shape and check shape frequently while filling.
  • πŸ’‘Glue a piece of acetate to the left side of the body to help maintain the rectangular shape during assembly.
  • πŸ’‘Align white rounds on arms and blouse before gluing to ensure symmetrical attachment and a clean finish.
  • πŸ’‘Weave in ends and fasten off securely at each color change to prevent unraveling and loose strands.
  • πŸ’‘Use small felt pieces and fabric glue for neat facial details or embroider details if you prefer a stitched finish.

This cheerful sponge-style amigurumi makes a delightful handmade gift that brightens any shelf or desk. The combination of crochet, felt and embroidered accents gives so much personality to a small project. Have fun customizing colors and accessories to make a collection of tiny friends! 🧢🧡

You ask,

we answer.

FAQs

What size will the finished piece be?

The finished amigurumi will be a small handheld toy; exact size depends on your yarn thickness and tension, but with 2 mm hook and thin yarn it will be compact and palm-sized.

Can I use different yarn weights for this pattern?

Yes, you can use different yarn weights but the final size and look will change; if you use thicker yarn, increase hook size and expect a larger, chunkier toy.

Do I need prior crochet experience for this pattern?

This pattern is rated intermediate because it uses increases, back-loop rounds and small shaping, so basic knowledge of single crochet, increases and working in the round is recommended.

How long does this project typically take to complete?

Most crocheters complete this project in 5-7 hours, though time may vary based on experience, speed, and whether you add embroidery or painted details.