🧢 Beautiful ✨ Detailed πŸ’ Adorable

Cute Bunny Comforter Amigurumi Pattern

Cute Bunny Comforter Amigurumi Pattern
4.2β˜… Rating
2-3 Hours Time Needed
3.7K Made This
βœ‚οΈ

Beginner Friendly Level

Perfect for those just starting their crochet journey, with clear instructions and simple techniques

⏱️

Bite-Sized Project

Finishes in 2-4 hoursβ€”perfect for an afternoon of creative relaxation.

🧸

Cute Companion

An adorable friend to cherish, handcrafted with love to bring comfort and joy for years to come.

About This Cute Bunny Comforter Amigurumi Pattern

This pattern creates a small bunny comforter β€” a cuddly amigurumi head with ears and arms attached to a granny square blanket. It uses simple stitches and a small amount of yarn, making it a fast and satisfying make. You will get clear step-by-step rounds for the head, rows for the ears, and rounds for the arms, plus a granny square blanket pattern.

Cute Bunny Comforter Amigurumi Pattern crochet pattern - detailed view of completed project

Easy to follow and safe for little ones when sewn with yarn for facial features. Ideal for gifting or finishing in an afternoon.

Why You'll Love This Cute Bunny Comforter Amigurumi Pattern

I absolutely love this pattern because it combines the simplicity of a classic granny square with the charm of a tiny amigurumi head to make a useful, lovable comforter. I enjoy how quickly the blanket grows and how satisfying the tiny head and ears are to crochet and assemble. The design is compact, uses very little yarn, and finishes into a sweet keepsake that is perfect for babies or as a small thoughtful gift. Making several in different colorways is one of my favourite ways to build a stash of handmade presents.

Cute Bunny Comforter Amigurumi Pattern step 1 - construction progress Cute Bunny Comforter Amigurumi Pattern step 2 - assembly progress Cute Bunny Comforter Amigurumi Pattern step 3 - details and accessories Cute Bunny Comforter Amigurumi Pattern step 4 - final assembly and finishing

Switch Things Up

I love changing the color palette to suit the recipient β€” try pastel blue or pink for a baby-themed comforter or bright jewel tones for a playful look.

You can switch yarn weight and hook size to make a mini keychain version or a larger cuddle blanket; just adjust your hook and yarn choice accordingly.

I often add a little satin ribbon bow under the head for a delicate finish that makes the piece gift-ready.

Try embroidering different facial expressions with yarn to change the mood β€” a simple smile, closed eyes or sleepy lashes make big differences.

For a textured blanket, replace rounds of granny clusters with simple shell stitches or puff stitches for a plush feel.

I sometimes add a thin wool stuffing disk behind the head to help it sit more firmly on the blanket while keeping the head soft to the touch.

Make a set by crocheting several heads in different colors and attaching them to matching granny squares for a coordinated nursery collection.

If you want a safer toy for very young babies, avoid small attachments and use purely embroidered facial features with yarn as in the pattern.

I like to edge the granny square with a contrasting color β€” a single round of sc or crab stitch looks neat and frames the bunny nicely.

Don't be afraid to mix yarn textures; a cotton blanket with a wool head can create an interesting tactile experience, just be mindful of washing instructions.

Common Mistakes & How to Fix Them

βœ— Skipping the stitch marker when working the head will make it hard to track rounds; place and move a marker at the start of every round to maintain correct stitch counts. βœ— Working loose stitches on the head causes stuffing to show through; keep tension tight and use smaller, firm stitches for the head to hide the stuffing. βœ— Not stuffing evenly leads to a lumpy head or misshapen ears; add small amounts of stuffing gradually and shape as you go for a smooth finish. βœ— Forgetting to leave a long tail when fastening off makes assembly harder; leave long tails for sewing the head and arms securely to the blanket body. βœ— Turning at the end of rounds for the head will change the shaping; work in continuous spirals as instructed and do not join at the end of rounds to keep consistent shaping.

Cute Bunny Comforter Amigurumi Pattern

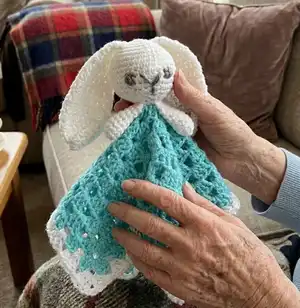
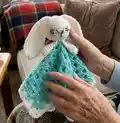
Make a sweet, soft bunny comforter that doubles as a lovey and mini blanket. This approachable pattern walks you through a granny square blanket, a small amigurumi head, ears and simple arms so you can finish a gift-ready cuddle buddy quickly. Perfect for gifting, nurseries, or keeping by the bedside β€” you will love how fast and fun this project is to crochet.

Beginner Friendly 2-3 Hours

Materials Needed for Cute Bunny Comforter Amigurumi Pattern

β€” Main Fabric

  • 01
    Worsted weight / 8ply (3/Light) yarn - 15g main color for bunny head, arms and ears
  • 02
    Worsted weight / 8ply (3/Light) yarn - 15g contrast color for blanket (body/dress)
  • 03
    Small amount of yarn for facial embroidery/details

β€” Tools Required

  • 01
    Crochet hook H (5mm)
  • 02
    Stitch marker
  • 03
    Darning needle

Progress Tracker

0% Complete

β€” Materials :

Infos :

Yarn: 3/Light/Worsted/8ply yarn - 15g of one color for bunny head, arms and ears, 15g of another color for blanket (body/dress) plus a small amount of yarn for the face. Hook: H hook (5mm). Gauge: Not particularly important but try to keep sts as tight as you can when working the head so that the stuffing does not show through. Terminology: US. Other items needed: Stitch marker, darning needle.

β€” Abbreviations :

Infos :

Beginning (beg). Chain (ch). Double Crochet (dc). Half Double Crochet (hdc). Loop (lp). Repeat (rep). Single Crochet (sc). Skip (skp). Slip Stitch (sl st). Space (sp). Stitch (st). Yarn Over (yo).

β€” Special Stitches :

Info :

sc2tog (sc dec) (Insert hook into next st and draw up a lp) twice, yo and draw through all 3 lps on hook – 1 sc decreased

β€” Granny Square Blanket :

Info :

Useful Granny Square Tutorial link from The Crochet Crowd: http://www.youtube.com/watch?v=BFnyfJEWCd8. Ch4 and sl st to the beginning ch to form ring.

Round 1 :

Ch3 (counts as a dc from now on), work 2dc into the ring, *ch2, 3dc into the ring*, rep from * twice more, ch2 and sl st to the top of the ch3 that started the round.

Round 2 :

Ch3, work 2dc into the same sp, *ch1, work 3dc, ch2, 3dc into next ch2 corner sp. Repeat from * all the way around. Your final sts should be 3dc, ch2 and then sl st to the top of the ch3 that started the round.

Round 3 :

Ch3, work 2dc into the same sp, ch1 * work 3dc, ch1, into each ch sp across to corner sp. In corner sp, work 3dc, ch2, 3dc, ch1. Repeat from * all the way around. Your final corner should have 3dc, ch2 and then sl st to the top of the ch3 that started the round.

Info :

Repeat round 3 nine times. Each round will cause the square to increase in size.
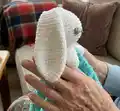
β€” Head :

Infos :

Notes: Rounds are worked in continuous spirals; do not join. Do not turn work at the end of each round but use stitch markers as indicated.

Round 1 :

Ch2, work 6sc in furthest ch from hook. Place stitch marker in first st for beg of next Round; move marker up at start of each Round.

Round 2 :

Work 2 sc in each sc around (12sc).

Round 3 :

*2sc in next sc, sc in next sc; repeat from * around (18sc).

Round 4 :

*2sc in next sc, sc in each of next 2sc; repeat from * around (24sc).

Round 5 :

*2 sc in next sc, sc in each of next 3sc; repeat from * around (30sc).

Round 6-10 :

Sc in each st around (30sc).

Round 11 :

*Sc2tog, sc in each of next 3sc; repeat from * around (24sc).

Round 12 :

*Sc2tog, sc in each of next 2sc; repeat from * around (18sc).

Round 13 :

*Sc2tog, sc in next sc; repeat from * around (12sc).

Info :

Stuff firmly.

Round 14 :

Sc2tog around (6sc).

Info :

Fasten off, leaving a long tail to use to sew head to centre of blanket.

β€” Bunny Ears :

Infos :

Make 2. Note: Turning ch1 does not count as a st.

Row 1 :

Starting at bottom of ear, ch 2, 3 sc in 2nd ch from hook, ch 1, turn (3sc).

Row 2 :

Sc in each st across, ch 1, turn (3sc).

Row 3 :

2sc in first sc, sc in next sc, 2sc in last sc, ch 1, turn (5sc).

Rows 4 & 5 :

Sc in each st across, ch1, turn (5sc).

Row 6 :

2sc in first st, sc in each st to last st, 2sc in last st, ch1, turn (7sc).

Rows 7 - 18 :

Sc in each sc across, ch1, turn.

Row 19 :

Sc2tog, sc in each st to last 2 sts, sc2tog, ch1, turn (5sc).

Row 20 :

Sc in each sc across, ch1, turn.

Row 21 :

Sc2tog, sc in next st, sc2tog, ch1, DO NOT TURN (3sc).

Edging :

Work 21 sc down side of ear, work 3 sc across opposite side of starting ch, work 21 sc up side of ear, ch1, join with a sl st to first sc of row 21. Leaving a length of yarn for sewing, fasten off.

Info :

Fold ear in half lengthwise and sew the top of row 21 together. Sew ears to top of head.

β€” Arms :

Infos :

Make 2. Notes: Rounds are worked in continuous spirals; do not join. Do not turn work at the end of each round but use stitch markers as indicated.

Round 1 :

Ch2, work 5sc in furthest ch from hook. Place stitch marker in first st for beg of next round; move marker up at start of each Round (6sc).

Round 2 :

Work 2sc in each sc around (12sc).

Rounds 3 - 4 :

Work 1sc in each st around (12sc).

Round 5 :

Sc2tog, sc in next two sts around (9sc).

Rounds 6 - 9 :

Work 1sc in each st around (9sc).

Info :

Do not stuff arms, sew open end shut and tie off leaving a long tail. Using tail sew arms just beneath the head onto the blanket body.

Info :

Finish by sewing a simple face onto the bunny using a darning needle - using yarn makes this comforter very safe for little ones.

Info :

I hope you like this pattern! If you have any problems with it please don't hesitate to let me know and I'll see if I can help!

Assembly Instructions

  • Sew the head to the centre of the granny square blanket using the long tail left when fastening off the head; stitch securely through the blanket centre so the head sits flat.
  • Fold each ear lengthwise and sew the top of row 21 together, then position each ear on top of the head and sew in place, matching placement visually or using photos as reference.
  • Place the arms just beneath the head on either side of the blanket body and sew them on using the long tails left when finishing the arms for a secure attachment.
  • Embroider a simple face with yarn using a darning needle, stitching eyes and nose securely and keeping all features made from yarn so the comforter is safe for little ones.

Important Notes

  • πŸ’‘Use a stitch marker to mark the beginning of rounds and move it up at the start of each round to keep correct stitch counts.
  • πŸ’‘Work the head in continuous spirals and do not join rounds to maintain smooth shaping and consistent stitch placement.
  • πŸ’‘Keep stitches tight when making the head so stuffing does not show through; the blanket tension is less critical but the head benefits from firmer tension.
  • πŸ’‘Do not stuff the arms; sew them closed and attach without stuffing for a flat, safe lovey design.

This adorable Cute Bunny Comforter pattern combines a tiny amigurumi head with a granny square blanket body for a perfect lovey. It uses very little yarn and finishes quickly, making it ideal for gifts and baby showers. Happy crocheting and enjoy the snuggles! 🐰🧢✨

You ask,

we answer.

FAQs

What size will the finished piece be?

The finished comforter measures approximately the size of a small lovey - the blanket size will vary depending on how many granny square rounds you work, but using the recommended yarn and hook produces a small comforter perfect for little hands.

Can I use different yarn weights for this pattern?

Yes, you can use different yarn weights but the final size will change; if you choose a bulkier yarn use a larger hook and expect a larger comforter, and adjust yarn amounts accordingly.

Do I need prior crochet experience for this pattern?

This pattern is beginner friendly, but you should be comfortable with basic stitches like chain, single crochet, double crochet and working in the round; knowing how to work in continuous spirals is helpful.

How long does this project typically take to complete?

Most crocheters complete this project in 2-3 hours, though time may vary based on experience level, yarn choice and finishing steps like embroidery and sewing.

How should I attach the ears and arms securely?

Sew ears to the top of the head using the tail left after fastening off the ear edging, and sew arms to the blanket body just beneath the head using the long tails left after finishing the arms.