๐Ÿงถ Beautiful โœจ Detailed ๐Ÿ’ Adorable

Crochet Wine Tote Bag Pattern

Crochet Wine Tote Bag Pattern
4.1โ˜… Rating
5-7 Hours Time Needed
1.6K Made This
โœ‚๏ธ

Intermediate Level

Ideal for those with basic crochet experience, featuring slightly more advanced stitches and techniques to expand your skills.

โฑ๏ธ

Weekend Treat

Takes 5-7 hours, making it an enjoyable project to finish over a couple of days.

โœจ

Stylish Touch

An elegant detail to elevate any look, combining traditional techniques with contemporary design sensibilities.

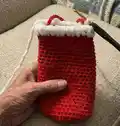
About This Crochet Wine Tote Bag Pattern

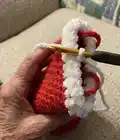
This pattern creates a handmade crochet wine tote that fits a standard wine bottle snugly. It uses basic stitches like half double crochet, double crochet and chain spaces to form a textured body and decorative perforated band. The design includes instructions for a braided strap and an optional velvet trim for a festive look. Clear photos accompany each main step to guide your progress.

Crochet Wine Tote Bag Pattern crochet pattern - detailed view of completed project

You will start with a small round base, increase to form the bottle bottom and then work straight rows for the body. The pattern is great for making personalized holiday gifts or quick craft market items.

Why You'll Love This Crochet Wine Tote Bag Pattern

I absolutely love this pattern because it turns simple stitches into an elegant, useful gift-ready piece. I enjoy how the round base grows into a neat bottle shape with only a few increases and then becomes decorative with perforated squares. I also love the option to switch to velvet yarn for a soft festive trim that looks professional. Making straps that you can adjust for length makes the tote versatile and fun to customize.

Crochet Wine Tote Bag Pattern step 1 - construction progress Crochet Wine Tote Bag Pattern step 2 - assembly progress Crochet Wine Tote Bag Pattern step 3 - details and accessories Crochet Wine Tote Bag Pattern step 4 - final assembly and finishing

Switch Things Up

I love customizing this tote by changing yarn colors โ€” try a neutral main color with a gold velvet trim for a classy holiday look.

I often lengthen or shorten the straight body rows to fit different bottle heights; measure the bottle as you go to get a perfect fit.

I sometimes use bulky cotton instead of macrame yarn for a sturdier, more structured tote that stands up on its own.

You can make the perforated band wider or narrower by adding more central repeat rows of the 4-ch squares for a different decorative effect.

I like adding a small pocket on the inside by crocheting a rectangle and sewing it in before finishing the top row โ€” perfect for a gift note.

Switch to a contrasting color for the straps to create a bold statement, or braid three thinner yarns together for a textured handle.

If I want a luxe finish, I replace the velvet trim with faux fur or a knitted cuff for extra softness and presentation.

To make a smaller version for mini bottles, I use lighter yarn and a smaller hook, reducing initial rounds proportionally.

I sometimes reinforce strap attachment points with a couple of stitches of sewing thread for added strength when gifting filled bottles.

If I want a reusable gift set, I crochet a matching tag or small sachet to tuck inside the tote โ€” it makes the presentation extra special.

Common Mistakes & How to Fix Them

โœ— Skipping stitch counts during the increase rounds causes the base to become lopsided; always count stitches after each round to ensure even shaping. โœ— Working the hdc too tightly will make the tote stiff and hard to shape; maintain a relaxed, consistent tension so the fabric remains flexible. โœ— Not securing strap joins tightly can make them slip when carrying a bottle; knot securely and weave in ends thoroughly at both strap attachment points. โœ— Rushing the perforated (square) rows can cause uneven gaps and misaligned squares; work slowly, count chains carefully and match the stitch positions on return rows.

Crochet Wine Tote Bag Pattern

Make a handmade crochet wine tote that's both stylish and practical. This pattern guides you through a round base, body shaping, decorative perforated rows and sturdy straps so you can present a bottle beautifully. Perfect for gifting or seasonal decor, you'll enjoy the textured stitches and a velvet-trim option for a festive finish. Follow step-by-step photos and clear instructions to create a snug, bottle-shaped carrier.

Intermediate 5-7 Hours

Materials Needed for Crochet Wine Tote Bag Pattern

โ€” Main Fabric

  • 01
    Macrame yarn (approx. 100 g) - main color (red shown)
  • 02
    White velvet yarn (approx. 20 g) - for optional top trim

โ€” Tools Required

  • 01
    Crochet hook size 4.5 mm
  • 02
    Scissors
  • 03
    Yarn needle for sewing in ends
  • 04
    Measuring tape or ruler
  • 05
    Stitch marker (optional)

Progress Tracker

0% Complete

โ€” Body :

Info :

Materials: 4,5 MM HOOK. 100 G MACRAME YARN, 20G WHITE VELVET YARN

Round 1 :

Make 6 ch, and connect to the first ch to form a ring. Make 10 hdc into the ring. Close the row by sinking into the top of the first hdc. With 2 ch go to the top row (we have reached the 2nd row). here we will make 2 hdc into each stitch. at the end of the row we will have a total of 20 hdc. it is important to proceed by counting. When we come to the end, connect to the top of the first hdc.

Round 2 :

Make 3 ch to go up to the 3rd row. make 1 more hdc into the same ch. (In the 2nd row we made 2 hdc into each ch. In the 3rd row we will advance the row by making 1 double 1 single.) 1 hdc on the next ch, 2 hdc on the next ch...When we come to the end, connect to the top of the first hdc.

Round 3 :

Let's move on to row 4 with 2 ch. in this row our work on all chains will be as follows; 1 hdc on 1ch, 1 hdc on the next 1 ch, 2 hdc single on the next 1 ch, 1 hdc double so when we complete the row, connect to the first hdc and close row 4. To move to row 5, make 2 ch. we will no longer increase. make 1 hdc on each ch. the trick here is to make the hdc ch sin only on the edge line. we do this for a complete curl. (picture a-b) When we complete the row, connect to the first hdc and close the 5th row. In rows 4 and 5, it will start to curl inwards and take the bottle form.

Round 4-13 :

In all the next 10 rows, when we close the row, we go to the top row with 1 ch. and we make 1 hdc on each ch.

Round 5 :

in this order, we go to the top row with 4 ch. (The reason why it is 4 is that we have moved to the perforated row) Skip 1 ch and make 1 dc on the 2nd ch. Make 1 ch, make 2 ch, skip 1 ch and make 1 dc on the next ch. complete the whole row like this. When closing the row, connect to the 3rd of the first 4 ch groups and close. When the row is completed, go up to the top row with 4 ch. make 1 dc on top of the dc in the next row. make 2 ch, make 1 dc on top of the next dc. so we will form squares. When closing the row, connect to the 3rd of the first group of 4 ch and close.

Round 6 :

in this order, we switch from perforated rows to straight rows again. in this order, we switch from perforated rows to straight rows again. In the bottom row, we made 2 ch between the squares. in this row, we will only work on 2 chs. we will complete the whole row by making 2 hdc in every 2 ch spaces. do not knit tightly in this row, knit more freely so that it does not tighten. When you reach the end of the row, connect to the first ch. Go to the top row with 1 ch. In this and the next 7 rows, we will make 1 ch on each ch. (total 8 row)

Round 7 :

we're moving on to making stalks. Let's make 40 ch. (you can extend the length here as much as you want. you can also do it by measuring here. Skip 8 ch and connect on the 9th ch. Here we must make it tight while connecting. we will call it a belt. we will complete the belt by making 1 hdc on each ch kin on the belt. connect to the beginning and cut the rope. knot tightly. Count 4 ch from the end of the arch and tie into ch 5. Make 40 ch. (this will be the 2nd arch.) skip 8 ch and tie tightly to the 9th ch. go back and make 1 hdc in all ch. tie at the beginning and cut the rope. knot tightly.

Round 8 :

and in this order we switch to velvet thread. the trick here. after knitting the straps, I continue with velvet because I want the straps to stay inside. follow this way for a more beautiful look. Since the velvet rope is fluffy, it may be difficult for you to see the chains. try to understand with your hand. we will continue in this way for a total of 2 rows by making 1 ch on each ch.

Info :

general view: for the perforated areas here; if you want, you can decorate it with velvet threads. If you want, you can write a cute note on the note paper and tie it. Or you can keep it simple.

Assembly Instructions

  • Securely knot and weave in the ends of the braided strap (made from 40 ch) and attach it to the tote side loops where noted; tie the connections tightly and sew through multiple times for strength.
  • When forming the perforated square band, close each 4-ch group by joining to the 3rd ch as instructed so the squares line up; confirm alignment before cutting yarn.
  • Switch to velvet yarn for the final 2 rows at the top and work 1 ch on each st to create a fluffy trim; hide the strap ends inside the velvet trim for a neat finish.
  • Measure with a bottle as you work to ensure the height and circumference fit; add or remove straight rows to adjust for taller or shorter bottles.

Important Notes

  • ๐Ÿ’กCount stitches after each round during increases to keep the round base even and avoid shape distortion.
  • ๐Ÿ’กDo not crochet too tightly on the 2 hdc in 2 ch spaces row; looser tension prevents the body from tightening and allows the bottle to slip in.
  • ๐Ÿ’กKnot strap ends tightly and weave in securely so they do not loosen when carrying a filled bottle.
  • ๐Ÿ’กUse the velvet yarn for the top trim if you want straps to be concealed and to achieve a soft, festive finish.

This wine tote makes a heartfelt handmade gift, perfect for holidays and celebrations. It combines simple stitches with thoughtful shaping to hold a bottle snugly. Add a velvet trim and a handwritten note for a special finishing touch. ๐ŸŽ๐Ÿท

You ask,

we answer.

FAQs

What size bottle does this tote fit?

The tote is designed to hold a standard 750 ml wine bottle; adjust the number of straight rows if you need it taller or shorter.

Can I use different yarn weights?

Yes, but changing yarn weight will affect final size and structure; use an appropriate hook and consider adding extra rows or stitches to compensate.

Is the pattern suitable for beginners?

This pattern is rated intermediate because it uses increases, perforated rows and strap construction; basic knowledge of HDC and DC is recommended.

How long does this project take to complete?

Most crocheters finish this tote in about 5-7 hours, depending on experience and any customizations you make.