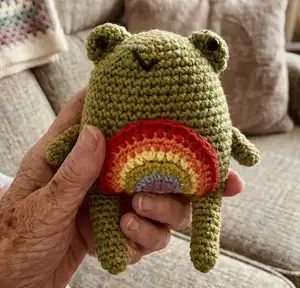
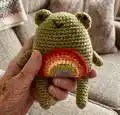
Make a cheerful Pride Frog to celebrate love and diversity with this colorful amigurumi crochet pattern. You will create a soft, squishy frog body, cute eyes, arms and legs, and a removable rainbow or pride patch to customize your frog. Clear step-by-step instructions and photos guide you through shaping, color changes, and assembly so you can finish a delightful handmade gift.
Progress Tracker
0% Complete
— Materials :
Info :
Worsted Weight yarn: Green for Frog. Rainbow Flag: Red, Orange, Yellow, Green, Blue and Purple. Trans Flag: Light Blue, Pink and White. Non-Binary Flag: Yellow, White, Purple and Black. 1- pair size 9.00 mm black safety eyes with washers. Scrap of Black yarn or thread (for nose embroidery). Poly-fill stuffing. Size G crochet hook. Yarn Needle. Stitch Marker.
— Abbreviations :
Infos :
sc = Single Crochet. hdc = Half-Double Crochet. 2sctog = single crochet 2 stitches together (decrease). 2scinc = single crochet twice in the same single crochet stitch (increase). 2hdcinc = Half-Double crochet twice in the same stitch (increase).
— Frog Body :
Round 1 :
Make a ring, sc 6 times into ring (6) (Remember to mark last stitch of each round)
Round 2 :
(starting in 1st sc on the ring) 2scinc in each stitch around (12)
Round 3 :
*2scinc, sc the next stitch * repeat between in *'s across (18)
Round 4 :
*2scinc, sc in each of the next 2 stitches once each * repeat between in *'s across (24)
Round 5 :
*2scinc, sc in each of the next 3 stitches once each * repeat between in *'s across (30)
Round 6 :
*2scinc, sc in each of the next 4 stitches once each * repeat between in *'s across (36)
Round 7 :
*2scinc, sc in each of the next 5 stitches once each * repeat between in *'s across (42)
Round 8-23 :
Sc around (72)
Round 24 :
*2sctog, sc in each of the next 5 stitches once each * repeat between in *'s across (36)
Info :
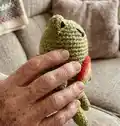
End- cut yarn leaving a 16 inch yarn tail and pull thru last stitch, you will use this yarn tail to sew the body closed, but first stuff the body firmly. Now, sew the body closed with the yarn tail across the last row as in photos.
— Arms :
Round 1 :
With Green yarn, (make 2) Make a ring, sc 8 times into ring (8) (Remember to mark last stitch of each round)
Round 2 :
(starting in 1st sc on the ring) sc in each stitch around (8)
Info :
End- slip stitch to next stitch, cut yarn leaving a 10 inch yarn tail and pull thru. You will use this yarn tail to sew arms to body at either side.
— Legs :
Round 1 :
With Green yarn, (make 2) Make a ring, sc 8 times into ring (8) (Remember to mark last stitch of each round)
Round 2 :
(starting in 1st sc on the ring) sc in each stitch around (8)
Round 3-12 :
Sc around (8)
Info :
End- slip stitch to next stitch, cut yarn leaving a 10 inch yarn tail and pull thru. You will use this yarn tail to sew legs to the bottom of the body.
— Eyes :
Round 1 :
With Green yarn, (make 2) Make a ring, sc 6 times into ring (6) (Remember to mark last stitch of each round)
Round 2 :
(starting in 1st sc on the ring) 2scinc in each stitch around (12)
Info :
End- slip stitch to next stitch, cut yarn leaving a 10 inch yarn tail and pull thru. You will use this yarn tail to eyes to top body, but first you will need to secure the black safety eyes to the inside of the eye pieces with the washers. Next stuff each eye lightly. Arrange and sew each eye to the top of the body with the yarn tail.
Info :
Now with a scrap of black yarn, or thread, embroider a simple "V" for the frog's mouth at the top of the body just below the eyes.
— Rainbow Patch :
Row 1 :
Start with Purple yarn, chain 2. In the 2nd chain from hook make 4 sc stitches (4)
Row 2 :
ch 1, turn: 2scinc in the first stitch, 2hdcinc in each of the next 2 stitches, 2scinc in the last stitch (8)
Info :
Change to Blue Yarn
Row 3 :
ch 1, turn: 2scinc in the first stitch, sc the next stitch, *2hdcinc, hdc the next stitch * twice, 2scinc in the next stitch, sc the last stitch (12)
Info :
Change to Green Yarn
Row 4 :
ch 1, turn: 2scinc in the first stitch, sc in each of the next 2 stitches, *2hdcinc, hdc in each of the next 2 stitches * twice, 2scinc in the next stitch, sc each of the last 2 stitches (16)
Info :
Change to Yellow Yarn
Row 5 :
ch 1, turn: 2scinc in the first stitch, sc in each of the next 3 stitches, *2hdcinc, hdc in each of the next 3 stitches * twice, 2scinc in the next stitch, sc each of the last 3 stitches (20)
Info :
Change to Orange Yarn
Row 6 :
ch 1, turn: 2scinc in the first stitch, sc in each of the next 4 stitches, *2hdcinc, hdc in each of the next 4 stitches * twice, 2scinc in the next stitch, sc each of the last 4 stitches (24)
Row 7 :
ch 1, turn: 2scinc in the first stitch, sc in each of the next 5 stitches, *2hdcinc, hdc in each of the next 5 stitches * twice, 2scinc in the next stitch, sc each of the last 5 stitches (28)
Info :
End- cut yarn leaving a 20 inch yarn tail and pull thru last stitch, you will use this yarn tail to sew the rainbow patch to the Body piece. First arrange the rainbow at the body, so that the flat portion aligns with the sewn edge of the body, with yarn tail sew all along the rainbow to secure.
— Trans Patch :
Row 1 :
Start with Light Blue yarn, chain 2. In the 2nd chain from hook make 4 sc stitches (4)
Row 2 :
ch 1, turn: 2scinc in the first stitch, 2hdcinc in each of the next 2 stitches, 2scinc in the last stitch (8)
Info :
Change to Pink Yarn
Row 3 :
ch 1, turn: 2scinc in the first stitch, sc the next stitch, *2hdcinc, hdc the next stitch * twice, 2scinc in the next stitch, sc the last stitch (12)
Info :
Change to White Yarn
Row 4 :
ch 1, turn: 2scinc in the first stitch, sc in each of the next 2 stitches, *2hdcinc, hdc in each of the next 2 stitches * twice, 2scinc in the next stitch, sc each of the last 2 stitches (16)
Info :
Change to Pink Yarn
Row 5 :
ch 1, turn: 2scinc in the first stitch, sc in each of the next 3 stitches, *2hdcinc, hdc in each of the next 3 stitches * twice, 2scinc in the next stitch, sc each of the last 3 stitches (20)
Info :
Change to Light Blue Yarn. End- cut yarn leaving a 20 inch yarn tail and pull thru last stitch, you will use this yarn tail to sew the patch to the Body piece. First arrange the patch at the body, so that the flat portion aligns with the sewn edge of the body, with yarn tail sew all along the patch to secure.
— Non-Binary Patch :
Row 1 :
Start with Black yarn, chain 2. In the 2nd chain from hook make 4 sc stitches (4)
Row 2 :
ch 1, turn: 2scinc in the first stitch, 2hdcinc in each of the next 2 stitches, 2scinc in the last stitch (8)
Info :
Change to Purple Yarn
Row 3 :
ch 1, turn: 2scinc in the first stitch, sc the next stitch, *2hdcinc, hdc the next stitch * twice, 2scinc in the next stitch, sc the last stitch (12)
Row 4 :
ch 1, turn: 2scinc in the first stitch, sc in each of the next 2 stitches, *2hdcinc, hdc in each of the next 2 stitches * twice, 2scinc in the next stitch, sc each of the last 2 stitches (16)
Info :
Change to White Yarn
Row 5 :
ch 1, turn: 2scinc in the first stitch, sc in each of the next 3 stitches, *2hdcinc, hdc in each of the next 3 stitches * twice, 2scinc in the next stitch, sc each of the last 3 stitches (20)
Row 6 :
ch 1, turn: 2scinc in the first stitch, sc in each of the next 4 stitches, *2hdcinc, hdc in each of the next 4 stitches * twice, 2scinc in the next stitch, sc each of the last 4 stitches (24)
Info :
Change to Yellow Yarn
Row 7 :
ch 1, turn: 2scinc in the first stitch, sc in each of the next 5 stitches, *2hdcinc, hdc in each of the next 5 stitches * twice, 2scinc in the next stitch, sc each of the last 5 stitches (28)
Row 8 :
ch 1, turn: 2scinc in the first stitch, sc in each of the next 6 stitches, *2hdcinc, hdc in each of the next 6 stitches * twice, 2scinc in the next stitch, sc each of the last 6 stitches (32)
Info :
End- cut yarn leaving a 20 inch yarn tail and pull thru last stitch, you will use this yarn tail to sew the rainbow patch to the Body piece. First arrange the rainbow at the body, so that the flat portion aligns with the sewn edge of the body, with yarn tail sew all along the rainbow to secure.
— Finishing / Assembly :
Info :
Sew the body closed using the 16 inch yarn tail across the last row after stuffing. Attach arms to the sides of the body using the 10 inch yarn tails and whipstitch securely. Sew legs to the bottom of the body using the 10 inch yarn tails, spacing evenly for balance. Attach eyes to the top of the body: secure safety eyes with washers to the inside of the eye pieces, stuff lightly, then sew the eye pieces to the top of the head. Sew patch to the front of the body aligning the flat portion with the sewn edge and stitch along the curve with the long tail. Embroider a small V mouth with black yarn just below the eyes.
Make a small, meaningful frog to celebrate pride and share love with friends and family. These frogs are quick to make, endlessly customizable with rainbow or flag patches, and perfect as little gifts or keepsakes. Try different colorways and give them as tokens of support and joy! 🐸🌈🧶