🧢 Beautiful ✨ Detailed πŸ’ Adorable

Crochet Emotional Support Pickle Amigurumi Pattern

Crochet Emotional Support Pickle Amigurumi Pattern
4.3β˜… Rating
2-3 Hours Time Needed
1.5K Made This
βœ‚οΈ

Intermediate Level

Ideal for those with basic crochet experience, featuring slightly more advanced stitches and techniques to expand your skills.

⏱️

Bite-Sized Project

Finishes in 2-4 hoursβ€”perfect for an afternoon of creative relaxation.

🧸

Cute Companion

An adorable friend to cherish, handcrafted with love to bring comfort and joy for years to come.

About This Crochet Emotional Support Pickle Amigurumi Pattern

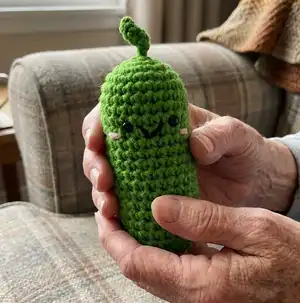
This pattern creates a small, cuddly Emotional Support Pickle with a curled stem, embroidered smile and tiny crochet hands. It uses a magic ring and works mainly in single crochet rounds for a neat amigurumi finish. The pattern includes clear photos and step-by-step instructions for placement of eyes, mouth and cheeks.

Crochet Emotional Support Pickle Amigurumi Pattern crochet pattern - detailed view of completed project

Youll get explicit rounds for the stem, body and hands plus assembly notes and finishing tips. A printable sign template and full materials list are also included.

Why You'll Love This Crochet Emotional Support Pickle Amigurumi Pattern

I absolutely love this pattern because it turns a simple idea into a cheerful, pocket-sized companion that spreads smiles. I designed the curled stem to be quick to make and playful, and the little hands and sign give the pickle personality. I enjoy how the pattern teaches tidy finishing techniques like invisible decrease and securing facial embroidery. Making multiples is addictive β€” theyre fast to crochet and make thoughtful gifts for friends.

Crochet Emotional Support Pickle Amigurumi Pattern step 1 - construction progress Crochet Emotional Support Pickle Amigurumi Pattern step 2 - assembly progress Crochet Emotional Support Pickle Amigurumi Pattern step 3 - details and accessories Crochet Emotional Support Pickle Amigurumi Pattern step 4 - final assembly and finishing

Switch Things Up

I love how easy it is to customize this pickle: change the yarn color to make a whole family of pickles in pastel or neon shades.

Want a keychain? Use thinner yarn and a smaller hook to create a mini version perfect for bags and keys.

For a plush, squishier version, use bulky yarn and a larger hook to scale it up and get a cuddly companion.

I often add tiny crocheted accessories like scarves, hats or tiny signs with different messages for varied occasions.

You can embroider different expressions to change the personality β€” try a sleepy face, surprise mouth, or a wink to create characters.

If you prefer safety-free toys, embroider the eyes with yarn instead of using safety eyes for a child-safe version.

I sometimes add a loop at the top of the stem to hang it as an ornament by using a few extra chains before finishing.

Try contrast-color hands or cheeks to make facial features pop and give more visual interest to the finished piece.

For added posability, insert a short piece of wire in each hand or stem before sewing closed, but make sure to cover wire ends safely inside stuffing.

I recommend experimenting with stuffing amounts to vary firmness β€” less stuffing gives a floppy look while more creates a firmer pocket pal.

Common Mistakes & How to Fix Them

βœ— Skipping stitch markers when working in continuous rounds causes you to lose track of the beginning of the round; place a marker at the start or end of each round to consistently identify your position. βœ— Overstuffing the body will distort the shape and make closing the hole difficult; stuff gradually, shaping as you go and add only firm but moderate stuffing to retain the pickle silhouette. βœ— Not pulling the magic ring tail tight enough can leave a visible hole at the top; after you make the sl st in the MR, pull both strings on the hook tight so the sl st becomes smaller and closes neatly. βœ— Forgetting to check right side out will give messy V stitches on the outside; always ensure the right side with neat V stitches faces out before continuing and keep the magic ring tail inside the work.

Crochet Emotional Support Pickle Amigurumi Pattern

Make a tiny, smiley Emotional Support Pickle you can gift or carry for a quick mood boost. This pattern guides you step-by-step through crocheting the curled stem, body, embroidered face and little hands with clear photos and tips. Youll learn invisible decrease, how to place safety eyes, and how to finish the piece neatly so it looks professional. Perfect as a thoughtful handmade gift or a cute desk companion.

Intermediate 2-3 Hours

Materials Needed for Crochet Emotional Support Pickle Amigurumi Pattern

β€” Main Fabric

  • 01
    5 Ply Cotton Yarn (Green) - primary color for body and stem (amount as needed for one small pickle)
  • 02
    Small amounts of black yarn - for mouth embroidery and details
  • 03
    Small amounts of pink yarn - for cheeks (two small yarn scraps)
  • 04
    Additional green scrap for hands if desired

β€” Tools Required

  • 01
    Crochet hook size 3.5mm
  • 02
    Yarn needle for sewing and embroidery
  • 03
    Stitch marker
  • 04
    Scissors
  • 05
    Polyester stuffing
  • 06
    Hot melt glue
  • 07
    6mm diameter safety eyes (2 pieces)
  • 08
    Printer to print the sign and card (You need to know how to print!)

Progress Tracker

0% Complete

β€” Notes :

Info :

Front loop is always the loop that is closest to you. When working in the round, start with a magic circle, then crochet continuously without joining with a slip stitch at the end of the round. This will ensure you do not end up with an inaesthetic seam. Use a stitch marker at the beginning or end of each round to keep track of your position. When you make sc in amigurumi, you could use yarn under method to make "X" stitches or use yarn over method to make "V" stitches. I make "V" stitches in this pattern. Make sure the project is right side out. The right side has neat V stitches. The yarn tail from the magic ring should be inside the work.

Info :

How to make invisible decrease: Go into the front loop with your hook. Then go into the next front loop with your hook. Yarn over and pull through both of these front loops. Yarn over and pull through these two loops.

Info :

How to make sl st smaller so that the inaesthetic seam will be invisible: After you make sl st, pull the two strings on the hook tight, so that the sl st will be smaller.

β€” Stem and Body :

Info :

Start with a magic circle Ch7 in MR(pic.1). Grab the top loop of the 2nd chain to make a sc(pic.2). Continue making 5sc (pic.3). Don’t press the stem. Make it curl naturally. Make a sl st in MR and pull the two strings on the hook tight, so that the sl st will be smaller. (page 4) Ch1 as turning chain (pic.4) The sl st and turning ch do not count as stitches. Then making the body.

Round 1 :

MR of 6sc (pic.5) (6)

Round 2 :

6 inc (12)

Round 3 :

(sc, inc)* 6 (18)

Round 4 :

(sc, inc, sc)* 6 (24)

Round 5-11 :

24sc (24)

Info :

Place eyes and sew mouth & cheeks. (page 7-9) Body Part 2 in page 9.

β€” Place eyes, sew mouth and cheek :

Info :

Eyes are placed between R8-R9. There are 3 holes between the eyes.

Step 1 :

Use 2 ply black yarn to sew mouth.

Step 2 :

Needle out from the first hole between eyes.

Step 3 :

Needle in from the 3rd hole between eyes.

Step 4 :

Needle out from the middle hole of 1 row below.

Step 5 :

Needle under the black yarn and pull the yarn down to a "V" shape.

Step 6 :

Needle in from the same middle hole of 1 row below. Use yarn tails to tie a double knots inside.

Info :

Use pink yarn to sew cheeks on the both sides.

β€” Body :

Round 12-21 :

24sc (24)

Info :

Stuffing (add stuffing as you continue to shape the body).

Round 22 :

(sc, dec, sc)* 6 (18)

Round 23 :

(sc, dec)* 6 (12)

Round 24 :

3 dec (9)

Info :

Make a sl st. Stuffing a little more. Leave about 15cm (5.9inches) and cut yarn. Pass the needle through the front loops of all 9 stitches and pull tight to close the hole, then weave in the tail end.

β€” Hand*2 :

Item Hand (P1) :

Ch 8, go into the 3rd stitch from the hook and do 6dc, ch1, leave long tail and cut yarn. Sew them on the body.

Info :

Print sign on card and glue it on the body. I print the sign file on 5"*7" card and cut each sign.

Assembly Instructions

  • Place safety eyes between rounds 8-9, leaving three holes between the eyes for correct placement before sewing the mouth.
  • Sew the mouth using 2-ply black yarn following the step sequence: needle out from first hole, in at third hole, out at middle hole one row below, pull yarn to form a V, then needle in and secure with double knots inside.
  • Sew the two small crochet hands onto the body sides using the long tails; position them so they appear to hold the printed sign and stitch securely from inside.
  • Stuff the body gradually through rounds 12-21, then complete rounds 22-24; leave a 15cm tail, pass the needle through the front loops of the final 9 stitches and pull tight to close, then weave in the tail.
  • Sew small pink yarn cheeks on both sides of the face using small stitches and hide tails inside the toy.

Important Notes

  • πŸ’‘When working in the round, start with a magic circle and crochet continuously without joining with a slip stitch at the end of each round to avoid an obvious seam.
  • πŸ’‘Use a stitch marker at the beginning or end of each round to keep track of your position and avoid losing rounds.
  • πŸ’‘Stuff gradually and evenly; add small amounts of stuffing while shaping to prevent lumps and maintain the pickle silhouette.
  • πŸ’‘Make the sl st in the magic ring small by pulling the two strings on the hook tight so the top closes neatly.

This little Emotional Support Pickle is a tiny hug you can hold whenever you need a smile. Handcrafted details like the curled stem, embroidered mouth, and tiny hands make it extra lovable. Make one to keep, gift, or tuck into a lunchbox for a thoughtful surprise. πŸ§ΆπŸ˜ŠπŸ€

You ask,

we answer.

FAQs

What size will the finished piece be?

The finished pickle measures approximately 12 cm (4.7 inches) tall with a diameter of about 5 cm (1.96 inches) when using 5-ply cotton yarn and a 3.5 mm hook.

Can I use different yarn weights for this pattern?

Yes, you can use different yarn weights, but this will change the finished size; choose an appropriate hook for the yarn and expect a larger or smaller result.

Do I need prior crochet experience for this pattern?

This pattern is rated intermediate; familiarity with magic ring, single crochet, increases, invisible decreases, and basic embroidery helps for best results.

How long does this project typically take to complete?

Most crocheters finish this petite pickle in about 2-3 hours, depending on experience and how much time you spend on finishing and embroidery.