🧢 Beautiful ✨ Detailed πŸ’ Adorable

Crochet Donut Pillow Pattern

Crochet Donut Pillow Pattern
4.0β˜… Rating
5-7 Hours Time Needed
3.6K Made This
βœ‚οΈ

Intermediate Level

Ideal for those with basic crochet experience, featuring slightly more advanced stitches and techniques to expand your skills.

⏱️

Weekend Treat

Takes 5-7 hours, making it an enjoyable project to finish over a couple of days.

🏑

Cozy Accent

A warm touch for your space that transforms ordinary corners into inviting nooks filled with handmade charm.

About This Crochet Donut Pillow Pattern

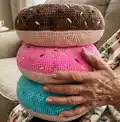
This pattern creates a plush, round donut pillow with a contrasting frosting band and embroidered sprinkles. It uses soft, chenille-style yarn for a velvety finish and a tight gauge to hold stuffing. The instructions include shaping rounds, a back-loop color-change row for the frosting edge, and step-by-step decorating guidance.

Crochet Donut Pillow Pattern crochet pattern - detailed view of completed project

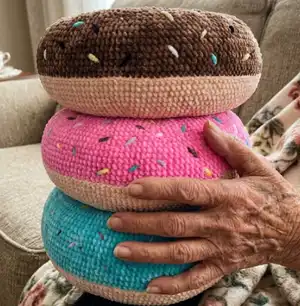
You will make one donut approximately 12.2 inches (29 cm) wide using the recommended yarn and hook. The pattern includes detailed round-by-round instructions and clear finishing and decoration steps.

Why You'll Love This Crochet Donut Pillow Pattern

I absolutely love this pattern because it turns simple stitches into a charming, tactile home accessory that always draws smiles. I enjoy the shaping challenge β€” increasing and decreasing rounds create a satisfying, even donut form. The decoration step is my favorite: adding colorful sprinkles makes each pillow unique and playful. I also appreciate that the pattern is adaptable β€” you can change yarn colors and weights to create minis or oversized cushions.

Crochet Donut Pillow Pattern step 1 - construction progress Crochet Donut Pillow Pattern step 2 - assembly progress Crochet Donut Pillow Pattern step 3 - details and accessories Crochet Donut Pillow Pattern step 4 - final assembly and finishing

Switch Things Up

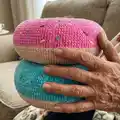
I love customizing this donut pillow by changing the frosting color and sprinkle shades for different moods and rooms.

I often use pastel yarns for a soft nursery look or bold brights for playful living room accents.

If you want a mini keychain version, switch to a lighter weight yarn and a smaller hook to reduce the diameter.

To make a chunky, huggable pillow, choose a bulky chenille yarn and increase the hook size β€” youll get a plush, larger donut.

I sometimes embroider tiny hearts or initials among the sprinkles to personalize gifts for friends and family.

Try changing the number of rows in the middle band to make a slimmer or thicker frosting layer for variety.

I like adding a removable cover by crocheting two identical halves and sewing them with a zipper hidden in the seam for easy washing.

For extra durability, double the sprinkle yarn when inserting so the colors sit up a bit more and are less likely to pull out.

I also experiment with combining yarn textures β€” a sparkly or metallic yarn for sprinkles adds a playful sparkle that catches the eye.

Finally, mix and match color blocks around the donut to create striped or patterned frosting effects for truly unique cushions.

Common Mistakes & How to Fix Them

βœ— Skipping the back-loop row (Round 24) will hide the frosting edge; be sure to work only into the back loops on that round to create the neat frosting seam; βœ— Overstuffing the donut before closing the hole can distort the shape; stuff gradually and sew a little, then add more stuffing as needed for a smooth finish; βœ— Not passing the long yarn end through the last loop makes closing the hole messy; pass the long end through the last loop, fold and sew the opening securely as shown; βœ— Forgetting to count stitches after increases or decreases leads to uneven shaping; count your stitches frequently, especially after rounds with INC or DEC, to maintain the correct stitch count;

Crochet Donut Pillow Pattern

Make a delightful crochet donut pillow that doubles as a cozy cushion and playful decor. This pattern walks you through creating a plush donut shape with a contrasting frosting band and embroidered sprinkles. Youll learn shaping, color changes, back-loop techniques, and how to finish and decorate for a polished result. Perfect for gifting or brightening your home with a handmade touch.

Intermediate 5-7 Hours

Materials Needed for Crochet Donut Pillow Pattern

β€” Main Fabric

  • 01
    Himalaya Dolphin Baby - color peach - 80333 - 100% Polyester (main yarn, quantity: approx two skeins depending on tension)
  • 02
    Himalaya Dolphin Baby - color pink - 80303 - 100% Polyester (alternate/main color for frosting, quantity: approx two skeins depending on tension)
  • 03
    Small amounts of contrasting polyester or cotton yarns for donut decoration (sprinkles) - several colors, small skeins
  • 04
    Fiberfill stuffing - approx 150 grams per donut pillow

β€” Tools Required

  • 01
    Crochet hook size 3.5 mm (Hook No: 3.5)
  • 02
    Fiberfill (approximately 150 grams is enough for one donut pillow)
  • 03
    Long needle (for sewing and decoration)
  • 04
    Scissors
  • 05
    Polyester or cotton yarns for donut decoration and stitching

Progress Tracker

0% Complete

β€” Donut :

Round 1 :

1 Rnd=Start crochet the bottom of donut pillow with peach color 36 CH then connect in a ring (36)

Round 2 :

2 Rnd=36 SC (36)

Round 3 :

3 Rnd= (2 SC,1 INC) *12 (48)

Round 4 :

4 Rnd= 48 SC (48)

Round 5 :

5 Rnd= (3 SC,1 INC) *12 (60)

Round 6 :

6 Rnd= (4 SC,1 INC) *12 (72)

Round 7 :

7 Rnd= 72 SC (72)

Round 8 :

8 Rnd= (5 SC,1 INC) *12 (84)

Round 9 :

9 Rnd= (6 SC,1 INC) *12 (96)

Round 10 :

10 Rnd= 96 SC (96)

Round 11 :

11 Rnd= (7 SC,1 INC) *12 (108)

Round 12 :

12 Rnd= 108 SC (108)

Round 13 :

13 Rnd= (8 SC,1 INC) *12 (120)

Round 14 :

14 Rnd= 120 SC (120)

Round 15 :

15 Rnd= (9 SC,1 INC) *12 (132)

Round 16 :

16 Rnd= 132 SC (132)

Round 17 :

17 Rnd= (10 SC,1 INC) *12 (144)

Round 18 :

18 Rnd= 144 SC (144)

Round 19 :

19 Rnd= (11 SC,1 INC) *12 (156)

Round 20-23 :

20-23 Rnds= 4 Rows 15 SC (156)

Round 24 :

24 Rnd= CC and crochet this row with a hook only for the back loops.

Round 25-30 :

25-30 Rnds= 6 Rows 156 SC (156)

Round 31 :

31= (11 SC,1 DEC) *12 (144)

Round 32 :

32= 144 SC (144)

Round 33 :

33= (10 SC,1 DEC) *12 (132)

Round 34 :

34= 132 SC (132)

Round 35 :

35= (9 SC,1 DEC) (120)

Round 36 :

36= 120 SC (120)

Round 37 :

37= (8CS,1 DEC) *12 (108)

Round 38 :

38= 108 SC (108)

Round 39 :

39= (7 SC,1 DES) *12 (96)

Round 40 :

40= 96 SC (96)

Round 41 :

41= (6 SC,1 DEC) *12 (84)

Round 42 :

42= (5 SC,1 DEC) *12 (72)

Round 43 :

43= 72 SC (72)

Round 44 :

44= (4 SC,1 DEC) *12 (60)

Round 45 :

45= (3 SC,1 DEC) *12 (48)

Round 46 :

46= 48 SC (48)

Round 47 :

47= (2 SC,1 DEC) *12 (36)

Round 48 :

48= 36 SC (36)

Info :

Pass the long end of the yarn through the last loop of the stitch. Fold the donut as in the picture and start sewing up the hole.

Info :

Here I used dark cotton yarn to show how I sew up the hole. Sew a little and be sure to stuff the donut with fiberfill and again sew a little and stuff the donut...

Info :

This is result without the donut decoration.

Item Name (Decoration) :

Let’s start decoration the pillow. 1.insert a needle with yarn from the bottom of donut.

Round :

2.After pulling out the needle, insert it nearby, stepping back two centimeters.

Round :

3.Repeat this with different colors of yarn until you decorate the donut.

Info :

4.At the end, stick the yarn back from where you started to insert the needle.

Info :

5.Tie 2 ends of the yarn and hide inside.

Info :

Congratulation! Your Donut is finished!

Assembly Instructions

  • Pass the long end of the yarn through the last loop, fold the donut in half as pictured, and start sewing up the hole with small stitches.
  • Sew a little, then stuff the donut with fiberfill gradually, alternating sewing and stuffing to achieve an even shape.
  • When closing the hole, use a long needle and hide the knot inside the donut for a clean finish.
  • Decorate by inserting a needle with colored yarn from the bottom, pulling out and reinserting nearby stepping back about two centimeters to form sprinkles.
  • Tie the two ends of each sprinkle yarn securely and tuck the ends back inside the donut to hide them.

Important Notes

  • πŸ’‘Work the back-loop only row (Round 24) carefully to create a clear edge for the frosting; use a stitch marker to identify the start of the round.
  • πŸ’‘Stuff gradually and evenly while sewing the hole closed to prevent lumps and maintain the donut shape.
  • πŸ’‘Secure all yarn ends by tying and hiding them inside the pillow to prevent unraveling and keep a neat finish.
  • πŸ’‘Use the recommended hook size and tight tension as noted to achieve the intended size of about 12.20 inches (29 cm).
  • πŸ’‘When decorating with sprinkles, use small lengths of yarn and knot them inside to keep the outside tidy.

This sweet donut pillow pattern is a fun, tactile project that brightens any room with a handmade touch. 🧢 It combines simple amigurumi shaping with a playful decoration step so you can personalize colors and sprinkles. 🍩 Make one for yourself or as a charming, cozy giftβ€”each pillow is unique and delightful to create. ✨

You ask,

we answer.

FAQs

What size will the finished piece be?

The finished pillow measures approximately 12.20 inches (29 centimeters) in diameter when using the recommended yarn and hook size.

Can I use different yarn weights for this pattern?

Yes, you can substitute yarns, but the final size and texture will change; choose a suitable hook for your yarn and expect adjustments to yardage and finish.

Do I need prior crochet experience for this pattern?

This pattern is rated intermediate because it includes shaping, increases and decreases, and a back-loop color-change row; basic crochet experience is recommended.

How long does this project typically take to complete?

Most crocheters finish the donut pillow in about 5-7 hours, depending on experience, decoration complexity, and how tightly you crochet.