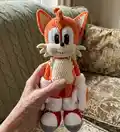
🧢 Beautiful ✨ Detailed πŸ’ Adorable

Copter-tailed Fox Amigurumi Pattern

Copter-tailed Fox Amigurumi Pattern
4.3β˜… Rating
12-15 Hours Time Needed
3.2K Made This
βœ‚οΈ

Intermediate Level

Ideal for those with basic crochet experience, featuring slightly more advanced stitches and techniques to expand your skills.

⏱️

Multi-Day Project

A rewarding 12+ hour journeyβ€”perfect for dedicated crafters who love detailed work.

🧸

Cute Companion

An adorable friend to cherish, handcrafted with love to bring comfort and joy for years to come.

About This Copter-tailed Fox Amigurumi Pattern

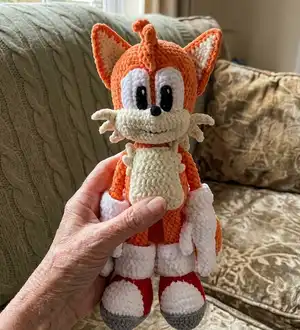
This pattern creates a plush copter-tailed fox amigurumi worked mainly in plush yarn with contrasting details. The design includes arms with gloves, detailed fingers, two tails, and shaped legs and shoes for a classic toy look. Techniques include working in spiral, color changes, front/back loop work, and attaching parts as you crochet.

Copter-tailed Fox Amigurumi Pattern crochet pattern - detailed view of completed project

Detailed photos and notes explain shifting of the round beginning and color-change points. The finished toy stands approximately 35 cm tall when made with the recommended yarn and hook.

Why You'll Love This Copter-tailed Fox Amigurumi Pattern

I absolutely love this pattern because it combines soft plush textures with playful shaping to create a cuddly fox full of character. I enjoy the way the tails and gloves add personality and allow for fun color work while remaining approachable. Sewing parts as you crochet makes assembly neat and helps the finished toy hold its shape. The pattern taught me useful tricks for shifting round starts and working neat color transitions, which I always appreciate in my amigurumi projects.

Copter-tailed Fox Amigurumi Pattern step 1 - construction progress Copter-tailed Fox Amigurumi Pattern step 2 - assembly progress Copter-tailed Fox Amigurumi Pattern step 3 - details and accessories Copter-tailed Fox Amigurumi Pattern step 4 - final assembly and finishing

Switch Things Up

I love experimenting with colors on this fox; try pastel shades for a soft nursery friend or bold hues for a playful statement piece.

You can make the toy larger or smaller by changing yarn weight and hook size β€” bulky plush yarn with a larger hook makes a cuddly, oversized fox while thinner yarn creates a tiny keychain-friendly version.

I often swap the glove and shoe colors to create seasonal versions, like using deep greens and golds for a festive look or greys and blues for a winter fox.

Try replacing the plush yarn for the belly or muzzle with a cotton yarn to make textured contrast and sharper detail in those areas.

I sometimes add embroidered eyelashes, felt eyebrows, or tiny crocheted accessories like a scarf or hat to personalize each fox.

If you want posable limbs, insert thin craft wire into the arms and legs before stuffing to give your fox holdable poses.

Change the tail shape by lengthening or shortening the tail rounds to create a bushier or sleeker silhouette that fits your style.

For safety when gifting to children, use embroidered pupils instead of safety eyes and secure all small parts with extra stitching.

I like to make matching miniature foxes by using the same stitch pattern but a smaller yarn/hook combo to build a coordinating family set.

Finally, consider making a display set: a sitting fox, a lying fox and a tiny fox baby to tell a story with your creations β€” they make wonderful handmade gifts and decor.

Common Mistakes & How to Fix Them

βœ— Skipping stitch markers during shaping leads to misplaced increases or decreases; use markers at key points and shift them when instructed to match the pattern. βœ— Forgetting to stuff as you go can make parts hard to shape later; stuff gradually, especially when the pattern notes to stuff in process for legs and tails. βœ— Cutting color threads too early creates loose ends and messy joins; when color changes are required keep the previous color tails and secure them only when instructed. βœ— Not checking the beginning-of-round shift causes misaligned color changes; follow the pattern guidance about shifting the stitch marker so your pattern matches the photos. βœ— Overstuffing palms or small details makes them bulky and changes proportions; stuff only as directed (e.g., stuff only the palm) and keep small amounts for tips.

Copter-tailed Fox Amigurumi Pattern

Make a charming copter-tailed fox amigurumi using plush yarn and clear step-by-step instructions. This pattern guides you through crocheting limbs, tails, gloves and shoes with helpful photos and shaping tips. You will enjoy making this cuddly fox for gifts or display, learning color changes and seamless assembly along the way.

Intermediate 12-15 Hours

Materials Needed for Copter-tailed Fox Amigurumi Pattern

β€” Main Fabric

  • 01
    Plush yarn (120 m/100 g) (131 yds/3.5 oz.) - Himalaya Dolphin Baby or YarnArt Dolce; main shade (orange) consumption 2 skeins
  • 02
    Other plush shades (white, ivory, grey, red, orange) - less than a half-skein each for accent colors
  • 03
    Cotton / semi-cotton yarn (~330 m/100 g) (361 yds/3.53 oz.) (YarnArt Jeans, Alize Cotton Gold, Gazzal Jeans) - black for pupils and nose
  • 04
    Cotton/semi-cotton to match plush yarn shades to sew details (optional)

β€” Tools Required

  • 01
    Crochet hook size 3.5 mm
  • 02
    Long needle for tightening (for plush yarn ~ 12 cm)
  • 03
    Nylon thread or any strong light thread for tightening
  • 04
    Needles for sewing body parts
  • 05
    Stitch markers
  • 06
    Pins with large head
  • 07
    Scissors
  • 08
    Fiber filling (polyester stuffing)
  • 09
    Yarn needle for weaving and assembly

Progress Tracker

0% Complete

β€” Arms :

Info :

*make 2 details. *stuff only the palms.

Thumb :

*white yarn. *don't stuff.

Round 1 :

6 SC in MR (6)

Round 2-5 :

4 rounds of 6 SC (6)

Info :

- work a CH, fold in half and crochet the sides together with 3 SC. - fix and cut the thread.

All other fingers (except the thumb) :

*white yarn. *make 4 details. *don't stuff.

Round 1 :

6 SC in MR (6)

Round 2-6 :

5 rounds of 6 SC (6)

Info :

- fix and cut the thread in 3 details. - when crocheting the last 4th detail, do NOT cut the thread and begin to join all 4 fingers.

Round 7 :

3 SC on the 1st finger, 3 SC on the 2nd finger, 3 SC on the 3rd finger, 6 SC on the 4th finger, 3 SC on the 3rd finger, 3 SC on the 2nd finger, 3 SC on the 1st finger (24)

Round 8-12 :

5 rounds of 24 SC (24)

Info :

- in Rd 13 we attach the thumb. - to make sure that the finger is exactly in its place, fold the detail in half along all the fingers and shift the stitch marker to the next SC from the fold line.

Round 13 :

left arm: SC, 3 SC with the thumb, 20 SC (24); right arm: 8 SC, 3 SC with the thumb, 13 SC (24)

Round 14 :

(10 SC, DEC)*2 (22)

Round 15 :

(9 SC, DEC)*2 (20)

Round 16 :

(3 SC, DEC)*4 (16)

Round 17 :

(2 SC, DEC)*4 (12)

Info :

- change thread color to orange, fix and cut the white thread.

Round 18 :

(4 SC, DEC)*2 (10)

Round 19 :

(3 SC, DEC)*2 (8)

Round 20 :

(2 SC, DEC)*2 (6)

Info :

- stuff only the palm so that it stays flat.

Round 21-30 :

10 rounds of 6 SC (6)

Info :

- (if needed) work several additional SCs so that the 1st finger is in one line with the fold line when folded.

Info :

- work a CH, fold in half and crochet the sides together with 3 SC. - fasten off.

Section :

The edge of the glove: *white yarn. *make 2 details. *make a turn and work a turning CH at the end of each row.

Round 0 :

Chain 22

Round 1 :

start in the 2nd chain from the hook: 21 SC

Round 2 :

BLO: 21 SC

Round 3 :

FLO: 21 SC

Info :

- fix the thread and leave a long end to sew. - fold the detail in half so that the loose front loops of rows 2 and 3 are on the front side. - carefully sew the edges. - turn out the detail.

Info :

- put it on the arm and fix it with two stitches on two opposite sides of the arm so that the seam is on the opposite side from the thumb between Rds 15 and 16 of the arm.

β€” Tail :

Info :

*make 2 details. *stuff a bit only the bottom of the tail. *start with white/ivory yarn.

Round 1 :

6 SC in MR (6)

Round 2 :

(SC, INC)*3 (9)

Round 3 :

(2 SC, INC)*3 (12)

Round 4 :

(3 SC, INC)*3 (15)

Round 5 :

(4 SC, INC)*3 (18)

Round 6 :

(5 SC, INC)*3 (21)

Round 7 :

(6 SC, INC)*3 (24)

Round 8 :

(7 SC, INC)*3 (27)

Round 9 :

(8 SC, INC)*3 (30)

Round 10 :

(4 SC, change color to orange, SC, change color to white)*6 (30)

Round 11 :

3 SC, change color to orange, 3 SC, change color to white, (2 SC, change color to orange, 3 SC, change color to white)*4, 2 SC, change color to orange, fix and cut the white thread, 2 SC (30)

Round 12 :

(9 SC, INC)*3 (33)

Round 13 :

33 SC

Round 14 :

(10 SC, INC)*3 (36)

Round 15-19 :

5 rounds of 36 SC (36)

Round 20 :

(10 SC, DEC)*3 (33)

Round 21 :

33 SC

Round 22 :

(9 SC, DEC)*3 (30)

Round 23 :

30 SC

Round 24 :

(8 SC, DEC)*3 (27)

Round 25 :

27 SC

Round 26 :

(7 SC, DEC)*3 (24)

Round 27 :

24 SC

Round 28 :

(6 SC, DEC)*3 (21)

Round 29 :

21 SC

Round 30 :

(5 SC, DEC)*3 (18)

Round 31 :

18 SC

Info :

- work a CH, fold in half and crochet the sides together with 4 SC. - fasten off.

β€” Legs :

Info :

*make 2 details. *stuff in process. *start with grey yarn. Principle of crocheting an oval without SS and turning chain using 10 CH in the base.

Round 0 :

Chain 10

Info :

- work in spiral (without a turning CH and SS) as in all amigurumi toys (oval-shape detail).

Round 1 :

start in the 2nd chain from the hook: 8 SC, 3 into the last chain from the hook, on the other side: 7 SC, INC (20)

Round 2 :

INC, 7 SC, 3 INC, 7 SC, 2 INC (26)

Round 3 :

SC, INC, 7 SC, (SC, INC)*3, 7 SC, (SC, INC)*2 (32)

Round 4 :

(2 SC, INC)*2, 4 SC, (2 SC, INC)*3, 4 SC, (2 SC, INC)*3 (40)

Round 5 :

(3 SC, INC)*2, 4 SC, (3 SC, INC)*3, 4 SC, (3 SC, INC)*3 (48)

Info :

- divide the oval in half and mark 24 SC in front and at the back - these will be the points of changing the thread color from red to white and back.

Info :

- change color to red, don't cut the grey thread and leave it on the outside for further crocheting.

Round 6 :

BLO: 11 SC, change color to white, 24 SC, change color to red, 13 SC (48)

Info :

- place stitch marker in the 13th SC worked with a red thread - it should be in the middle of the heel; it is the beginning of the next Rd.

Round 7 :

12 SC, change color to white, 8 SC, 4 DEC, 8 SC, change color to red, 12 SC (44)

Info :

- return to the grey thread, don't cut the red one. - work 48 SS in loose front loops of Rd 5. - join the Rd with SS, fasten off, hide the thread inside the foot.

Info :

- continue crocheting the foot with a red thread.

Round 8 :

12 SC, change color to white, 6 SC, 4 DEC, 6 SC, change color to red, 12 SC (40)

Round 9 :

12 SC, change color to white, 4 SC, 4 DEC, 4 SC, change color to red, 12 SC (36)

Round 10 :

12 SC, change color to white, 2 SC, 4 DEC, 2 SC, change color to red, 12 SC (32)

Round 11 :

12 SC, change color to white, 4 DEC, change color to red, fix and cut the white thread, 12 SC (28)

Round 12 :

10 SC, 4 DEC, 10 SC (24)

Round 13 :

8 SC, 4 DEC, 8 SC (20)

Round 14 :

6 SC, 4 DEC, 6 SC (16)

Info :

- stuff the foot tightly keeping a pointed triangle shape.

Round 15 :

(6 SC, DEC)*2 (14)

Round 16 :

(5 SC, DEC)*2 (12)

Round 17 :

(4 SC, DEC)*2 (10)

Round 18 :

(3 SC, DEC)*2 (8)

Info :

- stuff the ankle well, then keep stuffing the leg in the process.

Round 19-29 :

11 rounds of 8 SC (8)

Info :

- fasten off on the first leg; it is the left leg of the toy.

Info :

- do NOT fasten off on the second leg (right one), work several additional SC (or loose several SC), so that the end of the round is on the inner side.

Info :

- continue crocheting the body.

Round 30 :

on the left leg: 8 SC, on the chain: 4 SC, on the right leg: 8 SC, on the chain: 4 SC (24)

Round 31 :

(2 SC, INC)*8 (32)

Round 32 :

(3 SC, INC)*8 (40)

Round 33 :

40 SC

Round 34 :

34 SC, 4 SC with the 1st tail, 2 SC with the 2nd tail (40)

Round 35 :

2 SC with the 2nd tail, 38 SC (40)

Round 36 :

40 SC

Round 37 :

(8 SC, DEC)*4 (36)

Round 38 :

36 SC

Round 39 :

(10 SC, DEC)*3 (33)

Round 40 :

33 SC

Round 41 :

(9 SC, DEC)*3 (30)

Round 42 :

30 SC

Round 43 :

(8 SC, DEC)*3 (27)

Round 44 :

(7 SC, DEC)*3 (24)

Info :

- in Rd 45 we are going to attach the arms; for accuracy of attachment mark 3 SC (place of attachment) at a distance of 9 SC in the front and on the back; the pattern of attachment may differ, so double-check by markers and adjust the stitch marker if needed.

β€” Body-Head :

Info :

*stitch marker is on the back. *stuff in process. *crochet chain 4 from the right leg. *attach both legs to each other and continue crocheting on the left leg from the side behind according to the pattern.

Assembly Instructions

  • Attach the thumb to the finger base in Round 13 by crocheting it into place as instructed so the thumb sits between the specified stitches and secures it with a few stitches.
  • Fold and sew the glove edge detail into a cuff, align the loose front loops to face forward, and fix the cuff on the arm so the seam is positioned between rounds 15-16 opposite the thumb.
  • When joining the legs, crochet the connecting chain of 4 from the right leg and continue on the left leg, following the rounds 30–35 instructions to create the body tube; use markers to align tails and attachment points.
  • In Round 45 of the body, attach the arms marking three stitches at each attachment point; check placement with pins and adjust by shifting the stitch marker before sewing.
  • Sew tails to the back area indicated by markers in Rounds 34-35, and secure all loose thread ends inside parts, hiding them with a yarn needle for a neat finish.

Important Notes

  • πŸ’‘Use stitch markers to track the beginning of rounds and the points where color changes or attachments occur for accurate shaping.
  • πŸ’‘Stuff parts progressively during assembly to achieve even shaping β€” stuff feet and tails firmly and palms only slightly as instructed.
  • πŸ’‘When changing colors, leave the previous thread tails live when instructed and tie or hide them only where the pattern directs for cleaner color transitions.
  • πŸ’‘Follow the pattern notes about shifting the beginning of the round; different crochet techniques can shift the start and affect color-change placement.

This Copter-tailed Fox is a playful, plush amigurumi with personality and character. It features two tails, gloves, and shaped shoes for a polished finish. Perfect as a gift or a keepsake for fans of handmade toys. 🧢🐾

You ask,

we answer.

FAQs

What size will the finished piece be?

The finished amigurumi measures approximately 35 cm (13.7 inches) tall when using the recommended plush yarn and a 3.5 mm hook.

Can I use different yarn weights for this pattern?

Yes, you can use different yarn weights but this will affect the final size and stitch counts; adjust your hook size accordingly and expect the finished toy to be larger or smaller.

Do I need prior crochet experience for this pattern?

This pattern is rated intermediate and assumes familiarity with amigurumi techniques like working in spiral, increases/decreases, and color changes.

How long does this project typically take to complete?

Most crocheters complete this project in 12-15 hours, though time may vary based on experience level and how much time you spend on assembly and finishing.